


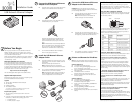

Connect the USB Network Ethernet
Adapter to the Computer
A. Insert the round connector on the USB cable into the
USB port on the USB Network Ethernet Adapter
B. Insert the flat connector on the USB cable into an
available USB port on your computer.
Windows automatically detects the USB Ethernet
Adapter and displays the New Hardware Found
screen. Windows then prompts you to search for a
driver.
Note: If Windows does not automatically detect the
device, click Windows Start, select Settings and then
click Control Panel. Then click the Add/Remove
Hardware icon and follow the on-screen prompts.
C. See “Install the USB Network Ethernet Adapter
Driver” for step-by-step instructions
Troubleshooting
This section offers answers to specific questions you may have
during installation and setup. For additional information, contact
3Com technical support. See “Support Resources” on the back side
of this guide for detailed contact information.
Using the LEDs to Diagnose Problems
As shown below, the USB Network Ethernet Adapter has two light
emitting diodes (LEDs). You can use these to diagnose installation
and connection problems.
The following tables describes how to interpret the LED signal. The
100 signal varies depending on the speed of the device that is
connected to the USB Network Ethernet Adapter. If you detect a
problem, contact 3Com technical support.
Frequently Asked Questions (FAQ)
This section provides answers to frequently asked questions about
installation and use of the USB Network Ethernet Adapter.
Q: How do I know if USB is enabled on the computer?
A: Follow this procedure to verify that USB is enabled on your
computer:
(1) Right-click the My Computer icon on your Windows desktop,
(2) Click Properties and then click the Device Manager tab (Win-
dows 2000 users click the Hardware tab and then click Device
Manager), (3) Double-click Universal Serial Bus Controller. If USB is
enabled on your computer, Universal/Open Host Controller appears
below this listing.
Q: Should the computer be powered off when I connect or
disconnect the USB Network Ethernet Adapter?
A: No, the power can remain on during installation.
Q: What if I do not have an available USB port on the
computer?
A: If you do not have an available USB port on your computer, you
can use a USB hub. A USB hub is a peripheral that expands the
number of USB ports available to the computer.
Note: You must use a USB hub that is self-powered. The computer
cannot provide sufficient power to run both the USB hub and the
USB Network Ethernet Adapter.
Q: How do I remove the USB Network Ethernet Adapter
driver file or an incomplete installation?
A: Follow this procedure to uninstall the driver file:
(1) From the Windows Start menu, select Settings and then Control
Panel, (2) Double-click the Add/Remove Programs icon, (3) Click the
Install/Uninstall tab and select 3Com USB Network Ethernet
Adapter, (4) click Add/Remove (Windows 2000 users click Change/
Remove) and then click Yes.
Before You Begin
You have just purchased the 3Com
®
USB Network Ethernet
Adapter. The USB connection is the easiest way to connect a
computer to a Broadband modem, Ethernet hub, home gateway,
or any other Ethernet Internet device.
Please read this Installation Guide before you begin installation.
If you have questions or problems during installation, see the
“Troubleshooting” section.
Download Valuable Free Software
3Com offers Preboot Execution Environment (PXE) software for
this product. PXE allows a system administrator to manage the
PC remotely, which reduces the number of support visits to the
PC and can decrease total cost. PXE support for this product is
available with 3Com’s MBA on Disk. To download MBA on Disk
for free and to obtain more information on PXE, go to:
http://www.3Com.com/managedpc.
Then click Managed PC Boot Agent on Disk (MBA on Disk).
Supplied and Required Items
Review these lists of items to be sure you have everything ready
to install the USB Network Ethernet Adapter.
Supplied:
10/100* Mbps USB Network Ethernet Adapter
2 ft USB cable
Installation diskette
This Installation Guide
* This adapter is compatible with 100Base-TX networks, but the
throughput is based on the bandwith of USB 1.0/1.1.
Required (Not Supplied):
Standard category 5 Ethernet cable with 2 male RJ-45
connectors
Computer running Microsoft
®
Windows
®
98, Windows 2000
Professional, or Windows Me operating system with:
Available USB port
66 MHz processor or higher
USB Network Ethernet Adapter
Install the USB Network Ethernet
Adapter Driver
A. Insert the Installation disk into the floppy drive, and
follow the on-screen prompts to install the driver file
from the disk.
Windows automatically installs the driver.
Note: If Windows prompts you to restart the
computer, follow the prompt to restart the computer.
B. See “Connect the USB Network Ethernet Adapter to
the Ethernet Port” to finish the installation.
Note: The illustration below shows one example of
how the USB Network Ethernet Adapter is used to
connect multiple devices on a home network.
Copyright 2001 3Com Corporation. All rights reserved. 3Com is a registered trademark, and the 3Com logo is a trademark of 3Com
Corporation. Microsoft and Windows are registered trademarks of Microsoft Corporation. All other company and product names may be
trademarks or registered trademarks of their respective companies.
Installation Guide
Part Number 09-2054-000
Connect the USB Network Ethernet
Adapter to the Ethernet Port
CAUTION: Use only an Ethernet cable to make this
connection. Inserting a telephone cable into the Ethernet
port can damage either device
A. Insert the Ethernet cable into the Ethernet port on
the USB Network Ethernet Adapter.
Note: The Ethernet cable is not included. See
“Before You Begin” for more information.
B. Insert the other end of the Ethernet cable into an
available Ethernet port on a broadband modem, hub,
home gateway, or other Ethernet Internet device.
C. The installation is complete. To verify the IP address,
see “Release and Renew the IP Address.”
Release and Renew the IP Address
Note: For more information about this procedure, consult
the Microsoft documentation that came with the computer.
Windows 98/Me Users:
A. Click Windows Start and select Run.
B. In the Open: field, type winipcfg and click OK.
The IP Configuration screen appears.
C. Select 3Com USB Network Ethernet Adapter from the
drop-down menu.
D. Click Release and then click Renew.
Windows releases and renews the IP address.
E. Exit the IP Configuration screen and return to the
Windows desktop.
Windows 2000 Users:
A. Click Windows Start and select Run.
B. In the Open: field, type command and click OK.
An MS-DOS Prompt screen appears.
C. At the C:\ prompt, type ipconfig /release and
press Enter.
Windows releases the IP address.
D. Then type ipconfig /renew and press Enter.
Windows renews the IP address.
E. Exit the MS-DOS prompt and return to the Windows
desktop.
1
2
4
3
1
2
4
3
1
2
3
4
100 Link/Act
Link/Activity LED100 LED