


Obtaining an IP Address Automatically 27
Windows Vista If you are using a Windows Vista computer, use the following procedure
to change your TCP/IP settings:
1 From the Windows start menu, select Network.
2 Select Network Center option from the top menu.
3 Select Manage Networks from the left panel.
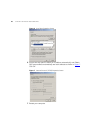
4 Double click on the Local Area Connection icon. A screen titled Local
Area Connection Status will appear.
5 Click on Details and bring up the Local Area Connection Properties tab.
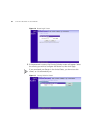
6 Select Internet Protocol TCP/IP and click on Properties.
7 Ensure that the options Obtain an IP Address automatically, and Obtain
DNS servers automatically are both selected. Click OK.
Windows XP If you are using a Windows XP computer, use the following procedure to
change your TCP/IP settings:
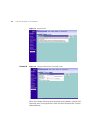
1 From the Windows Start menu, select Control Panel.
2 Click on Netmwork and Internet Connections.
3 Click on the Network Connections icon.
4 Double click on LAN or High Speed Connection icon. A screen titled Local
Area Connection Status will appear.
5 Select Internet Protocol TCP/IP and click on Properties.
6 Ensure that the options Obtain an IP Address automatically, and Obtain
DNS servers automatically are both selected. Click OK.
7 Restart your computer.
Windows 95/98/ME If you are using a Windows 95/98/ME computer, use the following
procedure to change your TCP/IP settings:
1 From the Windows Start Menu, select Settings > Control Panel.
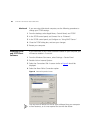
2 Double click on Network. Select the TCP/IP item for your network card
and click on Properties.
3 In the TCP/IP dialog, select the IP Address tab, and ensure that Obtain IP
address automatically is selected. Click OK
.