


INSTALLATION AND
CONFIGURATION
General Installation Sequence
1) Install the HBA in your ALTOS NAS 700 appliance
2) Connect your ASC NAS 700 appliance to your storage network
3) Linux 7.3 installation through a:
a. Recovery image
b. Manual installation
4) ASC Server installation
5) ASC Management Console installation
6) ASC SAN Client installation
7) Configure ASC SAN Resources
8) Assign a SAN Resource to one or more client.
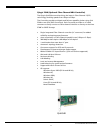
Installing HBA into the Altos NAS 700
Before you can start with setting up the ASC Software you may need to add
additional Controllers into your Altos NAS 700. If you are using a Qlogic Fibre
Channel HBA you need to add, open the housing and add the Controller. Also
make sure that your LSI RAID Controller 320-1 is installed correct and the SCSI
Cable from the backplane board is connected to this Controller. There should
be up to 2 x 36GB and 6 x 146 GB Hot Swap Hard Disk installed and the
Backplane is connected to the LSI 320-1 RAID controller.
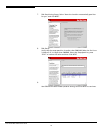
Setting up RAID Array and LUNs
On the first start of the Altos Server G710 press Ctrl-M to get into the
MegaRAID set up utility and create a new Array.
1. Select Configure -> New Configuration (Note: Choosing “New
Configuration” will erase any former configuration, do not select this
option if you simply want to add a new Array group to an existing
configuration)
2. You will see a list of Drives available for your RAID Array, use the arrow
keys to move between them
3. You must select 2 disks with the spacebar key to create one Array and a
logical drive with 8000MB for operating system.
4. Press Enter when you are done with the selection.
5. Finish your physical Array selection and press F10 to create a Logical
Acer Altos® NAS 700 Solution Guide
12