BACK
Acu-Rite instruments have been designed and engineered to provide accurate and reliable
Measurements. Please read the instructions thoroughly before setting up your wireless
thermometer.
The remote sensor is designed to stand or hang. For wall mounting, use the enclosed screw
to mount to the desired surface. Use the slot on the back of the case to mount the remote
sensor to the surface.
Remote Sensor Features:
• The remote sensor can transmit up to 100 feet
• The remote sensor has a weather resistant case. Keep the unit out of direct sunlight and
direct weather conditions. This will extend the life of the unit.
• The remote sensor has a temperature measurement range of -4ºF to 122ºF / 0ºC to 50ºC
and a humidity measurement range of 20% to 99%.
NOTE: Severe cold weather can cause alkaline batteries to freeze and stop functioning
properly. Lithium batteries are required for temperatures below -12ºF / -24ºC.
Battery Installation and Setup:
For installation, insert batteries in the main unit first, then install batteries in the remote
sensor unit second.
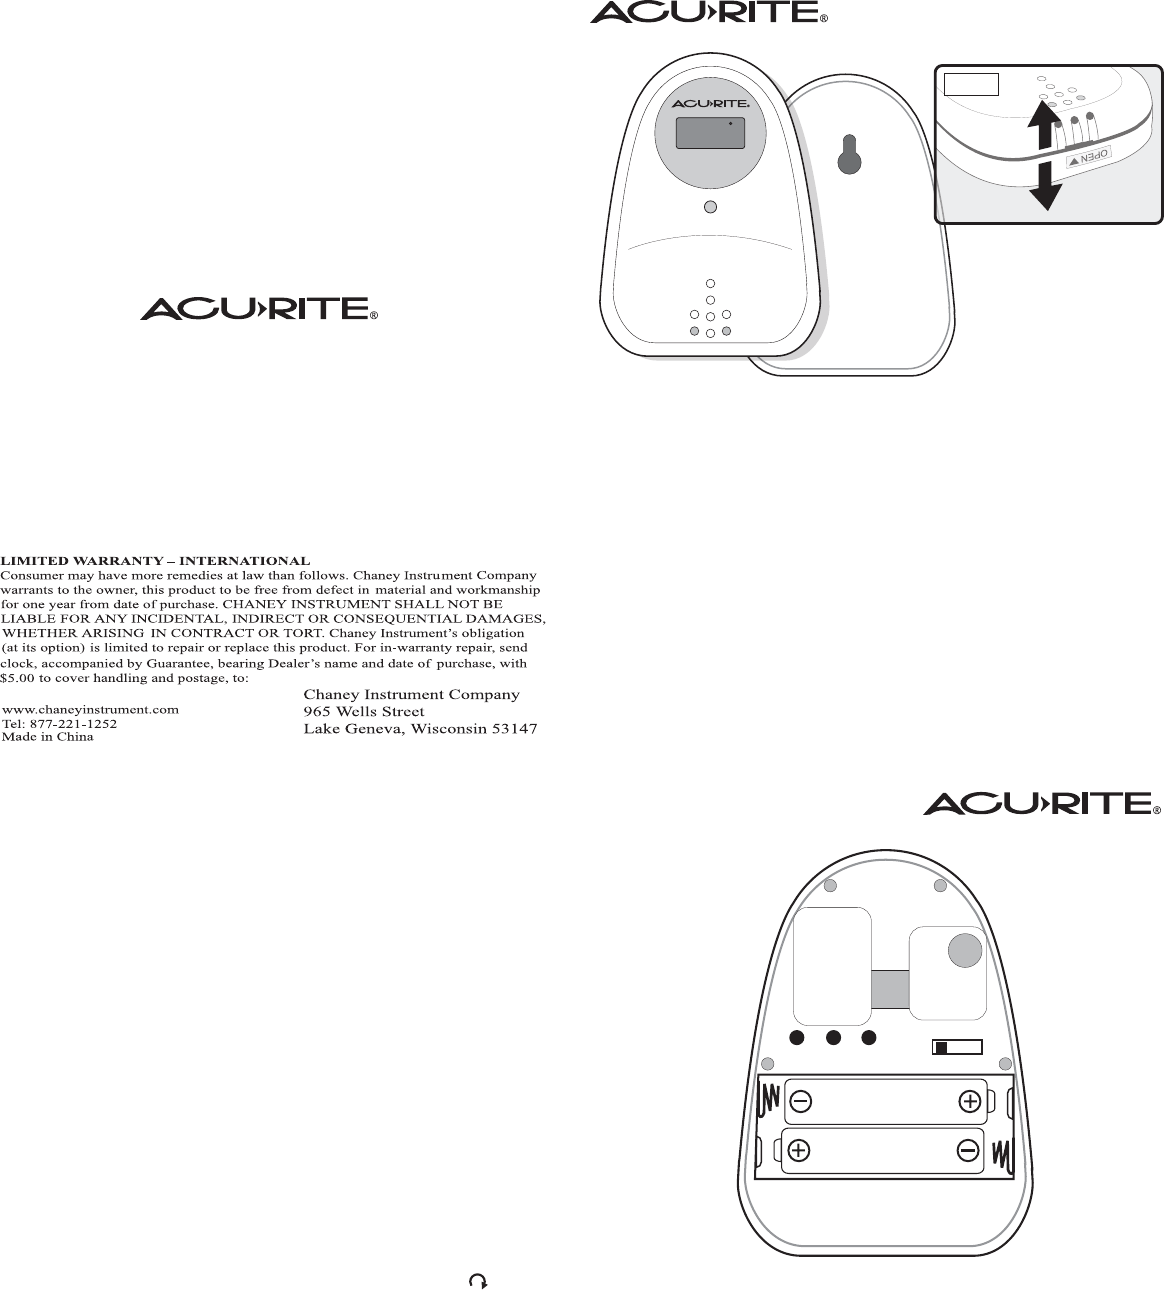
To install batteries in the remote sensor unit, refer to figure 1 on page 1 for visual reference.
Gently open the case along the seam separating the front and back halves. Insert two
“AAA” (1.5v) batteries according to the diagram in the battery compartment.
Next, select a channel to use with the channel selection switch. You may use up to 3 remote
sensors with the 00592W and the 00593W main units. Your new RF remote sensor is built
with random security code technology. The main unit will learn the random security code of
the remote sensor and will be registered without being interfered with by a neighbor who
may be using the same type of sensor under the same channel setting.
Press the “TX” button located above the battery compartment to send a signal to the
main unit. The main unit will then receive the signal from the remote sensor and log the
random signal code in as the same channel you selected on the remote sensor.
To link additional wireless remote sensor units to the main unit, repeat the above steps
1
3 2
00984 Wireless Thermometer & Hygrometer
Remote Sensor
To access the battery
compartment and the
function buttons, open
the case along the seam.
BACK (inside the case)
Fahrenheit or Celsius Setup:
To select between Fahrenheit or Celsius temperature display on the remote sensor display,
push the “C/F” button located inside the case above the battery compartment.
Mode Selection:
The mode button allows you to select between different display modes on the remote sensors
built-in display. The default display mode when you first install the batteries is to show the
temperature. You may press the “MODE” button once to change to humidity display, or press
the “MODE” button a third time to move to an alternating display which shows the temp.
and humidity in an alternating format. A small icon will appear on the screen ( ) to signify
that you are in the alternating display mode. If you press the “MODE” button a fourth time,
you will return back to the default temperature display mode.
CLOSE THE CASE BY PRESSING THE FRONT AND BACK TOGETHER FIRMLY.
Replacing Batteries:
When replacing batteries in the remote sensor unit, the channel logged in the main unit
must be cleared. Follow the appropriate main unit instructions on channel selection.
To reset the entire unit, remove the batteries in the main unit and the remote sensor(s) and
the registered channel(s) will be erased. Follow the thermometer set-up procedures as
outlined in the appropriate main unit instruction manual and this remote sensor manual.
FRONT
Additional Remote Sensor Placement Suggestions:
Additional sensors can be purchased separately, Acu-rite model #00984
• Outside your home or place of business
• Wine cellars
• In the garage
• Childrens room
• Gardens or greenhouses
• Any location that remote temperature readings are beneficial
To order more sensors by phone, please call Klock-it at 800-556-2548
Fig. 1
AAA 1.5v
AAA 1.5v
TX
C/F MODE
1 2 3
CHANNEL
86.5
F
1
THERMO HYGRO
TROUBLESHOOTING:
The main unit may display “---” if the signal is being interrupted by outside interference.
In most cases, the unit will re-sync with the remote sensor on it’s own. It may also help to
bring the remote sensor closer to the main unit to re-sync the main unit and the remote
sensor. However, should this condition continue to occur, be sure to check the following:
A. The batteries may be low, replace and repeat setup procedure.
B. The sensor may be placed outside of the effective transmission range (100 feet).
C. The sensor may have outside interference that is preventing transmission.
( metal surfaces, other electronic devices, etc.). The sensor may need to be moved to
another location if interference continues.
Do not return product to retail store.
For Technical Assistance and product return information,
please call Chaney Instrument Co. direct at:
877-221-1252


