


ADCP-96-015 • Issue 1 • July 2004
Page 48
© 2004, ADC Telecommunications, Inc.
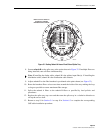
2. Push down on the small tab at the top of the adapter and at the same time pull outward on
the adapter until it is released from the panel.
3. Pull the adapter away from the panel until about 6 inches of fiber are exposed.
4. Disconnect the distribution connector from the rear side of the adapter.
5. Discard the damaged adapter.
6. Clean the distribution fiber connector as specified in Optical Fiber Systems Cleaning and
Mating Instructions (ADCP-90-159).
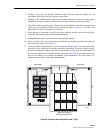
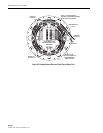
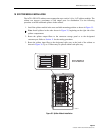
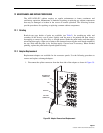
7. Orient the replacement adapter as shown in Figure 39 and then mate the distribution
connector with the rear side of the adapter (see ADCP-90-159).
8. Re-install the replacement adapter in the connector panel. Make sure the small tab on the
adapter is facing up and that the fiber feeds smoothly back into the connector panel.
9. Clean the splitter connector and mate it with the front side of the replacement adapter (see
ADCP-90-159).
12.3 Connector Replacement
Damaged fiber optic connectors may be replaced using a field-installable connector
replacement kit. Follow the procedures provided with the kit when replacing a damaged
connector. Damaged distribution fiber connectors may be accessed using the procedure in
Section 12.2. Clean all optical connectors as specified in Optical Fiber Systems Cleaning and
Mating Instructions (ADCP-90-159).