ADDONICS TECHNOLOGIES
Model: CCHESEXC34
Installation Guide
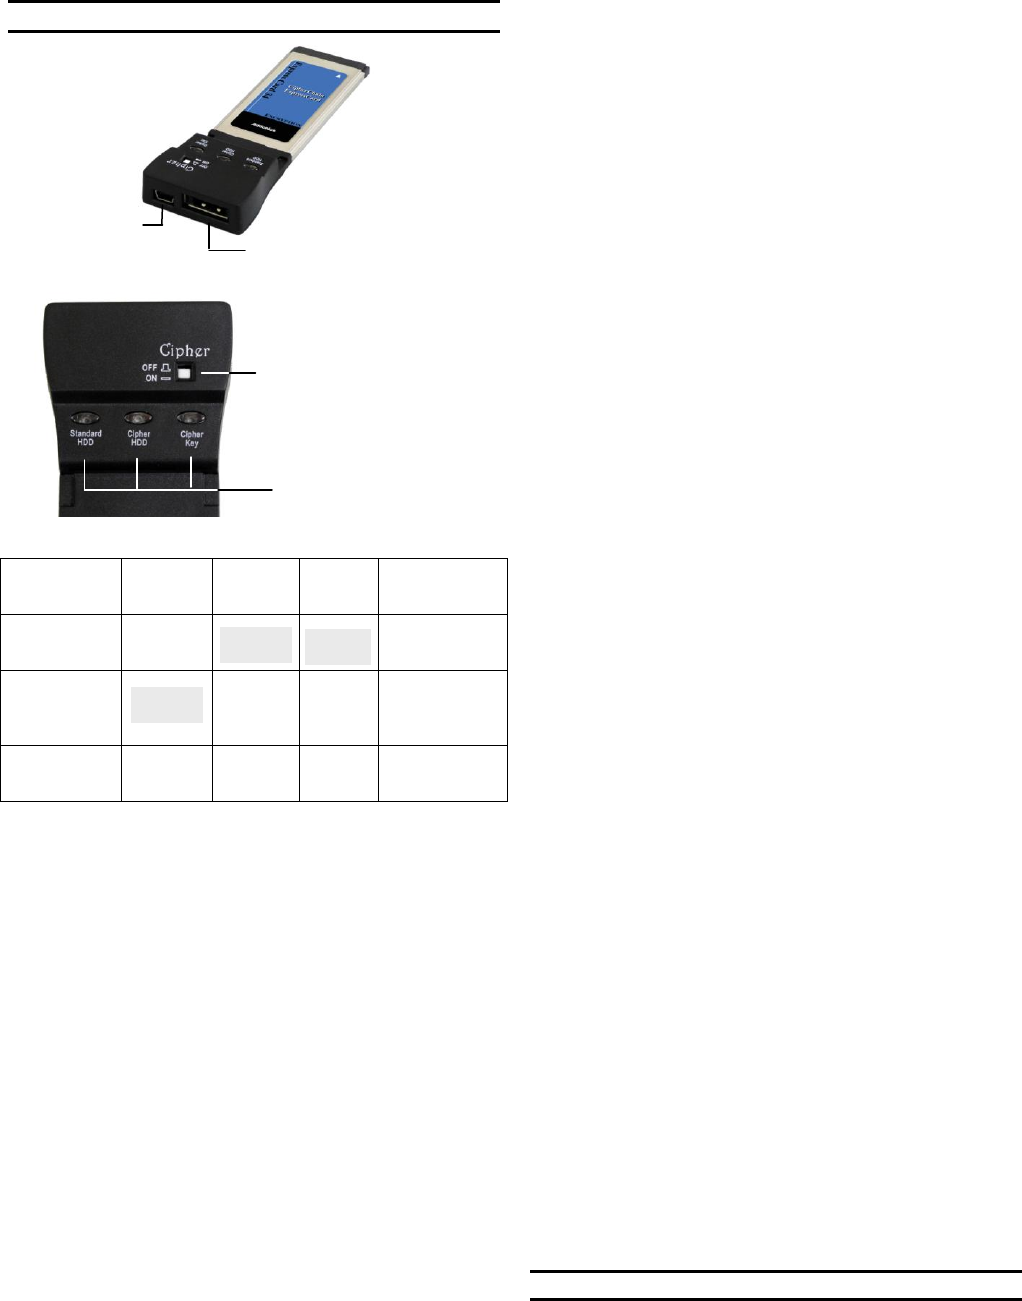
Cipher mode
(cipher switch
is ON)
Encrypted
eSATA HDD /
SSD
Non-Cipher
mode (cipher
switch is
OFF)
Standard
eSATA HDD /
SDD / optical
drive
Standard USB
HDD / SDD /
optical drive
Adding the CipherChain ExpressCard to an existing
Windows system
Driver Installation:
1. Insert AES 256-bit cipher key on the cipher keyhole.
2. Press cipher switch using a pen tip or equivalent to ON
position to enable encryption.
3. Insert CipherChain Expresscard to ExpressCard slot.
4. Attached an eSATA storage device to the hybrid eSATA
port. This is required to power on the CipherChain
Expresscard.
5. “Found New Hardware Wizard” opens. Follow wizard to
update driver and navigate to the driver folder where the
driver file is located.
6. In cases where the “Found New Hardware Wizard” does
not display, try to locate unknown Mass Storage
Controller in Device Manager. Highlight and right click
on the Mass Storage Controller then select Update
driver. Navigate to the driver folder where the driver file
is located.
7. After driver installation, restart the system.
Confirming Driver Installation
1. Right click the My Computer icon and select Manage.
2. Click Device Manager in the Menu Tree.
3. Click the “+” sign in front of SCSI and RAID Controllers.
You should see Silicon Image SiI 3531 SATA
Controller.
Operating the CipherChain Expresscard:
I. Cipher mode
Cipher switch is in ON position.
1. Insert AES 256-bit cipher key on the cipher keyhole.
2. Press cipher switch using a pen tip or equivalent to ON
position to enable encryption.
3. Insert CipherChain Expresscard to ExpressCard slot.
4. Attached an eSATA storage device to the hybrid eSATA
port. Observe that both Cipher HDD & Cipher key LEDs
light up. If it does not, remove the CipherChain
Expresscard, reseat the cipher key and re-insert the
CipherChain Expresscard to ExpressCard slot.
5. For new drive, go to the operating system’s
management utility to partition, format and mount the
encrypted drive.
6. Go to File Manager and view the encrypted drive.
Note: Once the encrypted drive is partitioned and formatted,
a drive letter should appear in My Computer. The eSATA
drive will function just like any external hard drive. Data
written to the drive will be instantly encrypted and data will
also be automatically decrypted when it is read or
transferred out of the drive.
II. Non-Cipher mode
Cipher switch is in OFF position.
1. Press cipher switch using a pen tip or equivalent to OFF
position to disable encryption.
2. Insert CipherChain Expresscard to ExpressCard slot.
3. Attached an eSATA storage device to the hybrid eSATA
port. Observe that standard HDD LED lights up. If it
does not, remove the CipherChain Expresscard and re-
insert back to ExpressCard slot.
4. For drive with data on it, go to File Manager and view
the drive.
Note: Encrypted drive will appear as brand new drive in non-
Cipher mode.
III. USB2.0 mode
1. Insert card to ExpressCard slot.
2. Attached a USB storage device to the hybrid eSATA
port.
3. The system should detect an additional drive.
Note: You may remove the cipher key from the CipherChain
Expresscard once it is powered on. All the files being
transferred into the drive are still encrypted even if the cipher
key is removed.
CipherChain Expresscard will be turned off whenever the
eSATA cable is removed. This will remove the hard drive
from the system and clear the cipher code.
Best Practices:
Create a label to identify the eSATA storage device and
the Cipher key used to encrypt the device.
Always keep a spare master key in a safe place.
TECHNICAL SUPPORT
Technical Support (8:30 am to 6:00 pm PST)
Phone: 408 453-6212
Email: http://www.addonics.com/support/query/


