ADDONICS TECHNOLOGIES
Model: MMTPRO
The MultiMedia Tower Pro comes with a port multiplier installed. For your
system to see multiple individual drives, confirm with your system
manufacturer that the eSATA port that came built-in with your system is
Port Multiplier (PM) compatible. You may add a PM compatible eSATA
port to your system with an add-on controller via PCI or PCI-Express slot
on a Desktop or an ExpressCard slot on your Notebook. Controllers that
use the Silicon Image 3132 or 3124 chipset are PM compatible and
Addonics offer a family of these controllers.
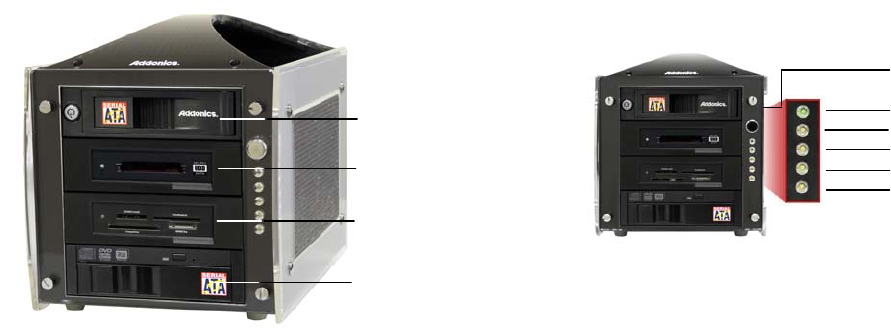
I. Installing drives into the MultiMedia Tower Pro
Step 1
Using 3.5” SATA hard disk drive, slide the drive into the drive bay.
For bay 1, close the front panel and using the key provided, turn the key
lock to the Lock position. This will secure the drive and turn on the power
to the hard drive.
For bay 2, slide any micro SATA hard drive/SSD or CFast card installed
in CFast-mSATA adapter.
For bay 3, insert any Flash media:
Compact Flash Type I and II, MicroDrive, Secure Digital (SD), SDHC (SD
2.0), SDXC, Micro SD*, mini SD*, Memory Stick (MS), Memory Stick Pro
(MS Pro 4bit)*, Memory Stick Duo (MS Duo)*, Memory Stick Pro Duo (MS
Pro Duo)*, Sony M2*, Multi Media Card (MMC & MMC Plus 4.2), Smart
Media, xD, Reduced Size MMC (RS-MMC)*, CFast card (require
Addonics CFast - mSATA adapter) into the correct slot on the reader
Media priority for flash reader
When more than one media is inside the internal SATA / USB DigiDrive
during bootup, the media that gets detected first is according to the
priority shown below
1. Compact Flash
2. Smart Media / xD Picture card
3. MMC / SD
4. Memory Stick
The flash media will show up as a removable drive in Explorer.
For bay 4, just push back the front panel to secure drive. There is no key
lock for this bay.
Note: It is recommended to fill up the MultiMedia Tower Pro with SATA
drives from top to bottom. This is to help in identifying which drives
connect to which ports for easier troubleshooting.
II. Connecting the power cable and MultiMedia Tower Pro
to the computer
a. Connect the power cord provided from the wall outlet to the
back of the MultiMedia Tower Pro.
b. Make sure the power is off (power LED light should be off).
III. Power on/off control
Turn on the power to the MultiMedia Tower Pro by pressing the power
button on the front. The power green LED light should lit indicating the
power is on.
Using the Port Multiplier mounted on the MultiMedia Tower Pro
Note: The Port Multiplier will only work with Port Multiplier aware eSATA
host controllers. It is compatible with eSATA host controllers using the
Silicon Image Chip SiI3124 & SiI3132.
When the port multiplier (PM) is connected to an eSATA Host controller
with SiI3124 or SiI3132 chip, in the RAID BIOS of the host controller, you
will only see one drive and that is the drive mounted in bay 1 of the
MultiMedia Tower Pro.
All the SATA drives mounted on the MultiMedia Tower Pro will show in
the SATARAID5 Array Manager.
For non-raid Silicon Image controller or using USB converters, the drives
will be detected on the disk utility of the operating system.
Step 1:
Connect the eSATA cable that is connected to a PM-aware eSATA host
controller to the eSATA port located at the back of the MultiMedia Tower
Pro.
Step 2:
Turn ON the MultiMedia Tower Pro
Step 3:
For eSATA raid controllers using Silicon Image chips, use the
SATARAID5 array manager to configure the external drives.
For non-raid Silicon Image controller or using USB converters, the drives
will be detected on the operating system.
TECHNICAL SUPPORT
Phone: 408-453-6212
Hours: 8:30 am - 6:00 pm PST
Email: http://www.addonics.com/support/query/
Bay 3 flash media LED
Bay 2 HDD drive LED
Power LED
Bay 1
Bay 2
Bay 3
Bay 4
Bay 1 HDD drive LED
Bay 4 HDD drive LED


