


Addonics
T E C H N O L O G I E S
NAS Adapter
Model: NASU2
Quick Install Guide
FCC Warning Statement
This equipment has been tested and found to comply with the limits for a class B digital
device pursuant to Part 15 of the FCC rules. These limits are designed to provide
reasonable protection against harmful interference in a residential installation. This
equipment generates, uses and can radiate radio frequency energy. If not installed and
used in accordance with the instructions, it may cause harmful interference to radio
communications. However, there is no guarantee that interference will not occur in a
particular installation. If the equipment does cause harmful interference to radio or
television reception, which can be determined by turning the equipment on and off, the user
is encouraged to try and correct the interference by one or more of the following
suggestions.
Reorient or relocate the receiving antenna
Increase the distance between the equipment and the receiver
Connect the equipment to a different power outlet other than the one where receiver is
connected
Consult a certified television or radio technician
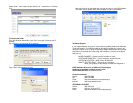
For more detailed information on setting up the NAS adapter, refer to the
User Manual located on the CD that came with the device.
The NAS adapter is a flexible, economical and powerful unit for your Network.
Follow the instructions to help you connect, setup, and configure it.
Note: Any external USB storage device that you connect to the NAS adapter
will initially be required to be formatted. This means, if you are
connecting an external USB drive with data on it, the hard drive will be
formatted erasing all the information.
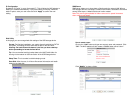
Network Environment
There are 3 different setup conditions you can choose:
A. Setup NAS Adapter as a DHCP Client:
If your NAS adapter is connected to a LAN network with an active DHCP
server, it will obtain an IP address from DHCP server automatically.
B. Setup NAS Adapter as DHCP Server:
If your LAN network does not have an active DHCP server, NAS adapter will
immediately act as DHCP server and assign itself an IP address for
installation.
C. Setup NAS Adapter in Static IP environment:
You need first configure the IP address for NAS adapter to operate in the
static IP environment. For Configuring details, please refer to “IP Config”
setup page.
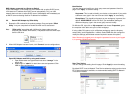
2.0 NAS Adapter Hardware Installation
Connections:
1. Connect external USB Storage device into USB port of the NAS
Adapter. Power on the USB Storage device.
2. Connect LAN cable via LAN switch and Router.
3. Connect 5V power adapter to power up the NAS adapter
NAS Adapter connected directly to a computer’s NIC card
If you connect the NAS adapter to a computer directly, the adapter will act as a
DHCP server, assigning itself an IP address automatically and also will assign an
IP address to the computer’s network card. This configuration will not enable you
to see the drive on the network.