


TRACER 4106/4206 System Manual Section 4 Network Turnup Procedure
612804206L2-1A © 2004 ADTRAN, Inc. 39
6. SUPPLYING POWER TO THE UNIT
The TRACER 4106/4206 can operate from a supply between 21 and 60 VDC, with either polarity
referenced to ground. Power supplies should be able to provide up to 30 watts at the selected voltage. A
dual pin terminal plug accepts power at the rear panel of the unit, providing a + and - polarity reference
point. Adapters for this plug are available (P/N 1175043L2) and are furnished with the unit and optional
power supply (P/N 1280650L1).
7. MOUNTING OPTIONS
Install the TRACER 4106/4206 in a location that requires minimal antenna feedline length (the loss in this
cable directly affects overall system performance). The TRACER 4106/4206 is designed to be mounted in
a rack. If multiple units are installed in one location, one half inch of spacing is recommended above and
below the unit.
The TRACER 4106/4206 systems are 1U high, rack-mountable units which can be installed into 19 or
23-inch equipment racks using the supplied rackmount brackets (3265498@B). Follow these steps to
mount the TRACER 4106/4206 into a rack:
• This unit shall be installed in accordance with Article 400 and 364.8 of the NEC NFPA
70 when installed outside of a Restricted Access Location (i.e., central office, behind a
locked door, service personnel only area).
• Power to the TRACER 4106/4206 DC system must be from a reliably grounded
21-60 VDC UL Listed or CSA Certified ITE power source with outputs meeting LPS
requirements.
• The branch circuit overcurrent protection shall be a fuse or circuit breaker rated
minimum 60 VDC, maximum 10A.
• A readily accessible disconnect device that is suitably approved and rated shall be
incorporated in the field wiring.
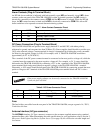
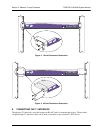
Instructions for Rackmounting the TRACER 4106/4206
1
Position the TRACER 4106/4206 in a stationary equipment rack. This unit takes up
1U of space. To allow proper grounding, scrape the paint from the rack around the
mounting holes where the TRACER 4106/4206 will be positioned.
2
Have someone else hold the unit in position as you install two mounting bolts
through the unit’s brackets and into the equipment rack using a #2 Phillips
screwdriver.
Be careful not to upset the stability of the equipment mounting rack when installing this
product.