


Installing the System 2
Installation and User’s Guide 87
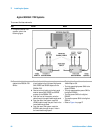
To switch on power to the system
NOTE
Proper system operation is dependent on the sequence in which the
system components are switched on.
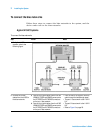
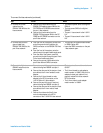
To switch on power to the system
Step Notes
1 Ensure that the individual instruments are
configured to match the available line power
source.
*
• For information regarding line power
settings, refer to the individual instrument
manuals.
2 Ensure that all component line power
switches are set to the OFF position.
3 Connect the system to line power.
4 Switch the rack cabinet ~ Line switch from
to (from standby to energized).
5 Switch on the low leakage switch mainframe
line power.
6 Switch on the precision LCR meter line
power.
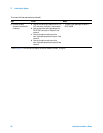
7 If present, on the 4284A SYSTEM CONFIG
page, highlight the value in the GPIB
ADDRESS field, and press 24 > Enter.
• This sets the correct system GPIB address
(24) for the 4284A.
8 If present, on the 35670A front panel, press
Local/GPIB > ANALYZER ADDRESS > 22 >
ENTER.
• This sets the correct system GPIB address
(22) for the 35670A.
9 If present, switch on the Agilent 4156C
precision semiconductor parameter analyzer
line power.
10 If present, switch on the 41501B expander
line power.
• The expander must be switched on before
the 4156C.
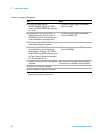
11 Switch on the Agilent 4156C precision
semiconductor parameter analyzer line
power.
• Ensure that the 41501B has already been
switched on prior to activating the 4156C.
12 On the 4156C, press System >
[MISCELLANEOUS], move the pointer to the
POWER LINE FREQUENCY field, and press
[50 Hz] or [60 Hz].
• This ensures that the 4156C is configured to
match the available line power frequency.
• The value is set to 60 Hz at the factory.
• Use the front panel arrow keys to move the
cursor.