


Installation Guide
NXF NetLinx
®
CardFrame
Overview
The NXF CardFrame (FG2001) accommodates a NetLinx Master (or Hub) card,
up to twelve NetLinx Control cards, and provides a back plane to distribute
power and data to/from the cards (FIG. 1).
The NXF CardFrame provides terminals on the rear panel for connection to the
control cards, and to a system power supply. A DIP switch on the rear panel sets
the CardFrame's base device number. For detailed product information on the
NXF CardFrame, and the NetLinx Control Cards, refer to the NetLinx
CardFrame, Control Cards, and NetModules Instruction Manual on-line at
www.amx.com.
Front/Rear Panel Components
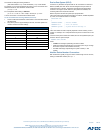
FIG. 2 shows the front and rear panel components of the NXF CardFrame:
Master/Hub Card Slot
The Master/Hub Card slot houses a NetLinx Master or Hub Card. The card
mounts in a horizontal position, through the master card slot on the rear panel of
the NXF enclosure. To install a Master or Hub Card in an NXF:
1. Discharge the static electricity from your body by touching a grounded
object.
2. Disconnect the power, and unplug all connectors from the NXF.
3. Remove the two screws that hold the front plate on the Master Card, and
remove the front plate.
4. Align the edges of the card with the guide slots inside the Master Card slot
on the NXF.
5. Slide the card about halfway into the slot.
6. Inside the Master Card slot on NXF, locate the 4-pin control cable
connector.
7. Plug the connector from the NXF into the 4-pin terminal on the Master
Card. This connector is keyed to ensure correct orientation.
8. Once the control cable is connected, gently slide the card all the way in
until you can screw the card in place.
9. Re-apply power and other connections as necessary.
Compatible NetLinx Master Cards
For use as a master controller, the NXF CardFrame accepts the following
NetLinx Master Card:
Compatible NetLinx Hub Cards
For use as a hub device, the NXF CardFrame accepts the following NetLinx Hub
Cards:
Control Card Connectors
1. 12 card slots for the NXC Control Cards that control devices connected to
the CardFrame. To install NXC Control Cards in the NXF CardFrame:
2. Remove the magnetic front faceplate/viewing window from the
CardFrame.
3. Align the edge of the Control Card with a slot in the CardFrame. Slide the
card into the CardFrame and press until you feel the Card seat in the back-
plane connector.
4. Put the magnetic faceplate back on the CardFrame. Secure with mounting
screws (if necessary).
Compatible NXC Control Cards:
The NXF CardFrame accepts the following NetLinx Control Cards:
+12 VDC PWR Connector:
On the rear panel. the 2-pin green (male) connector is for connecting a 12 VDC
power supply. The CardFrame can be powered either via the Master Card
(default), or by an external power supply connected to the CardFrame's PWR
connector. If a power supply is connected to the PWR connector, the CardFrame
power automatically switches to the connected power supply. In that case, the
Master/Hub Card and CardFrame are independently powered.
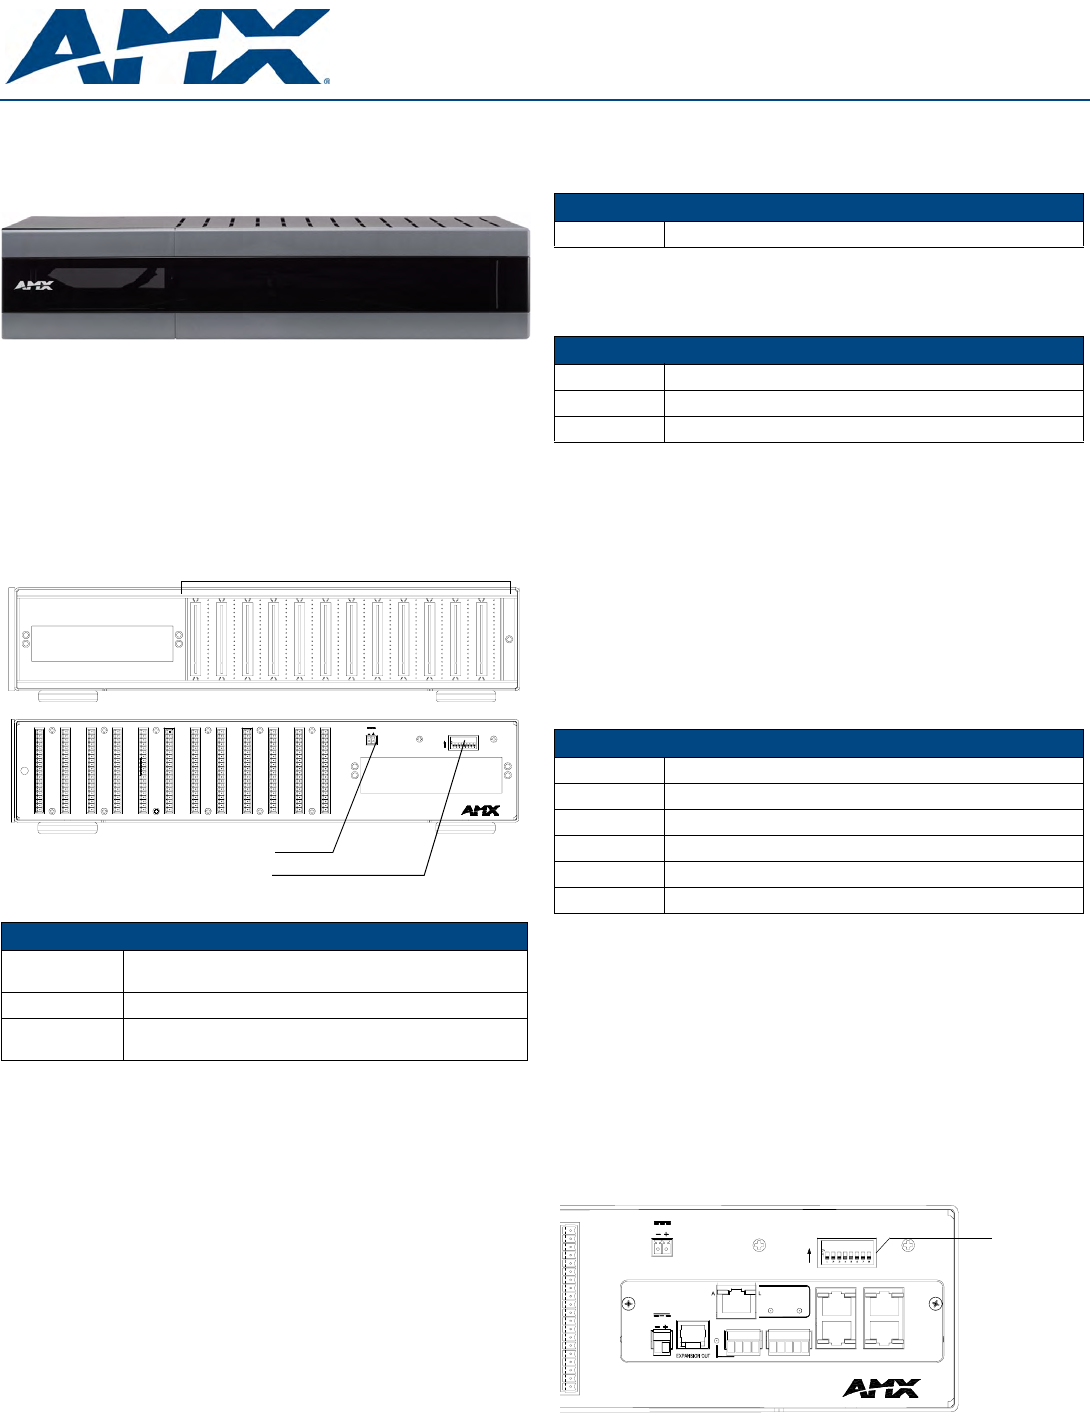
CardFrame Number DIP Switch:
The 8-position CardFrame Number DIP switch, located on the rear of the
CardFrame (FIG. 3), sets the starting address (the device number in the D:P:S
specification) for the Control Cards you install into the CardFrame. The address
range is 12-3060.
FIG. 1 NXF CardFrame - front panel (with faceplate)
FIG. 2 NXF CardFrame - Front/Rear Panel Components
Specifications
Dimensions
(HWD):
3.5" x 17.0" x 9.6" (8.90 cm x 43.20 cm x 22.50 cm)
Weight: 9.1 lbs. (4.1 kg)
Power
Requirement:
+12 VDC
123456789101112
123456789101112
CARDFRAME
NXF
222222222222
12VDC
CARDFRAME NUMBER
12
1
34
1
5
4
3
6
5
10
11
9
8
15
13
14
16
19
17
18
1212
7
4
3
6
5
10
11
9
8
7
4
3
6
5
6
1
78
1
11 9
1
1012
1
PWR
CARDFRAME
ON
123
12
7
4
3
6
5
10
11
9
8
15
13
14
16
19
20
17
18
15
13
14
16
19
17
18
121212
10
11
77
4
3
6
5
4
3
6
5
10
11
9
8
9
8
7
4
3
6
5
10
11
9
8
15
13
14
19
17
18
16
15
13
14
16
19
20
17
18
15
13
14
16
19
17
18
15
13
14
16
19
20
17
18
1212
7
4
3
6
5
10
11
9
8
7
3
5
6
4
8
9
11
10
15
13
14
16
19
17
18
14
13
16
15
18
17
20
19
15
13
14
16
19
20
17
18
9101112
1212
7
4
3
6
5
10
11
9
8
7
4
3
6
5
10
11
9
8
10
11
9
8
15
13
14
16
19
20
17
18
15
13
14
16
19
17
18
45678
1212
7
4
3
6
5
10
11
9
8
7
Master/Hub Card slot
PWR (power) connector (2-pin male)
CardFrame Number (device ID) DIP switch
Master/Hub
Card slot
Control Card connectors (20-pin male) 1-12
Control Card slots (1-12)
Rear
Front
NetLinx Master Card
NXC-ME260 Master-Ethernet Card/Module
NetLinx Hub Cards
NXC-NH ICSNet Hub Card (FG2060)
NXC-HS ICSHub Server Card (FG2061)
NXC-HE ICSHub Expander Card (FG2062)
NetLinx Control Cards
NXC-COM2 Dual COM Port Control Card (FG2022)
NXC-I/O10 Input/Output Control Card (FG2021)
NXC-IRS4 4-Port IR/S Control Card (FG2023)
NXC-REL10 Relay Control Card (FG2020)
NXC-VAI4 Analog Voltage Control Card (FG2025)
NXC-VOL4 Volume Control Card (FG2024)
FIG. 3
CardFrame Number DIP switch (8-position)
CARDFRAME
NXF
12VDC
CARDFRAME NUMBER
1
PWR
CARDFRAME
ON
1
OUT
IN
NXC-ME260
Master-Ethernet
PWR
12VDC
AXlink
AXM
GND
PROGRAM
PWR
AXP
CTS
RTS
GND
RX
TX
10/100
ETHERNET
SPEED FD
ICSNet ICSHub
NXF
CardFrame
Number
DIP switch