TI032-3W 400-032-001-B 30/11/06 1/2
TI032-3W
Installation and User Guide
Programmable Wall Switch
The TI032-3W switch can be used in a single-pole or 3-way installation
with the following types of lighting:
• Incandescent
• Halogen
• Low-voltage halogen with transformer
• Fluorescent
The
TI032-3W
switch cannot be used with a load below 40 W or above
500 W.
n Cut power at the circuit breaker to avoid electric shock.
o Remove the existing switch. (For a 3-way installation, identify and
label the wire that is connected to the “common” screw.)
p Install the new switch (refer to the appropriate section below).
q Apply power at the circuit breaker.
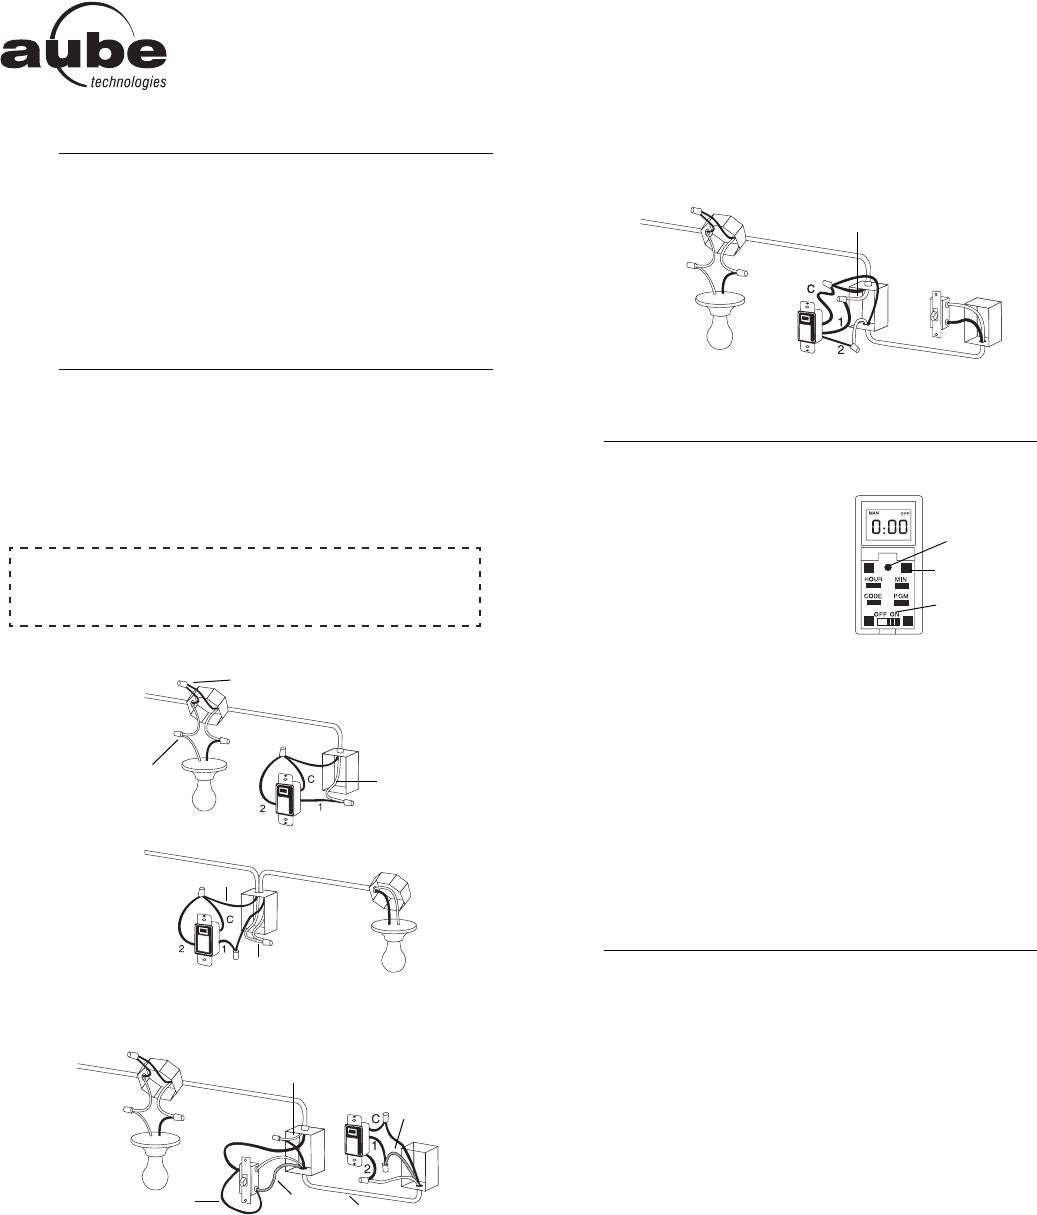
SINGLE-POLE INSTALLATION
Connect wires "2" and "C" of the TI032-3W to the line (120 V) wire.
EXISTING 3-WAY INSTALLATION
Connect wire "C" of the TI032-3W to the "common" wire, identified when
removing the old switch. Connect the other two TI032-3W wires to the
two remaining wires.
At the other 3-way switch, connect the jumper wire between the "com-
mon" screw and the screw where wire "1" of the TI032-3W is connected.
NEW 3-WAY INSTALLATION
The jumper wire is not required in this installation. A single-pole
switch can be used as the other switch in a 3-way installation.
n Pry the switch door open from the
bottom using a small screwdriver.
o Ensure the ON/OFF selector is set
to ON.
p Reset the switch using a paper clip.
0:00 and MO will flash.
If the display is blank:
• Ensure the ON/OFF selector is properly engaged in the ON posi-
tion. Push it to the right using a small screwdriver.
• If the programmable switch controls a lamp equipped with a
built-in On/Off switch, ensure the lamp switch is set to On.
• Ensure the light bulb is not burned out and is tightly screwed in its
socket.
EXISTING 3-WAY INSTALLATION
If either switch does not work properly, rewire the jumper between the
"common" screw and the other screw.
WARNING: Before replacing the light bulb, place the ON/OFF
selector in the OFF position. Failure to do so might damage the
switch.
NOTE: The switch displays the time in 24-hour format by default or
following a reset.
n To change to 12-hour format (or vice versa), proceed as follows:
a) Press one of the control buttons to ensure the MAN or
AUTO indicator is displayed.
b) Press the MIN and HOUR buttons simultaneously and brief-
tly (0:00 display = 24-hour, 12:00 display = 12-hour ).
o Set the time using the HOUR and MIN buttons. If you have
selected the 12-hour format, ensure that PM appears on the
screen when an afternoon time is displayed.
p Set the day by using the DAY button.
q Press one of the control buttons or close the switch door to
return to normal operation.
n
Applications
1.
o
Installation
2.
NOTE A:
The white wire is not the neutral wire but the wire going to the
load.
Line
Neutral
See NOTE A
120 VAC
Line
Neutral
120 VAC
Red
120 VAC
Jumper
Red
3-wire cable
See NOTE A
p
Power-On
3.
q
Setting the Clock
4.
120 VAC
See NOTE A
Control (4)
Reset
On/Off
selector
400-032-001-B ENG (print at 90%).fm Page 1 Thursday, November 30, 2006 8:52 AM