


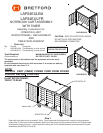
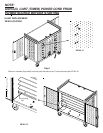


LAP24EULBA
LAP24EULFR
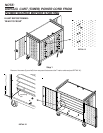
NOTEBOOK CART ASSEMBLY
WITH TIMER
Assembly Instructions for:
INTERIOR E-UNIT
REPOSITIONING / REPLACEMENT
AND
TIMER REPLACEMENT
Parts List
Qty. Part No. Description
1 LAP24EULBA Cart Assembly, e-units at back
LAP24EULFR Cart Assembly, e-units at front
Tools Required
Philips screwdriver
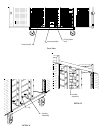
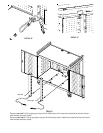
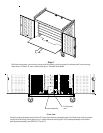
Step 1
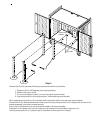
Open both front doors of cart to access E-Units. From underneath the bottom shelf, carefully unplug the power
cords of the E-Units from the timer assembly (see Front View) and unclip the power cords from the 4 clips located
at the bottom panel of the cart. Loosen the screw holding the E-Unit bracket assembly and remove all 4 bracket
assemblies (see DETAILS 'A' and 'B').
LAP24EULFR
LAP24EULBA
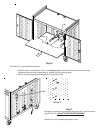
SEE DETAIL 'A'
SEE DETAIL 'B'
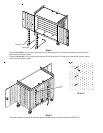
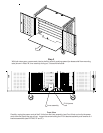
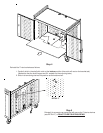
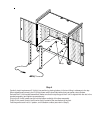
E-UNIT REPOSITIONING:
'FRONT TO REAR'
bottom shelf
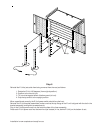
MAXIMUM WEIGHT OF ACCESSORIES
ON TOP OF CART: 25 LBS.
NO TV/MONITOR TO BE
USED ON TOP OF CART
NOTE:
UNPLUG CART (TIMER) POWER CORD FROM POWER
SOURCE BEFORE STARTING
The socket-outlet to be installed near the equipment and to be easliy
accessible.
Do not load each electrical unit with more than 12 A and do not load any
recepticle with more than 12 A.
CAUTION: RISK OF ELECTRICAL SHOCK.
DO NOT PLUG INTO ANOTHER
RELOCATABLE POWER TAP.