


• Allow all users to access enabled ports or allow the configuration of group authorizations
to restrict access
• Enable or disable BootP Configuration Retrieval and/or Live Configuration Retrieval
• Select a Security Profile, which defines:
• Enabled services (FTP, ICMP, IPSec and Telnet)
• SSH and HTTP/HTTPS access
The administrator can select either a preconfigured Security Profile or create a custom profile.
All the services and the SSH and HTTP/HTTPS configuration options that are enabled and
disabled for each Security Profile are shown in the Wizard - Security and the System - Security
- Security Profile pages.
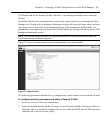
To configure the Security Profile:
1. Select System - Security - Security Profile.
2. In the Idle Timeout field, enter the number of minutes before the virtual console server
times out open sessions.
NOTE: Thisvalueappliestoanyuser session tothe applianceviaHTTP,HTTPS, SSH or Telnet.The new idle
time-out willbeappliedto new sessionsonly.
3. Under the Enabled Services section, enable or disable the RCP checkbox.
4. Under the Serial Devices heading, enable or disable the Port access is controlled by
authorizations assigned to user groups checkbox.
5. Select the checkbox for Custom, Moderate, Open or Secure under the Security Profile
heading.
6. Click Save.
You can also configure DSView 3 software security settings. When the virtual console server is
managed by the DSView 3 software, the DSView 3 server will supply the certificate to the
virtual console server. Under normal conditions, the DSView 3 software will manage the
certificate to clear and replace it with a new certificate as needed. If communication with the
DSView 3 software is lost, the DSView server will be unable to clear the certificate and the
virtual console server cannot be used. Click the Clear DSView Certificate button to configure
the virtual console server in Trust All mode.
To configure DSView 3 software security settings:
1. Select System - Security - DSView.
2. Click the Allow appliance to be managed by DSView checkbox and click Save.
Chapter 3: Accessing a Virtual Console Server via the Web Manager 17