1
2
Initialize Your Cash Register
(See Page 13 in the Users Manual)
3
Choose the Language if necessary
(See Page 13 in the Users Manual)
4
Set the Date and Time
(See Page 13 in the Users Manual)
5
Message on the display
6
7
Quick Start Guide
Casio Model Number PCR-T480/470/48S
Press
/
for more information Visit
http://casio4business.com/ecr
Please keep this sheet for future reference.
Load the Memory Protection Batteries and Paper Roll
(See Pages 10 - 12 in the Users Manual)
A) Unpack your cash register and
remove the printer cover.
B) Open battery com
-
partment cover.
C) Insert 2 new “AA” type batteries
into the compartment.
D) Install the supplied 58mm thermal paper roll by lifting
up the printer arm and placing the paper roll into the
printer well. Close the cover firmly.
6 6
6
To set the paper roll, refer to page 12.
A) Insert the supplied key and turn to the “OFF” position.
B) Printed out what you enterd.
A) You can choose the printout language from English, French or Spanish.
B) Read the printout and follow the procedure printed on the chit.
Select the language code (0 ~ 2) and press
F
key. If you want to
skip this step, just press
s
key.
Follow the procedure printed on the chit to set the date and time. EFT device is DATACAP SYSTEMS,INC. model :162SL/MSR.
(1)When No EFT device is connected
By default, the cash register is set to display "NO EFT CREDIT"
and emit a single beep when initialization ends. This setting should
not be changed.
When power is restored following an outage, press the
C
key as
prompted by the message on the display.
(2)When EFT device is connected
When power is restored following an outage, press the
¥
key as
prompted by the message on the display.
•
•
•
INIT
(C) 2007 by CASIO
COMPUTER CO.,LTD.
All rights reserved.
LANGUAGE:"ENGLISH"
DD-MM-YYYY HH:MM
!!RESTORE INIT. START!!
PLEASE WAIT FOR A WHILE.
PLEASE INPUT TIME BY 24
HOUR SYSTEM.
HHMM<CA>:INPUT
PLEASE INPUT DAY.
DD<CA>:INPUT
<C> :RETURN
PLEASE INPUT MONTH.
MM<CA>:INPUT
<C> :RETURN
PLEASE INPUT YEAR.
YYYY<CA>:INPUT
<C> :RETURN
8
8
8
YEAR
MONTH
DAY
TIME
8
A)
C) Initialize will take about 1
minitus to complete with fol-
lowing receipt printed.
Setting Tax Rates
(See Page 14 in the Users Manual)
Tax Rates can be set 2 ways: Perform procedure 1) or procedure 2).
1) Input the desired flat tax rate / Change the flat tax rate.
A) Turn the key to the “PGM” position.
B) Enter
3
followed by the
s
key.
C) Enter
1
(for tax table 1) followed by the
~
key.
(Enter
2
for tax table 2)
D) Enter your tax rate, followed by the
F
key.
(Example: For 6% enter the number 6. For 5.75% enter 5.75.)
E) Press the
F
key again. (This operation sets add-on rounding.)
F) Press the
s
key to end tax programming.
Example: Set state tax 5.75%
3s
1
~
5^75F
F
s
PGM3 appears in the mode display.
Enter 1 (for tax table 1).
Enter tax rate.
Press <CASH> again.
To end the setting function.
Department 16 - 25 are initialized as Taxable 1 and 2, others are initialized as non-taxable.
To stop unexpected long printing, press
s
key twice.
To use TAX function (tax rate and status)
You can set multiple tax rates on this cash register. If you select a rate from the preset tax table for the products for each department/PLU, the cash register
will automatically calculate the tax for each product.
This setting is referred to as the "tax status". For instance, when the tax for products is calculated using Tax Table1, this is called "Tax Status1".
Department 16 - 25 are initialized as Taxable 1 and 2, others are initialized as non-taxable.
To stop unexpected long printing, press
s
key twice to cancel printing.
1) Program tax status to the department key
A) Turn the mode key to the "PGM" position.
B) Press the
~
key several times to select the Tax Status you want to
set and then press the department key.*1
C) If necessary, press the department key after you have pressed the
~
and
D
key.
D) To set the same tax status for another department, press the key for
that department also.
E) To change the tax status, press the
~
key, change the tax status to
the desired setting and then press the department key.
F) Finally, press the
s
key to end tax status programming.
Example:
To set Tax Status1 for department 1 and Tax Status2 for de-
partment 15
2) Program tax status to the PLUs
A) Turn the mode key to the "PGM" position.
B) Press the
~
key several times to select the Tax Status you want to
set.
C) Enter the desired PLU No. and press the
*
key.
D) To set the same tax status for another PLU, specify that PLU in the
same way.
E) To change the tax status, press the
~
key, change the tax status to
the desired setting and then specify the PLU No.
F) Finally, press the
s
key to end tax status programming.
Example: To set Tax Status1 for PLU1 and Tax Status2 for PLU100
~
!
~
15
s
Selects Tax Status1.
Sets Tax Status1 for department 1.
Selects Tax Status2.
Sets Tax Status2 for department 15.
Ends tax status programming.
~
1
*
~
100
*
s
Selects Tax Status1.
Sets Tax Status1 for PLU1.
Selects Tax Status2.
Sets Tax Status2 for PLU100.
Ends tax status programming.
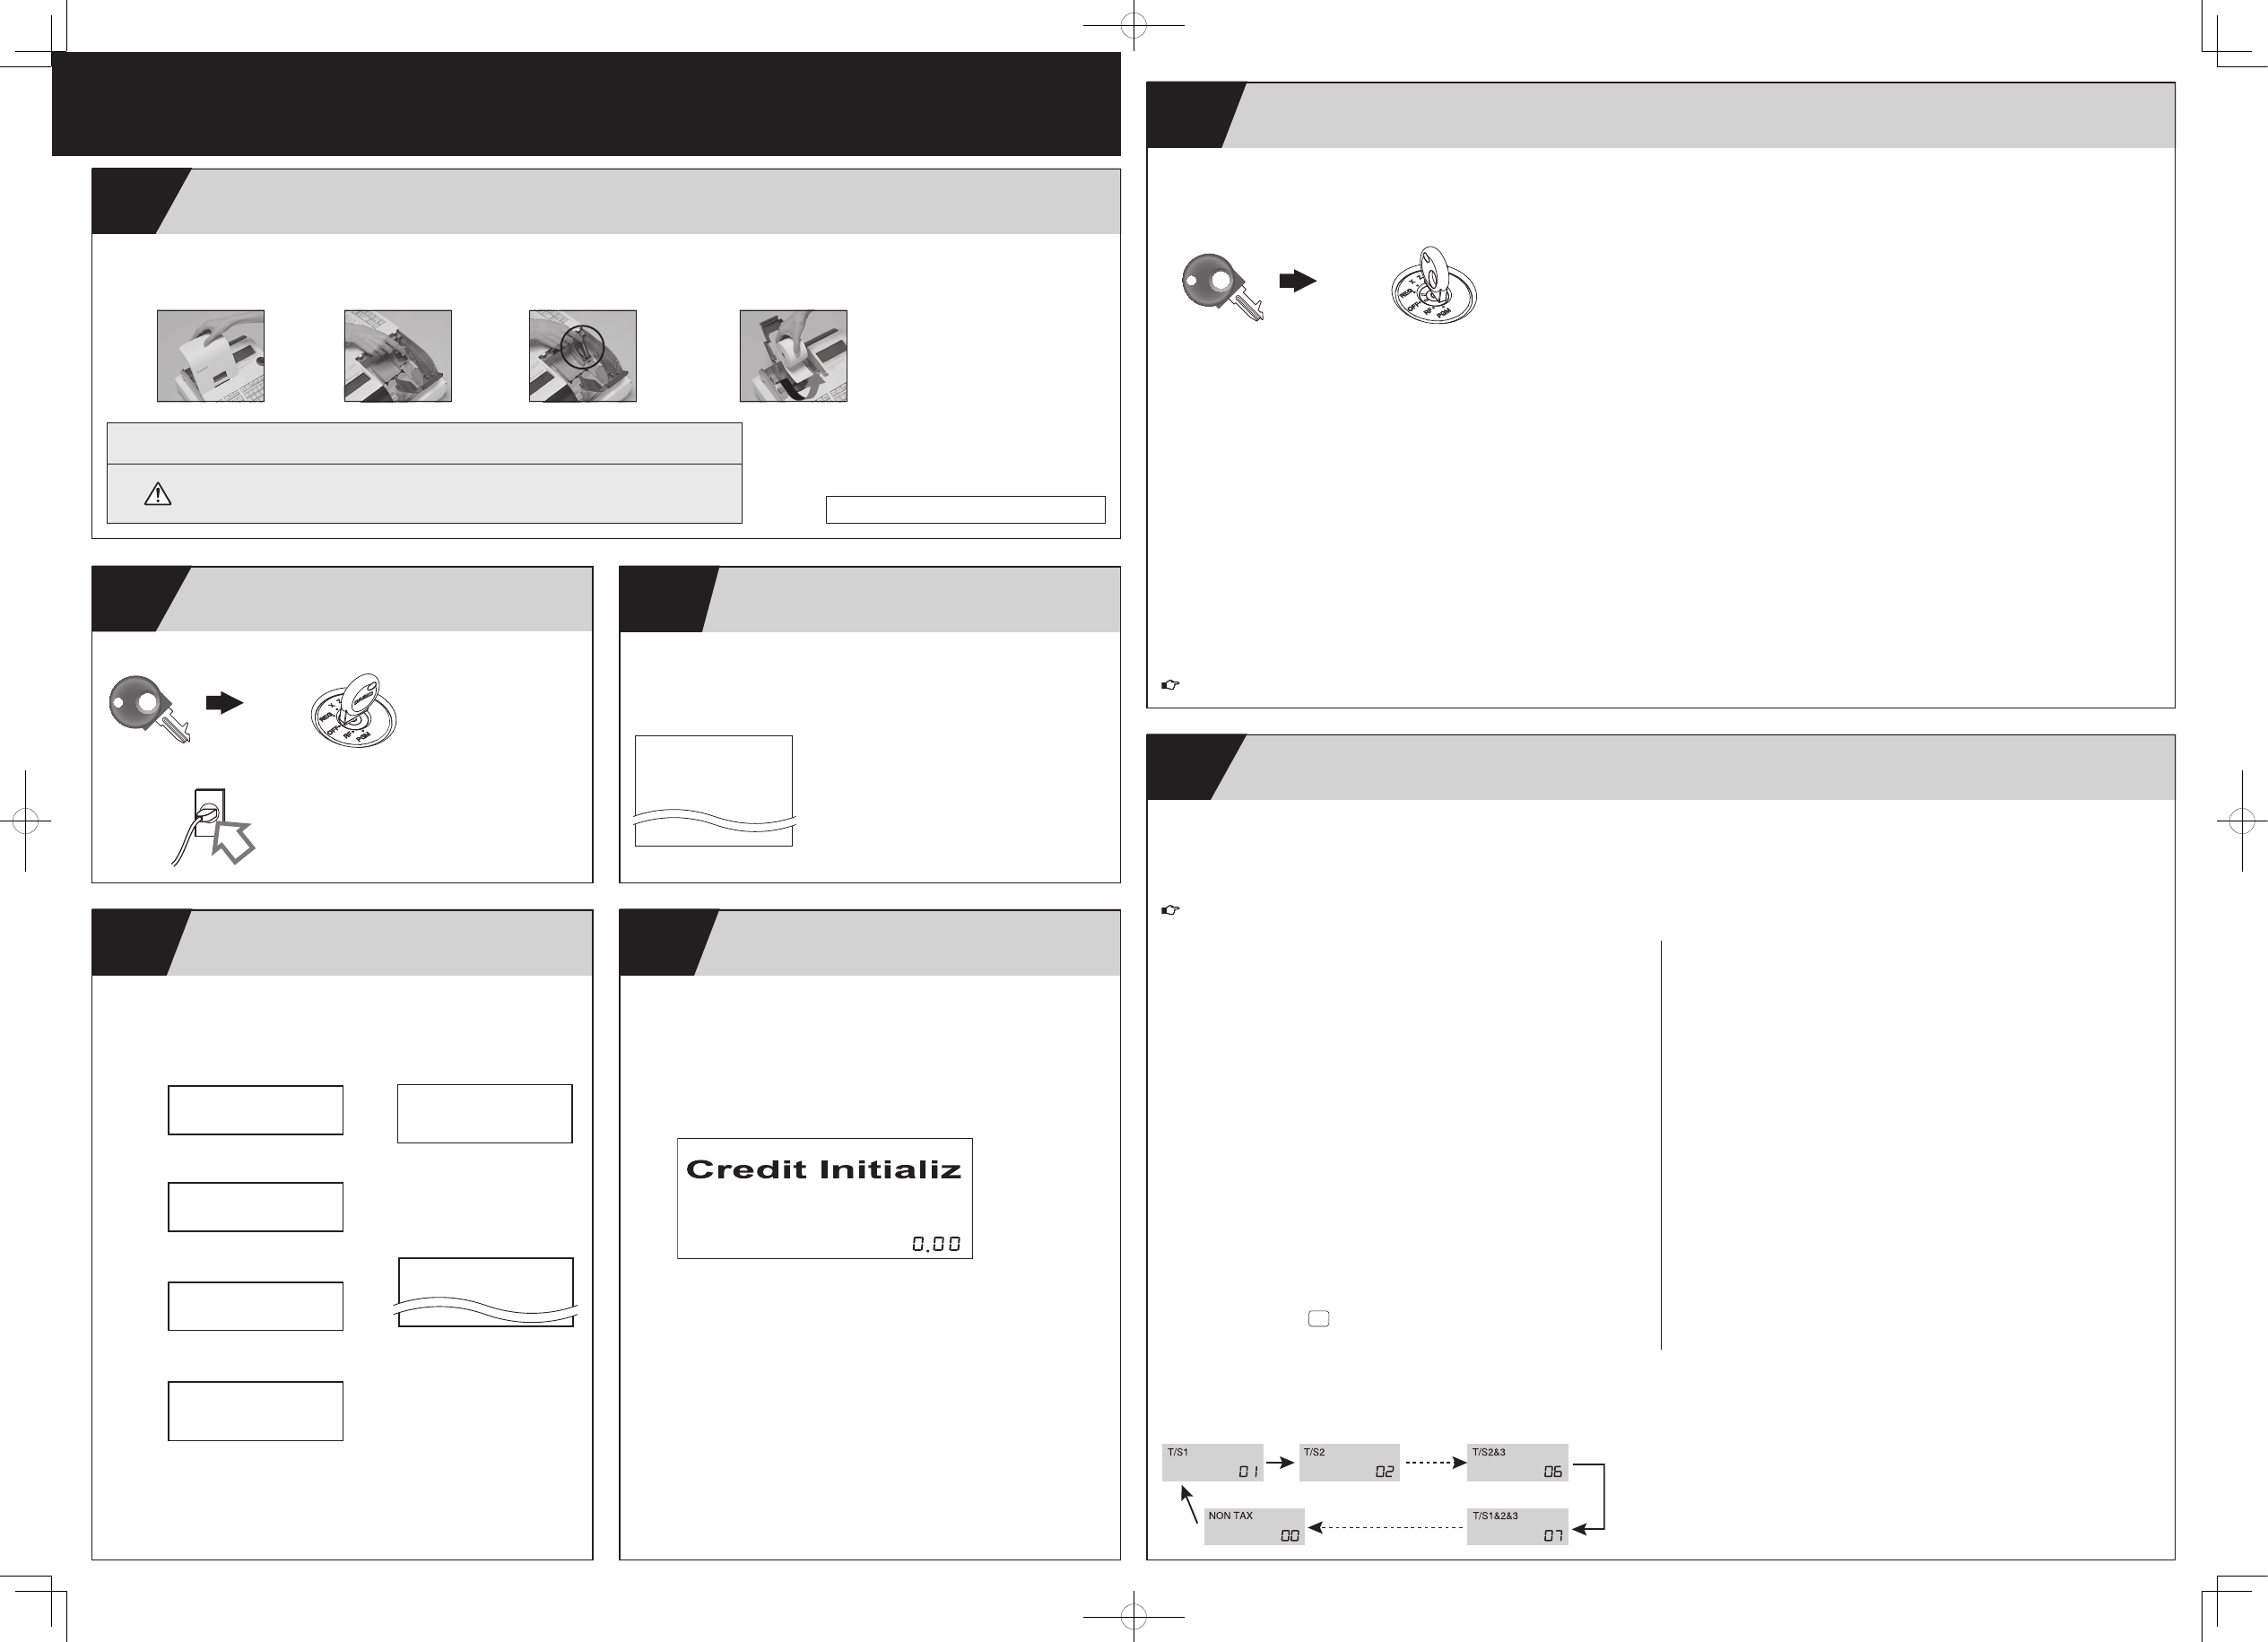
*1: The display changes in the sequence shown below.
"T/S1"
→
"T/S2"
→
"T/S1&2"
→
"T/S3"
→
"T/S1&3"
→
"T/S2&3"
→
"T/S1&2&3"
→
"ALL"
→
"NON TAX".
t
:
Tax calculated at the rate set in Tax Table1.
T
:
Tax calculated at the rate set in Tax Table2.
u
:
Tax-exempt. Tax not calculated.
For other tax status, refer to page 68.
Important
Be sure that the plus (+) and minus (-) ends of the batteries are facing in
the directions indicated by the illustration inside the battery compartment.
We strongly recommend that you should install two “AA” type alkaline batteries
for memory protection. Otherwise you will miss the totals during power failure.
No battery is included in the accessories.
•
•