


25
Versatile Interface Processor (VIP6-80) Installation and Configuration Guide
OL-5078-01
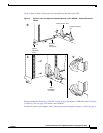
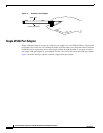
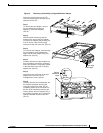
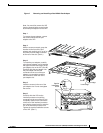
Step 6 Using your thumbs, simultaneously push both ejector levers inward until the VIP6-80 is pushed entirely
into its slot. (See Figure 3c.)
Step 7 Tighten both of the captive installation screws to ensure proper EMI isolation for the router.
Step 8 Repeat Step 1 through Step 7 to install any additional interface processors.
This completes the procedure for installing a VIP6-80.
To configure the new interface, use the configuration section of the specific port adapter installation and
configuration guide, or the Cisco IOS software configuration documentation listed in the “Related
Documentation” section on page 2. The documentation is available online on Cisco.com, and on the
Documentation CD-ROM.
Performing a Basic Configuration
After a VIP6-80 is reinstalled, the system brings online only port adapter interfaces that match the
current configuration and were previously configured as up; all others require that you configure them
with the configure command.
To configure the interfaces on the PAs installed on your VIP6-80, first enable the router as described
below.
Step 1 At the user-level EXEC prompt, enter the enable command. The EXEC prompts you for a
privileged-level password as follows:
Router> enable
Password:
Step 2 Enter the password (the password is case sensitive). For security purposes, the password is not displayed.
When you enter the correct password, the system displays the privileged-level system prompt (#):
Router#
This completes the procedure for enabling the router.
For a complete description of commands and configuration options available for your VIP6-80, refer to
the configuration section of the specific port adapter installation and configuration guide and to the
appropriate Cisco IOS software configuration publications. (See the “Related Documentation” section
on page 2.)