


United States January 3, 2003
compaq.gif (932 bytes)
top_nav.gif (991 bytes)
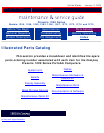
Presario 1200 Series
Models: 1255, 1256, 1260, 1262, 1266, 1267, 1272, 1273, 1274, and 1275
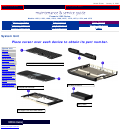
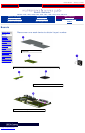
Before You Begin Specifications Parts Catalog
Removal Sequence Troubleshooting Battery Operations
Product Description Pin Assignments
Index
Solving Minor Problems
Some minor problems and possible solutions are outlined in the following tables. If the problem
appears related to a software application, check the documentation provided with the software.
The following problems and possible solutions are addressed:
● Audio Problems
● Battery Pack and Battery Gauge Problems
● CD Drive Problems
● Diskette and Diskette Drive Problems
● Display Problems
● Hard Drive Problems
● Hardware Installation Problems
● Keyboard/Numeric Keypad Problems
● Memory Problems
Solving Audio Problems
Some common audio problems and solutions are listed in the following table.
Solving Audio Problems
Problem Probable Cause Solution(s)
Computer does not beep after the Power-On
Self-Test (POST).
This is typical; it indicates successful
completion of the Power-On Self-Test
(POST).
No action is required.
Solving Battery Pack and Battery Gauge Problems
Some common causes and solutions for battery pack problems are listed in the following table.
The "Solving Power Problems" section in this chapter may also be applicable.
Solving Battery Pack and Battery Gauge Problems
Problem Probable Cause Solution(s)
Computer won't turn on when battery
pack is inserted and power cord is
unplugged.
Battery pack is discharged. Connect the computer to an external
power source and charge the battery
pack.
Replace the battery pack with a fully
charged battery pack.
Check the battery connectors on the
system board to verify that they are
evenly spaced and are not bent or
broken.
Computer is beeping and battery LED
icon is blinking.
Battery charge is low. Immediately save any open file(s).
Then do any one of the following:
● Connect the computer to an
external power source to charge
the battery pack.
● Turn off the computer or initiate
Hibernation until you can find
another power source or charge
the battery pack.
Computer battery LED icon (front on
the unit) blinks to indicate low battery
condition, but computer does not beep.
Volume is turned down too low. Adjust the volume.
Battery LED icon doesn't light and
battery pack won't fast charge.
Battery pack is already charged. No action is necessary.
Battery pack was exposed to
temperature extremes.
Allow time for the battery pack to
return to room temperature.
Battery pack is at end of its life. Replace battery pack.
You have to set the date and time every
time you turn on the computer.
RTC battery is dead. Replace the RTC battery.
Battery charge does not last as long as
expected.
Battery is being exposed to high
temperatures or extremely cold
temperatures.
Keep the battery pack within the
recommended operating temperature
range 50° F to 104° F (10° C to 40° C)
or recommended storage range -4° F to
86° F
(-20° C to 30° C ). Recharge the
battery pack.
Battery has partially self-discharged. Recharge the battery. Discharge the
battery completely and then recharge
it.
Power management is disabled. Set a power management level in
Computer Setup.
An external device or PC Card is
draining the battery.
Turn off or disconnect external devices
when not using them.
Battery pack is warm to the touch after
charging.
Normal warming has occurred due to
charging.
No action is required.
Battery pack operating time is far less
than the documented average operating
time.
Power management is turned off or
disabled.
Enable power management in Computer
Setup and in Windows Power
Properties.
An external device or PC Card is
draining the battery.
Turn off or disconnect external devices
when not using them.
Battery pack has partially self-
discharged.
Condition the battery pack by fully
charging, fully discharging, then fully
recharging it.
To maintain the charge, leave battery
packs in the computer when it is
connected to external power.
If the computer is disconnected from
external power for more than two
weeks, remove battery packs from the
computer to reduce the discharge rate.
Battery pack is being exposed to high
temperatures or extremely cold
temperatures.
Keep the battery pack within the
recommended temperature ranges.
Operating: 50° F to 104° F
(10° C to 40° C)
Storage: -4° F to 86° F
(-20° C to 30° C )
Recharge the battery pack.
Solving CD Drive Problems
Some common causes and solutions for CD drive problems are listed in the following table.
Solving CD Drive Problems
Problem Probable Cause Solution(s)
CD drive cannot read a compact disc. Compact disc is upside down or is
improperly inserted in the CD drive.
Open the CD loading tray, lay the
compact disc in it (label side up), then
close the tray.
CD is CD Plus or Pregap/Track 0 type. Cannot read these type CDs in 24x.
Remove the CD.
Solving Diskette and Diskette Drive Problems
Some common causes and solutions for diskette and diskette drive problems are listed in the
following table.
Solving Diskette and Diskette Drive Problems
Problem Probable Cause Solution(s)
Diskette drive cannot write to a
diskette.
Diskette is write-protected. Disable the diskette's write-
protect feature or use a
diskette that is not write-
protected.
Computer is writing to
the wrong drive.
Check the drive letter in the
path statement.
Not enough space is left
on the diskette.
Use another diskette.
Drive error has occurred. Run Computer Checkup from
the Compaq Diagnostics
diskette.
Diskette is not formatted. Format the diskette. At
the system prompt, enter
FORMAT A:
Diskette drive cannot read a
diskette.
The wrong type of diskette is
being used.
Use the type of diskette
required by the drive.
Diskette has a bad sector. Copy files to hard drive or
another diskette. Reformat bad
floppy.
Drive error has occurred. Run Computer Checkup from
the Compaq Diagnostics
diskette.
Diskette is not formatted. Format the diskette. At the
system prompt, enter
FORMAT A:
Cannot boot from diskette. Bootable diskette is not in
drive A.
Put the bootable diskette in
drive A.
Diskette Boot has incorrect
setting in Computer Setup.
Run Computer Setup and set
diskette as first to boot.
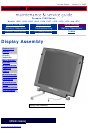
Solving Display Problems
This section lists some common causes and solutions for computer display and external monitor
problems.
You can perform a monitor self-test on an external VGA color or monochrome monitor by
disconnecting the monitor from the computer. To do so, complete the following steps:
1. Turn off the monitor.
2. Turn off the computer.
3. Disconnect the monitor signal cable from the computer.
4. Turn on the monitor and allow it to warm up for one minute.
The display should be white. A narrow black border may also appear on the left and right sides of
the display. Either of these displays indicates that the monitor is working properly.
Solving Display Problems
Problem Probable Cause Solution(s)
Screen is dim. Control for brightness or
contrast (if applicable) is not
set properly.
Adjust the Brightness of the
display by using Fn + F7 or
Fn + F8.
Adjust the Contrast of the
display by using Fn + F5 or
Fn + F6.
Computer screen is in direct
light.
Tilt display or move
computer.
Screen is blank. Screen save was initiated by
Power Management due to
lack of user activity.
Press any key or touch the
Touch Pad.
Display has overheated. If computer is in direct
sunlight, move it and allow it
to cool off.
Display is blank and the Power icon
is flashing, or the Suspend icon is
present.
System is in Suspend mode. Press any key or touch the
Touch Pad.
Internal display is blank and the
screen on an external monitor
displays information.
Display function was
switched to the external
monitor.
Use Fn + F3 to switch
between LCD or CRT.
Internal display flashes or has
garbled characters when computer is
connected to external monitor.
Using 1024 × 768 or higher
resolution on external
monitor and have toggled
back to internal display,
which supports up to 800 ×
600.
Restart the computer.
The light tube-s on the edge of the display
panel do not light up at all and Power-On Self-
Test (POST) completes when the unit is
powered up.**
Improper backlight or display cable
connections
Replace the display assembly.
Defective inverter board. Replace the display assembly.
Defective display cable. Replace the display assembly.
Defective display panel. Replace the display assembly.
Defective system board. Replace the system board.
The light tubes on the edge of the display
panel do not light up at all and Power-On Self-
Test (POST) does not complete when the unit
is powered up.**
Defective system board. Replace the system board.
Backlight (brightness) cannot be adjusted with
Fn + F7 or Fn + F8.
Improper display cable connections. 1. Reseat the display cable to the
system board.
2. Replace the display assembly.
Defective inverter board. Replace the display assembly.
Defective display cable. Replace the display assembly.
Defective system board. Replace the system board.
Contrast cannot be adjusted with
Fn + F5 or Fn + F6.
System may have a TFT display
(which is always at maximum
contrast)
No adjustment is possible.
Improper display-cable connections. 1. Reseat the display cable to the
system board.
2. Replace the display assembly.
Defective inverter board. Replace the display assembly.
Defective display cable. Replace the display assembly.
Defective system board. Replace the system board.
** This problem indicates that the backlight or its power circuitry has failed. Since you cannot observe the POST result on
the display panel when the backlight is not functioning, connect the unit to an external monitor before powering the unit
up. If an external monitor is not available, verify that POST completes by opening and closing the display, listening for the
single or double beep, and watching for the LEDs to turn on at the front of the computer.
Problem Probable Cause Solution(s)
This display panel has a continuous pattern
across it (e.g., a "jailbars" pattern), has a
single color on it, or has garbled graphics
across the entire panel. This failure is for
patterns across the entire panel
(not just on one section).
Improper display cable
connections
Reseat the display cable to the following
until the problem is solved:
1. System board
2. Display assembly
Defective display cable. Replace the display assembly.
Defective inverter board. Replace the display assembly.
Defective system board. Replace the system board.
Ghost bars extending from graphics on the
display.
Common characteristic of STN
displays.
1. Change the background colors.
2. Adjust the Contrast of the display by
using Fn + F5 or Fn + F6.
A single line, a small group of lines, or a block
appears on the display panel. This failure
occurs in only a section of the display panel.
Defective display panel. Replace the display assembly.
NOTE:
To perform a "self-test" on an external VGA color or monochrome monitor, complete the following steps: The
screen should be white. A narrow black border may also appear on the left and right sides of the display. Either of
these displays indicates that the monitor is working properly.
Solving Hard Drive Problems
Some common causes and solutions for hard drive problems are listed in the following table.
CAUTION: To prevent loss of information, always maintain an up-to-date backup of your hard drive at all
times, in case of errors or failures.
Solving Hard Drive Problems
Problem Probable Cause Solution(s)
Reading hard drive takes an unusually
long time after restarting the computer.
System entered Hibernation due to
low battery condition and is now
exiting from it.
Give the system time to restore the
previously saved data to its exact state
before Hibernation.
Hard drive error occurs. Hard drive has bad sectors or has
failed.
Run
Computer Checkup.
Hard drive does not work. Hard drive is not seated properly. Turn off and unplug the computer,
remove the battery pack, and remove
and then reinstall the hard drive.
Solving Hardware Installation Problems
Some common causes and solutions for hardware installation problems are listed in the following
table.
Solving Hardware Installation Problems
Problem Probable Cause Solutions(s)
A new device is not recognized as
part of the computer system.
Cable(s) of new external
device are loose, or
power cables are unplugged.
Ensure that all cables are
properly and securely
connected.
Power switch of new external
device is not turned on.
Turn off the computer, turn on
the external device, then turn
on the computer to integrate
the device with the computer
system.
Device is not seated properly. Turn off the computer and
reinsert the device.
Solving Keyboard/Numeric Keypad Problems
Some common causes and solutions for keyboard/numeric keypad problems are listed in the
following table.
Solving Keyboard/Numeric Keypad Problems
Problem Probable Cause Solution(s)
Embedded numeric keypad on
computer keyboard is disabled.
Num Lock function is not
enabled.
Press the Shift+NumLk keys
to enable the Num Lock
function and embedded
numeric keypad. The Num
Lock icon on the status panel
turns on.
Embedded numeric keypad is
disabled and Num Lock function is
on.
External numeric keypad is
connected to the computer.
Disconnect the external
numeric keypad from the
computer.
Solving Memory Problems
Some common causes and solutions for memory problems are listed in the following table.
Solving Memory Problems
Problem Probable Cause Solution(s)
Memory count during Power-On Self-
Test (POST) is incorrect.
Optional memory expansion
card is installed incorrectly,
is incompatible with
the computer, or is defective.
Ensure that the optional
memory expansion card is
installed correctly.
"Out of Memory" message is
displayed on the screen or
insufficient memory error occurs
during operation.
System ran out of
memory for the application.
Check the application
documentation for memory
requirements.
Install additional memory.
Too many TSR (terminate-
and stay-resident)
applications are running.
Remove from memory any
TSR applications that you do
not need.
Solving Minor Problems (continued)
or return to the Troubleshooting index page.
privacy and legal statement