


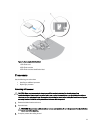

4. If applicable, remove the socket protective cap from the processor shield. To remove the socket protective cap,
push the cap from the inside of the processor shield and move it away from the socket pins.
NOTE: It is recommended that you install/remove the socket protective cap from the processor shield with the
processor shield in the open position.
CAUTION: Positioning the processor incorrectly can permanently damage the system board or the processor.
Be careful not to bend the pins in the socket.
CAUTION: Do not use force to seat the processor. When the processor is positioned correctly, it engages
easily into the socket.
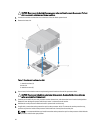
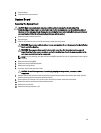
5. Install the processor in the socket:
a) Align the processor with the socket keys on the ZIF socket.
b) Set the processor lightly in the socket.
Because the system uses a ZIF processor socket, do not use force. When the processor is positioned correctly,
it drops down into the socket with minimal pressure.
c) Close the processor shield.
d) Rotate the socket release lever down until it is locked in position.
CAUTION: Applying too much thermal grease can result in excess grease coming in contact with and
contaminating the processor socket.
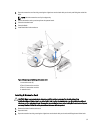
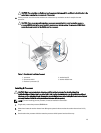
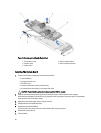
6. Install the heat sink:
If you are:
Reinstalling a
heat sink
Use a clean, lint-free cloth to remove the existing thermal grease from the heat sink.
Upgrading a
processor
If a new heat sink was supplied with the processor, install it.
Reinstalling a
processor
Clean any remnants of thermal grease from the processor.
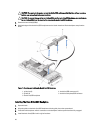
a) Open the grease applicator included with your processor kit and apply all of the thermal grease in the
applicator to the center of the topside of the new processor.
b) Place the heat sink on the processor.
c) Tighten the four retention sockets to secure the heat sink to the blade system board.
NOTE: Do not over-tighten the heat sink retention screws when installing the heat sink. To prevent over-
tightening, tighten the retention screw until resistance is felt, and stop once the screw is seated. The
screw tension should be no more than 6 in-lb (6.9 kg-cm).
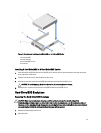
7. If applicable, install the cooling shroud.
8. Close the blade.
9. Install the blade in the enclosure.
As the system boots, it detects the presence of the new processor and automatically changes the system
configuration information in the System Setup.
10. Press <F2> to enter the System Setup and check that the processor information matches the new system
configuration.
11. Run the system diagnostics to verify that the new processor operates correctly.
12. Update the system BIOS.
44