


268 Adding and Replacing Parts
17
Connect your computer and devices to their electrical outlets, and turn
them on.
See the documentation that came with the drive for instructions on
installing any software required for drive operation.
18
Enter the system setup program (see
"System Setup
" on page 89) and
select the appropriate
USB for Flexbay
option.
19
Verify that your computer works correctly by running the Dell Diagnostics.
See "Dell Diagnostics" on page 136 for instructions.
Optical Drive
CAUTION: Before you begin any of the procedures in this section, follow the
safety instructions in the
Product Information Guide
.
CAUTION: To guard against electrical shock, always unplug your computer from
the electrical outlet before opening the cover.
NOTICE: To prevent static damage to components inside your computer, discharge
static electricity from your body before you touch any of your computer’s electronic
components. You can do so by touching an unpainted metal surface on the
computer.
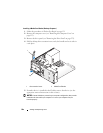
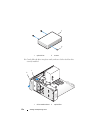
Removing an Optical Drive (Tower Computer)
1
Follow the procedures in "Dell Diagnostics" on page 136.
2
Remove the computer cover (see "Removing the Computer Cover" on
page 153).
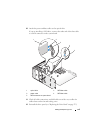
3
Remove the drive panel (see "Removing the Drive Panel" on page 233).
4
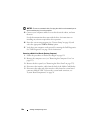
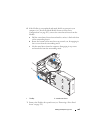
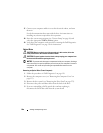
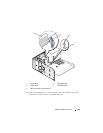
Disconnect the power and data cables from the back of the drive.
5
If you are uninstalling a SATA optical drive and not replacing it,
disconnect the SATA data cable from the system board.