


Advanced Features 57
5
Click
Finish
to delete the volume.
About Migrating to a RAID Configuration
Migration is only possible from a factory-installed RAID configuration, if
when you ordered your system it was configured for RAID and if you are
migrating between certain RAID configurations.
Migrating to a RAID Level 0 Configuration
1
Set your computer to RAID-enabled mode (see "Setting Your Computer to
RAID-Enabled Mode" on page 53).
2
Click the
Start
button and point to
All Programs
→
Intel(R) Matrix
Storage Manager
→
Intel Matrix Storage Console
to launch the Intel
Storage Utility.
If you do not see an
Actions
menu option, you have not yet set your
computer to RAID-enabled mode (see "Setting Your Computer to RAID-
Enabled Mode" on page 53).
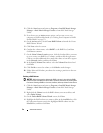
3
On the
Actions
menu, select
Create RAID Volume From Existing Hard
Drive
to
launch the Migration Wizard.
4
Click
Next
on the Migration Wizard screen.
5
Enter a RAID volume name or accept the default.
6
From the drop-down box, select
RAID 0
as the RAID level
.
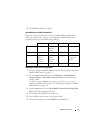
2-drive RAID 0 3-drive RAID 0 2-drive RAID 1 3-drive RAID 5
2-drive RAID 0 Not applicable 2- to 3-drive
migration
possible
Not possible Not possible
3-drive RAID 0 Not possible Not applicable Not possible Not possible
2-drive RAID 1 RAID 1 to
RAID 0
migration
possible
RAID 1 to
RAID 0
migration
possible
Not applicable RAID 1 to RAID
5 migration
possible
3-drive RAID 5 Not possible Not possible Not possible Not applicable