


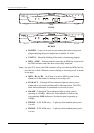


DI-304/DI-304M ISDN Remote Router
Connecting to an ISDN BRI Line
A. S/T-Interface Model
1. Locate the ISDN cable.
2. Plug one of the RJ-45 connectors on the cable into the ISDN port on the
rear panel of the router.
3. Plug the other end of the cable into any of the NT-1 (or NT1 plus) S/T-
interface ports.
B. U-Interface Model
1. Locate the ISDN cable.
2. Plug one of the RJ-45 connectors on the cable into the ISDN port on the
rear panel of the router.
3. Plug the other end of the cable into the ISDN wall outlet.
Connecting to a DSL/Cable Modem
The router supports connection of a DSL modem via an Ethernet interface only.
Non-Ethernet interface DSL modems, such as USB and ATMF-25, will not be
supported.
1. Attach the Ethernet cable to the Ethernet port of the DSL/Cable modem.
2. Plug the other end of the cable into the P1 to P4 port.
3. If the port’s LED is not bright, please change the direct cable to cross cable.
The hardware installation is now complete. The following sections will guide you
through setting up your management PC and connecting to the Web Configurator.
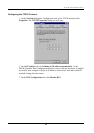
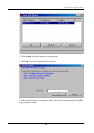
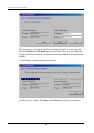
Setting Up a Management PC
The Router has a built-in HTTP (Web) server for configuration. Before you use the
router to access the Internet, you should set up a management PC to log into the
router for further configuration. The management PC may be configured with a
fixed or dynamically assigned IP address. For a fixed IP address, use an IP address
from a 192.168.0.0/24 network, such as 192.168.0.2. For the dynamic IP address,
you need to set the PC as a DHCP client, and then restart or renew the network
settings. The DHCP server embedded in the router is enabled by default so the PC
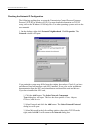
will then be assigned an IP address and related settings by the router. The following
examples are for a Microsoft Windows 95/98 machine set to use a dynamic IP
address. For other operating systems, please refer to the OS user manuals.
13