25
USING THE MENU FUNCTIONS
1
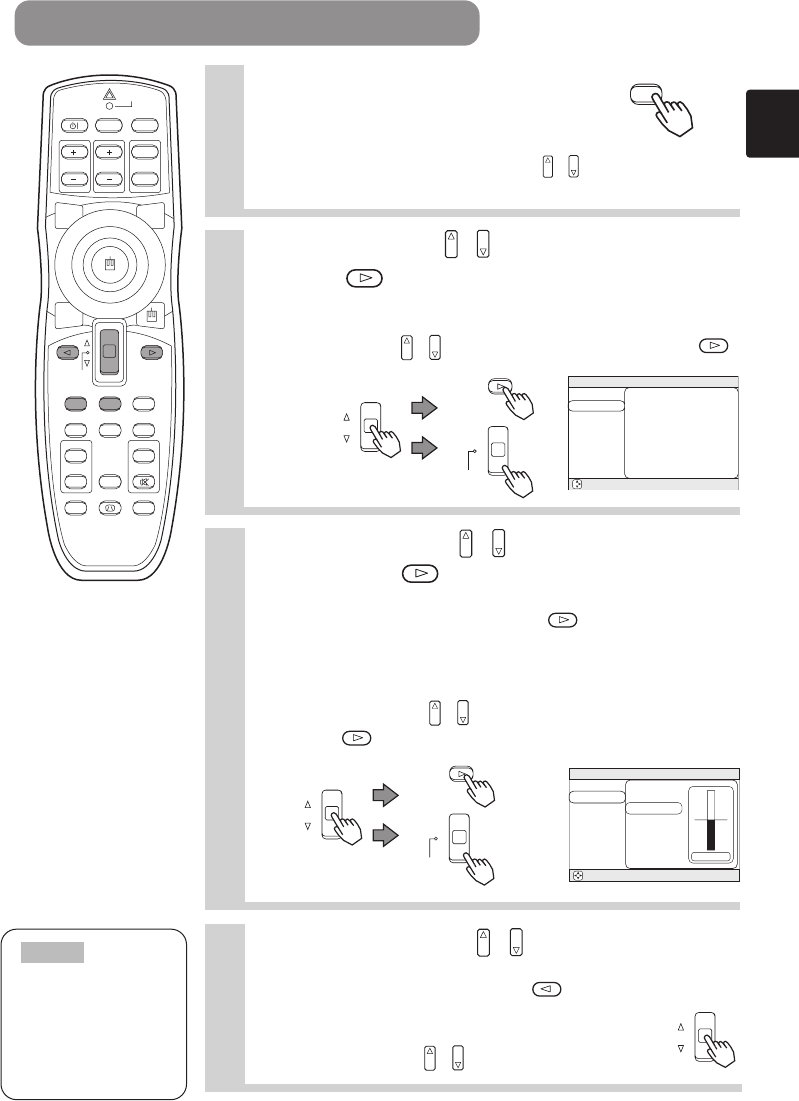
Press the MENU button
The menu display appears on the screen. The projector
has the following menus: MAIN, PICTURE-1, PICTURE-2,
INPUT, AUTO, SCREEN, and OPTION, WIRELESS. When
you select a menu name using the lever switch / , the
current settings of items that can be manipulated from that menu are displayed.
2
Use the lever switch / to select a menu, then
press the or ENTER button
The display of the selected menu appears.
[ex. Adjusting SHARPNESS]
Use the lever switch / to select PICTURE-1, then press the
or ENTER button.
: SELECT
MENU
MAIN
PICTURE-1
PICTURE-2
INPUT
AUTO
SCREEN
OPTION
WIRELESS
COLOR BAL R
COLOR BAL B
SHARPNESS
COLOR
TINT
–1
+1
–1
+1
–1
3
Use the lever switch / to select SHARPNESS,
then press the or ENTER button
The operation display of the selected item appears. To
adjust a numerical value, press the or ENTER button
again to switch to the single menu (small display showing
only the operation display area).
[ex. Adjusting SHARPNESS]
Use the lever switch
/
to select SHARPNESS, then
press the or ENTER button.
4
Use the lever switch
/
to adjust the level
Press the MENU button to hide the menu and finish your
operation. Alternatively, press the or ESC button to
return to the previous display.
[ex. Adjusting SHARPNESS]
Use the lever switch
/
to adjust the sharpness.
COLOR BAL R
COLOR BAL B
SHARPNESS
COLOR
TINT
0
MENU
: SELECT
MAIN
PICTURE-1
PICTURE-2
INPUT
AUTO
SCREEN
OPTION
WIRELESS
STANDBY/ON
VIDEO
UP
DOWN
BLANK
ASPECT
PUSH
LASER
INDICATOR
LASER
RGB
FOCUS
ENTER
ON
OFF
ESC MENU RESET
POSITION
MAGNIFY VOLUME
MUTE
WIRELESS KEYSTONE
FREEZE
ONE TOUCH
AUTO
PinP
ZOOM
PA GE
MENU
PUSH
ENTER
PUSH
ENTER
•
For details about menu
operations, see the
separate "MULTI
FUNCTIONAL
SETTINGS" (Vol. 2).
NOTE


