DX-EF101 USB External Floppy Disk Drive
Lecteur de disquettes externe USB DX-EF101
Unidad externa de disquete USB DX-EF101
Quick Setup Guide I Guide d’installation rapide I Guía de instalación rápida
General description
The USB external floppy disk drive is a portable and slim drive for use with
computers that have a USB port and an operating system that supports USB.
Features
• Plug-and-play compatibility
• Reads and writes high-density 3.5-inch floppy disks
• No external AC power adapter required (self-powered via USB)
• Supports iMac, iBook, G3, G4, and IBM PC-compatible computers
• USB transfer rate of 12 Mb/sec (maximum)
Package contents
• Dynex DX-EF101 USB external floppy disk drive
• Quick Setup Guide
System requirements
PC or Macintosh
• Pentium 133 MHz or faster
• One available USB port
• Windows 2000 SP4, Windows XP, Windows Vista, Windows 7 or Mac OS X
10.2.0 or higher
Installing in Windows
1 Start the computer, then connect the USB cable to an available USB port
on the computer.
2 After Windows detects the attached drive, a “Found New Hardware”
message appears on the Windows taskbar, then Windows automatically
installs the drivers.
3 Click Start, then click My Computer or Computer. A new drive icon
appears for the floppy drive.
Ejecting the disk
Make sure the activity indicator is not on, then press the eject button. The
floppy disk can now be safely removed.
Installing in Mac OS
1 Start the computer, then connect the USB cable to an available USB port
on the computer.
2 Insert a floppy disk into the floppy drive. A floppy disk icon appears on the
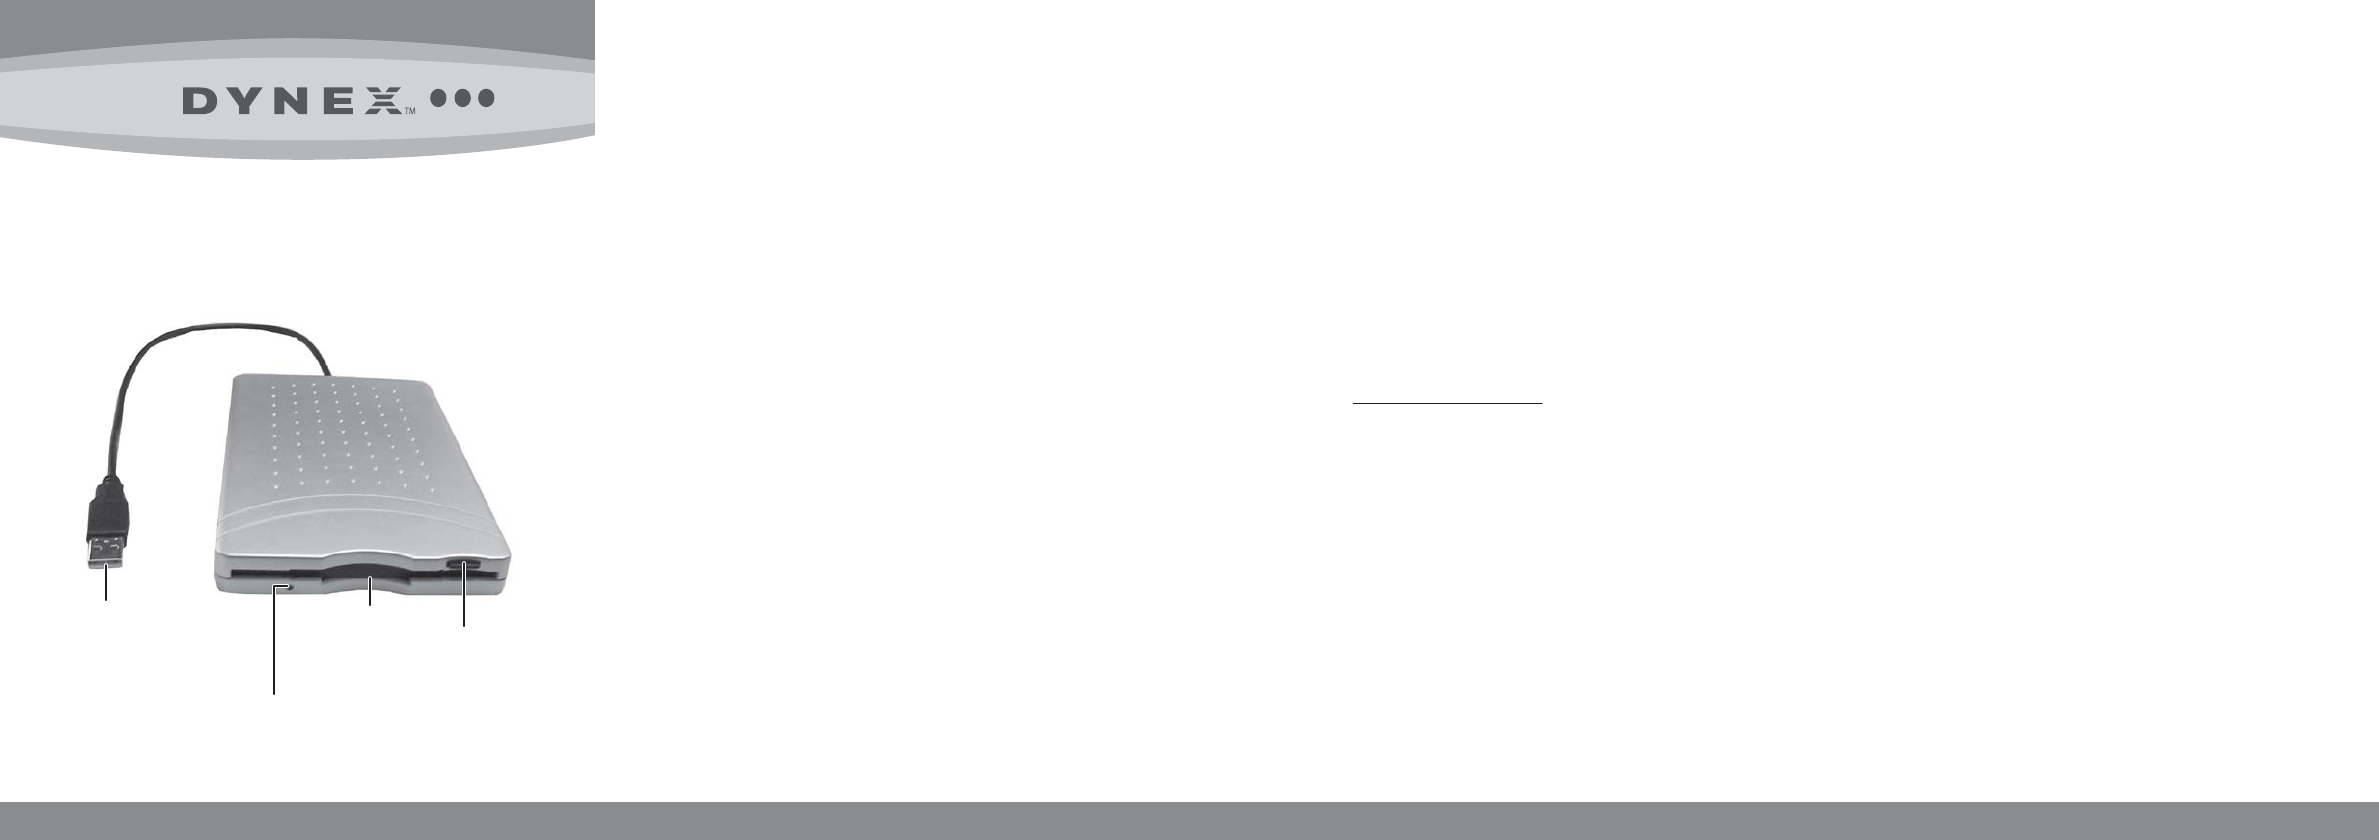
LED indicator
Témoin à DEL
Indicador LED
USB A type plug
Connecteur USB de type A
Conector USB tipo A
Floppy disk drive
Lecteur de disquettes
Unidad de disquete
Eject button
Touche éjecter
Botón de
expulsión
desktop. If the disk is not yet formatted for use, a message appears
indicating that the disk needs to be initialized before using it. (Messages
may vary slightly between different Mac OS systems.)
3 Click Initialize or Launch Disk Utility. The Disk Utility program opens.
4 Click to select the floppy drive, click Erase, select the desired volume
format, then edit the disk name.
5 Click to confirm that the disk (volume) should be erased. When the
process completes, the floppy disk is ready for use.
Ejecting the disk
Make sure the activity indicator is not on, then click and drag the floppy disk
icon to the trash can icon. The floppy disk can now be safely removed.
Caution: Remove the disk only as outlined above. If the disk is removed any
other way, the operating system may become unstable, and the contents of
the disk may become corrupt.
For more information
For troubleshooting, specifications, legal notices, warranty, and
instructions for installing the drive in other operating systems, see your
online User Guide at www.dynexproducts.com.
For important safety instructions, see your online User Guide.
© 2009 Best Buy Enterprise Services, Inc. All rights reserved. DYNEX is a trademark of
Best Buy Enterprise Services, Inc. Registered in some countries. All other products and
brand names are trademarks of their respective owners.
Description générale
Le lecteur de disquettes externe USB portatif et ultraplat est destiné à être
utilisé avec les ordinateurs qui ont un port USB et un système d’exploitation
compatible USB.
Caractéristiques
• Technologie prêt à l’emploi
• Lecture et écriture de disquettes de 3,5 po haute densité
• Aucun adaptateur d’alimentation c.a. n’est nécessaire (autoalimenté par
la connexion USB)
• Compatible avec les ordinateurs iMac, iBook, G3, G4 et PC IBM
• Débit de transfert USB de 12 Mbit/s (maximum)
Contenu du carton
• Lecteur de disquettes externe USB DX-EF101 de Dynex
• Guide d’installation rapide
Configuration système requise
PC ou Macintosh
• Processeur Pentium 133 MHz ou supérieur
• Un port USB disponible
• Windows 2000 SP4, Windows XP, Windows Vista, Windows 7 ou Mac OS X
10.2.0 ou supérieur
Installation sous Windows
1 Démarrer l’ordinateur, puis connecter le câble USB à un port USB
disponible de l’ordinateur.
2 Quand Windows détecte le lecteur connecté, le message « Found New
Hardware » (Nouveau matériel détecté) s’affiche dans la barre des tâches
Windows, puis Windows installe automatiquement les pilotes.
3 Cliquer sur Start (Démarrer), puis sur My Computer (Poste de travail) ou
Computer (Ordinateur). Une nouvelle icône de lecteur s’affiche pour le
lecteur de disquette.
Éjection de la disquette
Vérifier que le témoin d’activité n’est pas allumé, puis appuyer sur la touche
éjecter. La disquette peut désormais être retirée en toute sécurité.
Installation sous Mac OS
1 Démarrer l’ordinateur, puis connecter le câble USB à un port USB disponible
de l’ordinateur.
2 Insérer une disquette dans le lecteur. Une nouvelle icône de disquette
s’affiche sur le bureau. Si la disquette n’est pas encore formatée pour être
utilisée, un message s’affiche pour indiquer qu’elle doit d’abord être
initialisée avant toute utilisation. Les messages peuvent varier légèrement
en fonction des versions du système d’exploitation Mac.
3 Cliquer sur Initialize (Initialiser) ou Launch Disk Utility (Exécuter l’utilitaire
disque). L’utilitaire de disque (Disk Utility) s’ouvre.
4 Cliquer pour sélectionner le lecteur de disquettes, cliquer sur Erase (Effacer),
sélectionner le format souhaité de volume, puis modifier le nom de la disquette.
5 Cliquer pour confirmer que la disquette (volume) peut être effacée. Quand
le processus est terminé, la disquette est prête à être utilisée.