


Tear Off
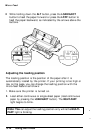
3. Print on continuous paper loaded on the front or rear tractor
(as described in Chapter 2). When you finish printing, the
printer advances the final printed page to the tear-off position.
4. Tear off all printed pages.
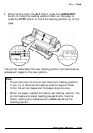
Note: If the perforation does not meet the tear-off edge, you
can adjust the tear-off position using the micro-feed feature as
described later in this chapter.
5. When you resume printing, the printer automatically feeds the
paper back to the loading position and begins printing.
You can leave tear-off mode turned on (DIP switch 2-3 on) even
when you are using single sheets or the pull tractor because
tear-off mode is disabled when you set the paper-release lever to
the single-sheet or pull-tractor position.
Using the TEAR OFF button
Whether or not the printer is in tear-off mode, you can use the
TEAR OFF button to advance continuous paper to the tear-off
position following the steps below:
1.
Make sure printing has finished. Press the TEAR OFF button.
The printer advances the paper to the tear-off edge and the
TEAR OFF
light comes on.
2. Tear off all printed pages.
Note: If the perforation does not meet the tear-off edge, you
can adjust the tear-off position using the micro-feed feature as
described in the next section of this chapter.
3. When you resume printing, the printer automatically feeds the
paper back to the loading position and begins printing. (You
can also manually feed the paper back to the loading position
by pressing the
TEAR OFF
button again.)
Using
the
Printer
3-17