Turn over
Start Here
EPSON Perfection 4870 Pro
Unpack Your Scanner
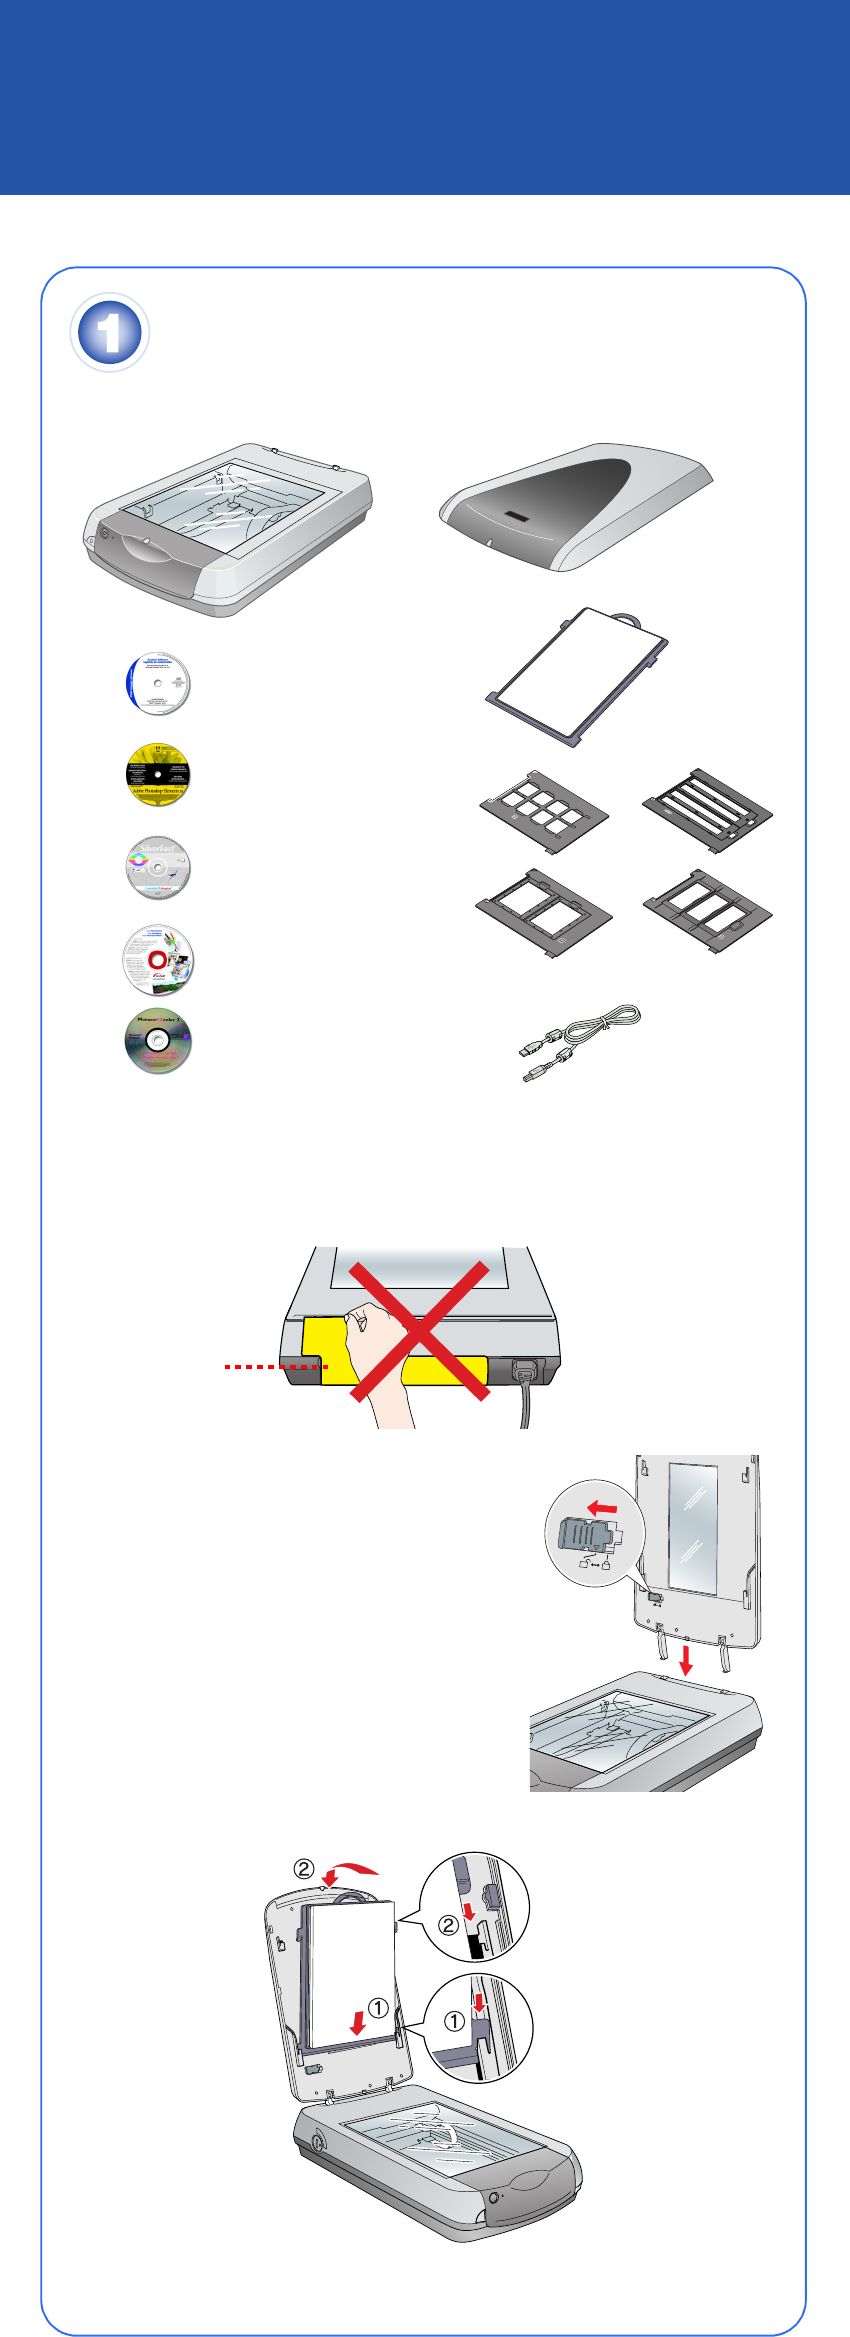
1 Make sure you have all the parts shown below for your EPSON
®
scanner:
Note: If you’ll be connecting your scanner using IEEE 1394 (FireWire
®
or iLink
™
),
you’ll need to purchase an IEEE 1394 cable (not included).
2 Remove all the packing tape, but leave the large stickers in place until you
are instructed to remove them.
3 Insert the hinges on the cover into the square
holes at the back of the scanner.
4 Remove the sticker, then slide the
transportation lock to the unlocked position.
5 Attach the document mat. Hold the top of the
document mat and slide it down gently along
the document cover. Make sure the tabs on
the bottom and sides of the document mat fit
in the slots on the document cover.
6 Close the cover.
Install the Software
Wait! You must install your software before connecting the scanner to
your computer. The installation process may take several minutes. Be sure
to close all open programs and turn off any virus protection programs.
The software works with Windows
®
98, Me, 2000, and XP, and Macintosh
®
OS 8.6
to 9.x and OS X 10.2.x. Follow the steps below (for Windows), or the steps in the
next column (for Macintosh).
Note: If you don’t already have Adobe Photoshop or Photoshop Elements on
your computer, install Photoshop Elements from the CD-ROM included with
your scanner.
Windows
First you’ll install Adobe Photoshop Elements, then your scanner software.
Photoshop Elements
1
Insert the Adobe Photoshop Elements CD-ROM in the CD-ROM or DVD
drive. The installer starts automatically. At the first screen, click Next.
2 Make sure US English is selected and click Next.
3 Follow the on-screen instructions to begin installation and accept the
software license conditions.
4 When you see this screen, click the Adobe Photoshop Elements button.
5 Follow the on-screen instructions. When you’re asked for a serial number,
enter the number printed on the sticker attached to the CD-ROM sleeve.
If you don’t have Acrobat Reader,
®
eject the CD-ROM and repeat
steps 1 to 3. Then select Adobe Acrobat Reader to install it.
Remove the CD-ROM and install the scanner software as described below.
Scanner Software
1
Insert the scanner software CD-ROM in the CD-ROM or DVD drive. The
installer starts automatically. If it doesn’t start, do the following:
• Windows XP: Click Start, click My Computer, then double-click the
EPSON CD-ROM icon.
• Windows 98, Me, and 2000: Double-click My Computer, then
double-click the EPSON CD-ROM icon.
2 At the language selection screen, select your preferred language.
3 When you see the antivirus software message, click Continue.
4 Read the license agreement, then click Agree to continue.
5 At the Software Installation screen, click Install. The software installs
automatically.
6 At the end of the installation, click Exit.
7 Register your scanner when prompted, then remove the CD-ROM.
Install LaserSoft SilverFast, MonacoEZcolor, and the ArcSoft Software Suite,
following the instructions included with each program.
Then follow the instructions in section 3 to connect the scanner.
Macintosh
Note: EPSON Scan does not support the UNIX
®
File System (UFS) for
Mac
®
OS X. You must install the software on a disk or in a partition that
does not have UFS.
First you’ll install Adobe Photoshop Elements, then your scanner software.
Photoshop Elements
1
Insert the Adobe Photoshop Elements CD-ROM in the CD-ROM or
DVD drive.
2 Double-click the or CD-ROM icon and double-click the
English folder.
3 Double-click the Install Photoshop Elements icon.
4 Follow the on-screen instructions to begin installation, and accept the
software license conditions. In Mac OS X, enter your administrator name and
password, then click OK.
5 When you’re asked for a serial number, enter the number printed on the
sticker attached to the CD-ROM sleeve.
6 When you see this screen, click the Install button.
7 Follow the on-screen instructions to install the software.
8 When you’re finished, click Quit.
9 If you don’t have Acrobat Reader, you can install it from the CD-ROM.
Open the Adobe Acrobat Reader folder. Then double-click the Reader
Installer icon to install it.
Remove the CD-ROM and continue with the following instructions to install
the scanner software.
Scanner Software
1
Insert the scanner software CD-ROM in the CD-ROM or DVD drive.
Double-click the EPSON CD-ROM icon, if necessary.
2 Double-click the EPSON icon.
3 At the language selection screen, select your preferred language.
4 When you see the antivirus software message, click Continue.
5 Read the license agreement, then click Agree to continue.
6 At the Software Installation screen, click Install. Enter your administrator
name and password, if necessary.
Note: If you’re installing on Macintosh OS 8.6 to 9.x, you may see a prompt
to update your Carbon Library. After the CarbonLib installation is complete
and you’ve restarted your system, double-click the EPSON icon, then
follow the steps above to continue the installation.
7 Follow the on-screen instructions to install the software. If you are prompted
to restart, click Quit.
8 At the end of the installation, click Exit.
9 Register your scanner when prompted, then remove the CD-ROM.
Install LaserSoft SilverFast, MonacoEZcolor, and the ArcSoft Software Suite,
following the instructions included with each program.
Then follow the instructions in section 3 to connect the scanner.
Connect the Scanner
After your software is installed, it’s time to connect your scanner.
1 Remove the sticker from the transportation lock. Use a coin to turn the lock
clockwise one-quarter turn to unlock the scanner carriage.
2 Remove the sticker from the back of the scanner.
3 Connect the cable for the built-in transparency unit (scanner cover). Make
sure the notch and arrow on the connector are facing up.
4 Connect either the USB cable that came with the scanner or an optional
IEEE 1394 (FireWire) cable. Do not connect both cables.
If you’re using USB
Plug the square end of the USB cable into the scanner’s USB port. Then
plug the flat end into any available USB port on your computer or hub.
Note: Your scanner may not work correctly if you use a USB cable other
than the one supplied by EPSON or if you connect your scanner through
more than one hub.
®
CD-ROM with EPSON Scan
driver, software, and
electronic manuals
USB cable
Adobe
®
Photoshop
®
Elements 2.0 CD-ROM
Film holders
LaserSoft
®
SilverFast
®
CD-ROM
MonacoEZcolor™
CD-ROM
ArcSoft
®
Software Suite
CD-ROM
Scanner
Scanner cover/
transparency unit
Document mat
IMPORTANT!
Leave the sticker
in place until you
are instructed to
remove it
Click Adobe Photoshop
Elements
Click Install
Click Install
Remove
sticker
4047109-00 XXX


