41276070 Rev.0
1-F K
Para ver información detallada y las recomendaciones de seguridad, consulte el Manual del usuario (instalado junto con el software).
Para obter informações detalhadas e recomendações de segurança, consulte o Manual do usuário (instalado com o software).
For detailed information and safety recommendations, see the User's Guide (installed with the software).
Pour des renseignements détaillés et les recommandations concernant la sécurité, consultez le Guide de l'utilisateur (installé avec le logiciel).
1
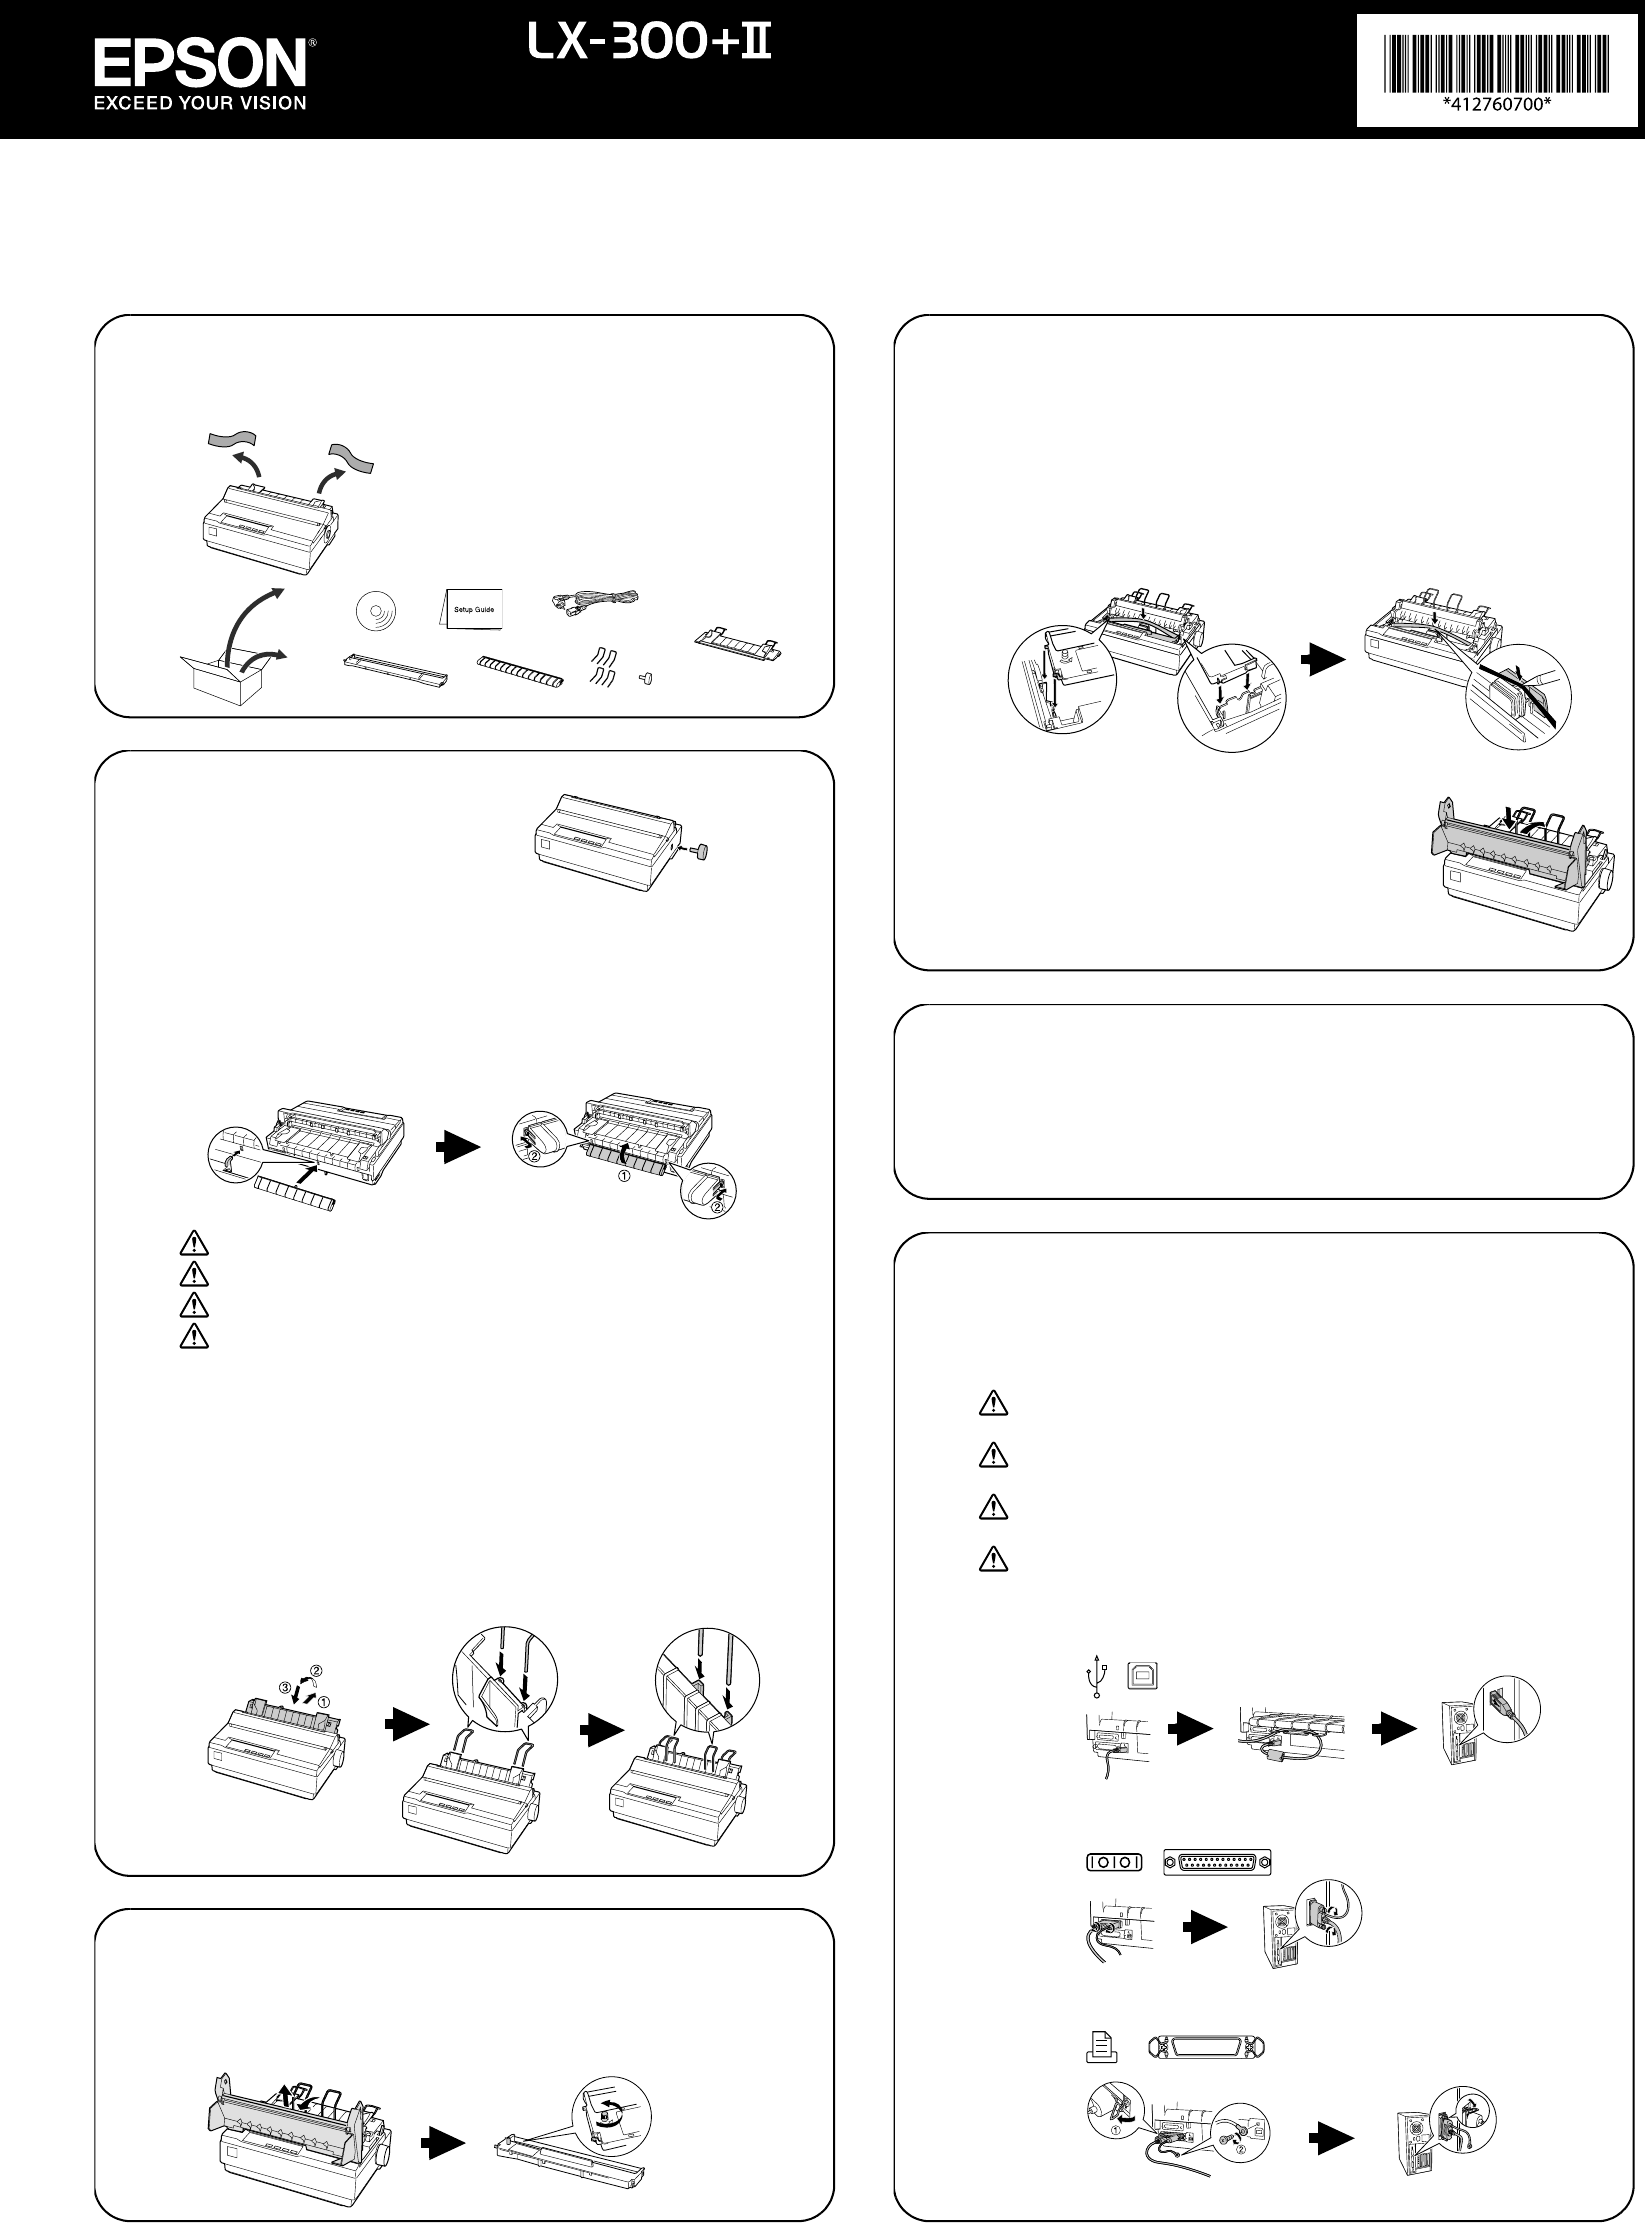
Quite toda la cinta y los materiales de empaque. En algunos modelos, no se suministra
un cable por separado.
Remova cuidadosamente todos os materiais de proteção
da impressora. Alguns modelos não vêm com um cabo
separado.
Remove all tape and packing materials. Separate cord not
provided for some models.
Enlevez tous les rubans et matériaux d'emballage. Il n’y a
pas de cordon séparé dans le cas de certains modèles.
Inserte la perilla de papel.
Encaixe o botão giratório.
Insert the paper knob.
Insérez le bouton du papier.
2
Acople el soporte del cable USB a la parte trasera de la impresora; después levántelp.
Encaixe o suporte para o cabo USB na parte traseira da impressora, conforme
indicado e, em seguida, levante-o.
Attach USB cable holder to back of the printer; then lift it up.
Fixez le porte-câble USB à l’arrière de l’imprimante, puis relevez-le.
PRECAUCIÓN: El soporte no es una manija. No lo use para mover la impresora.
CUIDADO: O suporte não é uma alça. Não o use para mover a impressora.
CAUTION: The holder is not a handle. Do not use it to move printer.
MISE EN GARDE : Le porte-câble n'est pas une poignée. Ne vous en servez pas
pour déplacer l'imprimante.
Acople la guía de papel, levántela y trábela en su lugar. Después, acople los soportes del
papel.
Encaixe a guia do papel, alinhando os entalhes em cada lado com as guias da
impressora. Levante a guia do papel e empurre-a um pouco para dentro da impressora
para travá-la no lugar. Encaixe os suportes para papel.
Attach paper guide, lift it up, and lock in place. Then, attach paper supports.
Montez le guide-papier, relevez-le et verrouillez-le en position. Montez ensuite les
supports à papier.
Quite la cubierta de la impresora. Gire el botoncillo en la cinta.
Retire a tampa da impressora. Gire o botão da fita.
Remove the printer cover. Turn knob on the ribbon.
Enlevez le capot de l’imprimante. Tournez le bouton sur le ruban.
3
Vuelva a colocar la cubierta de la impresora y ciérrela.
Recoloque a tampa da impressora e feche-a.
Replace the printer cover and close it.
Reposez le capot de l’imprimante et fermez-le.
Inserte el cartucho de cinta hasta que encaje en su lugar. Guíe la cinta entre el cabezal
de impresión y la guía de la cinta.
Insira o cartucho de fita até que um clique indique que está posicionado. Passe a fita
entre cabeçote de impressão e a guia da fita.
Insert ribbon cartridge until it clicks in place. Guide ribbon between print head and ribbon
guide.
Insérez la cartouche-ruban jusqu’à ce qu’elle s’enclenche en position. Acheminez le
ruban entre la tête d’impression et le guide-ruban.
Conecte el cable de alimetnación a la impresora y a una toma de corriente eléctrica con
puesta a tierra.
Conecte o cabo de alimentação à impressoa e a uma tomada elétrica aterrada.
Connect power cord to printer and to a grounded electrical outlet.
Branchez le cordon d’alimentation à l’imprimante et à une prise électrique mise à la terre.
4
Conecte la impresora a una computadora.
Conecte a impressora ao computador.
Connect printer to computer.
Raccordez l’imprimante à l’ordinateur.
PRECAUCIÓN: Los conectores del cable de interfaz sólo tienen una orientación
correcta. Cerciórese de que la orientación al conector sea la correcta.
CUIDADO: Os conectores do cabo de interface só têm uma orientação correta.
Certifique-se de que o conector está no sentido correto.
CAUTION: The interface cable connectors have only one correct orientation. Make
sure the orientation of the connector is correct before inserting it into the appropriate port.
MISE EN GARDE : Les connecteurs du câble d'interface ne peuvent être orientés
que d’une seule manière. Vérifiez que le connecteur est correctement orienté.
5
USB
RS-232C
(serial)
(série)
IEEE1284
(parallel)
(parallèle)
Guía de instalación
Guia de configuração
Setup Guide
Guide d'installation
Declaration of Conformity
According to 47CFR, Part 2 and 15 for Class B Personal Computers and Peripherals; and/or CPU
Boards and Power Supplies used with Class B Personal Computers:
We: Epson America, Inc.
Located at MS 3-13
3840 Kilroy Airport Way
Long Beach, CA 90806-2469
Telephone: (562) 981-3840
Declare under sole responsibility that the product identified herein, complies with 47CFR Part 2 and 15
of the FCC rules as a Class B digital device. Each product marketed is identical to the representative
unit tested and found to be compliant with the standards. Records maintained continue to reflect the
equipment being produced can be expected to be within the variation accepted, due to quantity
production and testing on a statistical basis as required by 47CFR §2.909. Operation is subject to the
following two conditions: (1) this device may not cause harmful interference, and (2) this device must
accept any interference received, including interference that may cause undesired operation.
Trade Name: Epson
Type of Product: Dot Matrix Printer
Model: P170B
FCC Compliance Statement for United States Users
This equipment has been tested and found to comply with the limits for a Class B digital device,
pursuant to Part 15 of the FCC Rules. These limits are designed to provide reasonable protection
against harmful interference in a residential installation. This equipment generates, uses, and can
radiate radio frequency energy and, if not installed and used in accordance with the instructions, may
cause harmful interference to radio or television reception. However, there is no guarantee that
interference will not occur in a particular installation. If this equipment does cause interference to
radio and television reception, which can be determined by turning the equipment off and on, the
user is encouraged to try to correct the interference by one or more of the following measures.
• Reorient or relocate the receiving antenna.
• Increase the separation between the equipment and receiver.
• Connect the equipment into an outlet on a circuit different from that to which the receiver is
connected.
• Consult the dealer or an experienced radio/TV technician for help.
WARNING
The connection of a non-shielded equipment interface cable to this equipment will invalidate the FCC
Certification of this device and may cause interference levels which exceed the limits established by
the FCC for this equipment. It is the responsibility of the user to obtain and use a shielded equipment
interface cable with this device. If this equipment has more than one interface connector, do not leave
cables connected to unused interfaces.
Changes or modifications not expressly approved by the manufacturer could void the user’s authority
to operate the equipment.
For Canadian users
This Class B digital apparatus meets all requirements of the Canadian Interface Causing Equipment
Regulations.
Cet appareil numérique de la classe B respecte toutes les exigences du Règlement sur le matériel
brouileur du Canada.
Epson America, Inc., Limited Warranty
This product is covered by a limited warranty. Please visit http://files.support.epson.com/pdf/
sdwarranty/sdwarranty.pdf to see its terms.
No part of this publication may be reproduced, stored in a retrieval system, or transmitted in any form or by any
means, electronic, mechanical, photocopying, recording, or otherwise, without the prior written permission of Seiko
Epson Corporation. No patent liability is assumed with respect to use of the information contained herein. Neither is
any liability assumed for damages resulting from the use of the information contained herein. Neither Seiko Epson
Corporation nor its affiliates shall be liable to the purchaser of this product or third parties for damages, losses,
costs, or expenses incurred by the purchaser or third parties as a result of accident, misuse, or abuse of this product
or unauthorized modifications, repairs, or alterations to this product, or (excluding the U.S.) failure to strictly comply
with Seiko Epson Corporation’s operating and maintenance instructions. Seiko Epson Corporation and its affiliates
shall not be liable against any damages or problems arising from the use of any options or of any consumable
products other than those designated as Original Epson Products or Epson Approved Products by Seiko Epson
Corporation.
Microsoft, Windows, and Windows NT are registered trademarks of Microsoft Corporation in the United States and/or
other countries.
EPSON is a registered trademark of Seiko Epson Corporation in the U.S. and other countries.
Copyright 2014 Seiko Epson Corporation. All rights reserved. CPD-41399
Printed in XXXXXX
Apague la impresora. Instale el software de la impresora que se encuentra en el
CD-ROM y siga las instrucciones en la pantalla. Después, encienda la impresora.
Desligue a impressora. Instale o software da impressora, que se encontra no CD-ROM, e
siga as instruções na tela. Em seguida, ligue a impressora.
Turn printer off. Install printer software on CD-ROM, and follow onscreen instructions.
Then, turn printer on.
Éteignez l’imprimante. Installez le logiciel de l’imprimante (CD-ROM) et suivez les
consignes qui s’affichent à l’écran. Allumez ensuite l’imprimante.
Nota: ❏ Si aparece otro diálogo utilitario de configuración de una impresora
Epson, haga un clic en Retry (Volver a Tratar) y configure el puerto en
forma manual.
❏ La instalación del software de impresora para Windows XP, 2000,
o Windows NT 4.0 puede requerir privilegios de administrador.
Si tienen problemas, pregúntele a su administrador.
❏ Se puede necesitar el CD de Windows al instalar el software de la
impresora. Si es así, siga las instrucciones en pantalla e inserte el CD
de Windows.
Observação: ❏ Se aparecer um outro diálogo de utilitário de configuração de
impressora Epson, clique em Retry (Tentar novamente) e configure a
porta manualmente.
❏ A instalação do software da impressora com o Windows XP, 2000, ou
Windows NT 4.0 pode exigir privilégios de administrador. Se tiver
algum problema, fale com o seu administrador.
❏ O CD do Windows pode ser necessário quando você instalar o
software da impressora. Se o sistema pedir, siga as instruções na
tela e insira o CD do Windows.
Note: ❏ If another Epson printer setup utility dialog appears, click Retry, and
configure the port manually.
❏ Installing printer software for Windows XP, 2000, or Windows NT 4.0
may require administrator privileges. If you have problems, ask your
administrator.
❏ The Windows CD may be required when you install printer software.
If prompted, follow on-screen instructions and insert the
Windows CD.
Remarque : ❏ Si la boîte de dialogue qui s'affiche concerne l'utilitaire d'installation
d'une autre imprimante Epson, cliquez sur Retry (Réessayer) et
configurez le port manuellement.
❏ L'installation du logiciel d'imprimante sous Windows XP, 2000 ou
Windows NT 4.0 peut nécessiter des privilèges d'administrateur. En
cas de problèmes, adressez-vous à votre administrateur.
❏ Le CD de Windows peut être nécessaire lors de l’installation du
logiciel de l’imprimante. Si cela vous est demandé, suivez les
consignes données à l’écran et insérez le CD de Windows.
6
Empuje la palanca de liberación de papel hacia atrás. Deslice la guía del borde
izquierdo hasta la marca de la guía. Ajuste la guía del borde derecho.
Empurre a alavanca de liberação de papel para trás. Desliza a guia de borda esquerda
até a marca de guia. Ajuste a guia de borda direita.
Push paper release lever back. Slide the left edge guide to guide mark. Adjust the right
edge guide.
Poussez la manette de dégagement du papier vers l’arrière. Faites glisser le guide de
bord gauche jusqu’au repère de guidage. Réglez le guide de bord droit.
7
8
Apague la impresora; quite la cubierta de la impresora y la guía del papel. Tire de la
palanca de liberación de papel hacia delante y destrabe los dientes del tractor.
Desligue a impressora, retire a tampa da impressora e a guia do papel. Puxe a alavanca
de liberação de papel para a frente e destrave as rodas dentadas de tração.
Turn off printer; remove printer cover and paper guide. Pull paper release lever forward,
and unlock tractor sprockets.
Éteignez l'imprimante, puis enlevez le capot de l'imprimante et le guide-papier. Tirez
la manette de dégagement du papier vers l’avant et déverrouillez les pignons
d'entraînement.
Deslice la rueda dentada a la marca 0 y trábela.
Deslize a roda dentada para a marca de 0 e trave-a.
Slide left sprocket to 0 mark and lock it.
Faites glisser le pignon gauche jusqu’au repère 0 et verrouillez-le.
Cierre las cubiertas de las ruedas dentadas. Deslice la rueda dentada derecha y trábela
en su lugar. Vuelva a colocar la guía de papel y la cubierta de la impresora.
Feche as coberturas das rodas dentadas. Deslize a roda dentada da direita e trave-a.
Recoloque a guia do papel e a tampa da impressora.
Close sprocket covers. Slide right sprocket and lock in place. Replace paper guide and
printer cover.
Fermez les couvercles de pignon. Faites glisser le pignon droit et verrouillez-le en
position. Reposez le guide-papier et le capot de l’imprimante.
Para más información, consulte el Manual del usuario instalado con el CD o la página
Web: global.latin.epson.com (seleccione Soporte y seleccione la impresora).
Para obter mais informações, consulte o Manual do usuário, instalado a partir do CD ou
do web site: epson.com (selecione o país, selecione Drivers & Suporte, selecione a
impressora).
For more information, see User’s Guide installed from CD or Web site: epson.com (select
country, select Drivers & Support, select printer).
Pour plus de renseignements, reportez-vous au guide de l’utilisateur installé à partir du
CD ou du site internet : epson.com (sélectionnez le pays, sélectionnez Drivers & Support
[Pilotes et assistance], puis sélectionnez l’imprimante) (site Web présenté en anglais
seulement).
9
41276070_b0_00.fm Page 1 Wednesday, May 14, 2014 3:12 PM


