


Summit WM20 Controller Installation Guide
© 2008 Extreme Networks, Inc. All Rights Reserved. Part number: 120400-00 Rev 01
Getting started
These installation instructions provide a general outline to
quickly install and configure the Summit WM Controller WM20.
For more information, see the documentation CD.
Unpack the controller:
1 Lift the controller, in its protective foam casing, straight up
and out of the carton.
2 Lay the controller on a flat surface and slide off the foam
casing.
3 Confirm that your carton contains the following contents.
Carton contents:
● One controller
● Two mounting brackets
● Six M3x6 lens head machine screws
● Four self-adhesive rubber feet
● One crossover RJ45 Ethernet cable (for installation)
● A printed copy of the installation instructions
● A documentation CD that includes the Summit WM20 Getting
Started Guide and the Summit WM20 User Guide.
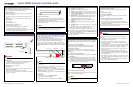
Step 1 – Mount
WARNING!
Do not obstruct the ventilation grills of the Summit WM Controller.
Rack mounting:
1 Attach the mounting brackets to the Summit WM Controller
by inserting the bracket tabs into the tab slots on the
controller, and then tightening the screws.
2 Attach the brackets to the rack.
Table mounting
1 Glue the four rubber feet to the stamped positions on the
bottom of the controller.
2 Place the Summit WM Controller on the table.
Ensure at least 6 cm of clearance on all sides of the controller
for proper ventilation.
Bracket Tab
Tab Slot
Step 2 – Connect to a power supply
● Connect the power cord to the controller.
To power off the controller:
● Use the Command Line Interface (CLI) commands or the
Summit WM Graphical User Interface (GUI). This operation
halts the operation of the controller software.
● To completely power off the controller, move the main power
switch to ‘Off’ position.
NOTE
Do not power off the controller using the power switch. Instead, use the
Command Line Interface (CLI) commands, or the Summit WM GUI.
Failure to do so may corrupt the data in the hard disk drive.
Step 3 – Configure Management interface
This step is optional. You can retain the default IP address of the
controller Management port if you do not intend to connect the
controller to your enterprise network.
Before you connect the controller to the enterprise network,
change the IP address of the controller Management port from its
factory default to the IP address suitable for the enterprise
network. To access the controller, use a laptop computer with a
browser. Connect the crossover Ethernet cable between the laptop
and Management Ethernet port of the controller. Follow the steps
below.
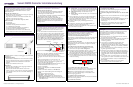
NOTE
The USB Server Port as depicted in the above illustration is not used in
the current release.
1 Statically assign an unused IP address in the 192.168.10.0/24
subnet for the Ethernet port of the laptop.
2 Launch your Web browser, and in the browser address bar,
type
https://192.168.10.1:5825. This launches the Summit
WM GUI. The logon screen appears.
3 In the User Name box, type admin, and in the Password box,
type abc123.
4 Click Login.
5 From the main menu, click Summit Switch.
6 In the left pane, click IP Addresses.
7 In the Management Port Settings section, click Modify.
Management
LAN Ports
USB Control
LEDs
Power Switch
USB Server
Configure Management interface
8 Type the following information:
● Hostname – The name of the controller
● Domain – The IP domain name of the enterprise network
● Management IP Address – The new IP address for the
controller’s Management port. Change this as appropriate
for the enterprise network.
● Subnet mask – The appropriate subnet mask for the IP
address to separate the network portion from the host
portion of the address (typically 255.255.255.0)
● Management Gateway – The default gateway of the
network
● Primary DNS – The primary DNS server used by the
network
● Secondary DNS – The secondary DNS server used by the
network
9 To save your changes and disconnect the Web connection
between the laptop and the controller, click Ok.
The IP addresses are now set to the network you defined.
10 Disconnect your laptop from the controller Management port.
11 Connect the controller Management port (Management port)
to the enterprise Ethernet LAN.
12 Login on the Summit WM GUI. The system is visible to the
enterprise network.
Step 4 – Configure your system
These eight steps provide a general outline on how to configure
the controller. For detailed information, see the documentation
CD.
1 – Before you begin configuration:
Research the type of WLAN deployment that is required. For
example, SSIDs, security requirements, and filter policies.
2 – Prepare the network:
Ensure that the external servers, such as DHCP servers and
RADIUS servers (if applicable) are available and appropriately
configured.
3 – Configure the physical port IP:
● To manage the controller through the interface, enable Allow
management.
● Configure the default IP address to be the relevant subnet
point of attachment to the existing network, and setup the
routing protocol and table. The default IP address is 10.0.#.1.
● To configure a physical port to attach to a VLAN, define the
VLAN as part of the IP address assignment.
4 – Select the country and time zone:
Login on the Summit WM GUI and select the country and time
zone, and then restart the controller.
NOTE
The controller’s clock settings are lost if the controller is powered down
for more than 72 hours.
LAN Ports / Physical Ports
Configure your system
5 – Install the controller license:
Install the license and confirm the latest firmware version is
loaded.
6 – Reboot the controller.
7 – Configure the WM-AD:
Research and configure the traffic topologies the network will
support.
8 – Install, register, and assign APs to the WM-AD:
● Confirm the latest firmware version is loaded.
● Deploy APs to their corresponding network locations. If
applicable, configure a default AP template for common radio
and WM-AD assignment.
For information on installing and powering the wireless APs, see
the Summit WM20 Controller Installation Guide.
Safety Information
WARNING!
Warnings identify information that is essential. Ignoring a warning can
adversely affect the operation of your equipment, or may even cause
bodily harm.
● Only authorized Extreme Networks service personnel are
permitted to service the system.
● Ensure that your system is grounded via the IEC320
connector according to your country’s electrical grounding
code requirements.
● Use only original accessories or components approved for the
system. Failure to observe these instructions may damage the
equipment or even violate safety and EMC regulations.
● This device must not be connected to a LAN segment with
outdoor wiring.
● Do not power off the controller using the power button.
Instead, use the Command Line Interface (CLI) commands, or
the Summit WM GUI. Failure to do so may corrupt the data
in the hard disk drive.
● The controller is capable of adjusting to voltages from 110 to
240 volts. Do not operate the controller if the power supply is
beyond this range.
● For system regulatory information, see the Summit WM20
User Guide on the documentation CD.