Maintenance
Access Procedures
4
4-7
4-13. Keyboard Assembly Removal and Installation
The following procedure assumes that the Display Assembly Removal procedure has
already been completed.
1. Remove all output cable connections (including GROUND-to-metal) from the front
panel binding posts. Save all removed hardware.
2. Remove the two hex screws at the front of each handle. Then remove the front
handles.
3. Gently release the eight plastic hook catches, and separate the front panel plastic
from the sheet metal.
4. Remove the output adjustment knob flywheel by taking out its center screw. Hold
the wheel in place by inserting a pencil in one of the flywheel holes and pressing on
one of the plastic standoffs.
5. Remove the nine self-tapping screws connecting the Keyboard assembly to the front
panel plastic.
6. Remove the Keyboard assembly by gently releasing the seven plastic hook catches.
Work from one side of the board to the other. Start at either side by simultaneously
releasing a catch and lifting on the board.
Reverse this procedure to install the Keyboard assembly. When reconnecting the wires to
the binding posts, be sure to include a washer on each side of the ring terminals. Refer to
the nearby decal or see sheet 4 of the Analog Motherboard schematic in Section 8 of this
manual for proper connection of the output cable to the front binding posts.
CAUTION
Do not tighten the nuts that hold the wires to the binding posts
more than 7 in-lb. Force exceeding 7 in-lb can destroy the
binding posts.
4-14. Analog Assembly Removal and Installation
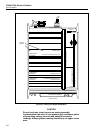
The analog assemblies are installed in the sequence shown in Figure 4-5. Note that each
module cannot be positioned in any other slot and that identifying information on the tab
for each module faces forward. In most cases, the component side of each module also
faces forward. The component side faces to the rear for three modules: Current/High
Resolution Oscillator (A7), Ohms Cal (A9), and High Voltage Control (A14). All
modules except the High Voltage Control pull straight up to disengage from the Digital
Motherboard. For the High Voltage Control module, two Phillips head captive screws at
the outer corners of the High Voltage Transformer must be removed before the module
can be removed.


