


Hardware Description and Installation
EN/LZT 108 6492 R2 - October 2003
5
2.4 Connecting the Hardware
Follow the procedures below to connect related devices.
NOTE! Before you begin, turn the power off for all devices. These
include your computer(s), your LAN hub/switch (if applicable), and
the HM210dp/di.
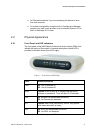
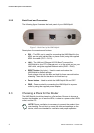
1. Connect to the ADSL Line
Connect one end of the provided ADSL Line cable to the port
labeled DSL on the back panel of the HM210dp/di. Connect the
other end to your ADSL service port (splitter/filter or phone outlet).
2. Connect to a PC or hub/switch:
- to a single PC
Attach one end of the provided Ethernet cable (straight-through) to
the port labeled LAN on the HM210dp/di. Connect the other end to
your PC’s Ethernet port.
- to a hub/switch
Attach one end of a “cross-over” Ethernet cable to a hub/switch and
the other end to the LAN port on the HM210dp/di.
- to a hub/switch’s uplink port
Use a “straight-through” Ethernet cable to connect to the uplink port
and the other end to the LAN port on the HM210dp/di.
3. Connect the Power Supply
Connect the provided Power cable from the Power Supply Adapter
to the PWR socket on the HM210dp/di. Plug the power supply
adapter into a power source (wall outlet or power strip).
4. Turn on the HM210dp/di and power up your systems
Press the Power button on the back panel of the HM210dp/di to
turn on the device.
Turn on and boot up your computer(s) and any LAN devices such
as hubs or switches.