


2
2-15
GFK-1084B Chapter 2 Installing the Ethernet Interface
3.0.0.1 First PLC
3.0.0.2 Second PLC
3.0.0.3 Third PLC
..
..
..
3.0.0.255 Logicmaster TCP or host
On an isolated network, the Subnet Mask, Gateway IP address, and Name Server
IP address can all be 0.0.0.0.
Note
If the isolated network is ever connected to another network, the IP
addresses 3.0.0.1 through 3.0.0.255 must not be used and the Subnet Mask
and Gateway IP address must be assigned by the Network Administrator.
The IP addresses must be assigned so that they are compatible with the
connected network. Refer to Appendix C for more information on
addressing.
See also the section “Determining If an IP Address Has Already Been
Used” in Procedure 4.
Converter: Allows you to account for the power consumption added by a serial
port converter (measured in watts). Choices are 0, 0.500, and 0.600.
AAUI Transceiver: Allows you to account for the power consumption added by
the AAUI Transceiver attached to the Ethernet module (measured in watts). The
valid range is 0.250 to 1.75.
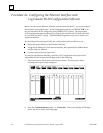
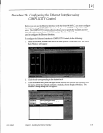
6. Optionally, after you have completed the Settings tab, you can configure parameters
for the Station Manager and Software Load ports by clicking the appropriate tab.
The details of the parameter settings for these ports are as follows:
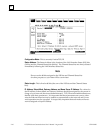
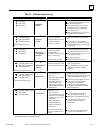
Data Rate: Data rate (bits per second or bps) for the port. Choices are 1200,
2400, 4800, 9600 , or 19200*.
Parity: Type of parity to be used for the port. Choices are None , Even, or
Odd*.
Stop Bits: Enter the number of stop bits. Choices are 1* or 2.
Flow Control: Type of flow control to be used for the port. Choices are
Hardware or None* .
Turnaround Delay: Turnaround delay time to be used for the port. Choices are
None* , 10 ms, 100 ms, or 500 ms.
Timeout: Length of timeouts used for the port. Choices are Long* , Medium,
Short, or None.
* Default selection for the Software Loader Port.
Default selection for the Station Manager Port
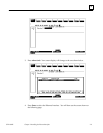
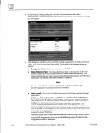
7. If you want to assign variable names to specific points on the Ethernet card, click the
Point Reference tab. To assign a variable to a point, double-click the reference
address you want. The Insert Variable dialog box will appear, which will allow you to
fill in a variable name and description.