


Modbus
®
security 17
4
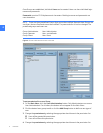
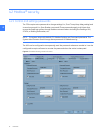
To change the Settings and/or Command passwords
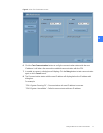
1. On the Main Menu, click the Maintenance button. The button will only be displayed if access
is allowed with the current login permissions.
2. Click the Modbus Security tab. The Modbus Security screen has options to change both
CPUA and CPU B Command and Settings passwords.
NOTE: It is recommended that the passwords in CPU A and CPU B be set to the same value.
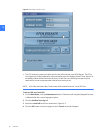
3. Enter the new commands password in the New Password field.
4. Re-enter the password in the Confirm Password field.
5. Click the Change button to download the password.
6. Select the desired Auto Send option.
Indicates the Auto Send option will transparently send the password each time a
command is sent to the CPU.
Disables the Auto Send option.The user will be prompted to enter the password (for the
CPU that is currently the default) each time a command is sent.
NOTE: For added security, it is recommended the Auto Send option be disabled. This will
require an additional password to be entered each time a command is performed.
4.2.2 Local HMI
An Entellisys system may have multiple HMI stations running. There are some functions that
should be performed by one HMI only. The “Local HMI” flag is provided to designate one HMI for
special functions.
The “Local HMI” flag affects the following functions:
• E-mail on Alarms is only sent from the HMI with the Local HMI flag set.
• Time Synchronization is only performed by the HMI with the Local HMI flag is set.
• “Block other HMIs” can be enabled/disabled only by the HMI with the Local HMI flag set. This
allows a user on the Local HMI to block all other HMIs from issuing control commands (i.e.,
Breaker Open), which may be desired during maintenance. For details on circuit breaker
control, see DEH-231 Entellisys Low Voltage Switchgear System User Manual, Chapter 3,
Basic Control.