


4
Series 90–70 Remote I/O Scanner User’s Manual – July 199254
Using Release 3 Configuration Files with Release 4 Software
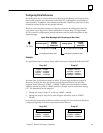
With Release 3 of the Logicmaster software, multiple folders were needed for the
configuration: one for the PLC, and one for each remote drop. With Release 4 software,
all configuration files are contained within the same folder.
Instructions to convert existing, operational Release 3 remote drop folders to a Release
4 common folder are summarized below, and explained in detail on the following
pages.
1. Load the configuration of each Remote I/O Scanner to the folder that has the
central PLC configuration. To do this:
A. Select the folder that contains the central PLC configuration.
B. Load the configuration from each Remote I/O Scanner in the system. The
configuration files created by the load will be in the form dropXXX.cfg, where
XXX is the Drop ID.
2. If the conversion is being done on a system that is not operational, after you load a
configuration file to the folder, “attach” it to the PLC configuration as described
below.
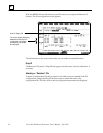
“Attaching” Configuration Files
An unattached remote drop configuration file is one that exists in the same folder as
the PLC configuration, although it has not yet been included in the PLC configuration.
An example would be a Release 3 configuration file that has been loaded to the
common folder as described above. Although the file is present, the configuration data
it contains is still separate from the central PLC configuration. Follow these steps to
attach a remote drop configuration file to the PLC configuration.
1. If the file has not already been loaded to the PLC configuration folder, load it as
described above.
2. The Bus Controller must already be configured. If that has not been done,
configure it according to the instructions in the Series 90–70 Genius Bus Controller
User’s Manual.
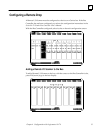
3. Configure a new Remote I/O Scanner as a device on the bus.
4. Zoom (F10) into the new Remote I/O Scanner’s configuration screen and change
its Drop ID to match the Drop ID of the remote drop configuration file being
attached.
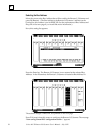
5. Press ESC to complete the attachment. The software saves the remote drop
configuration to disk and returns the display to the bus screen. At the next ESC
from the bus level, the software saves the entire configuration to disk, updating
both both the central PLC configuration and the remote drop configuration.