


16
Section 2 - Printing Basics
At the client
:
1 Install the printer software from the Starter CD or Installation Disk 1 (see page 6).
2 When prompted for the printer name and port, choose “HP DeskJet 1120C Printer” and either “None”
or the Port (LPT1:) for the port that you wish to redirect the printer to. Click OK.
3 Continue installation until complete, then restart Windows.
4 Select Printers from the Windows Control Panel, click on the HP DeskJet 1120C printer icon, then click
Connect.
5 Choose the port to which the printer is connected (for example LPT3).
6 Click Network... then select the network path for the printer. To set up the printer as a permanent
network printer on your system, click the Permanent box, and then click Connect.
Installing Printer Software in Windows 95 / NT 4.0
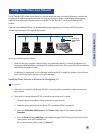
At the server :
I. If the server is running Novell Netware 3.12 & 4.11, set up the printer and make the cable connections to
your network.
II. If the server is running Windows NT 4.0 , ensure that your printer port is shared.
1 Set up the printer and make the cable connections to your network.
2 Install the printer software from the Starter CD or Installation Disk 1 (see page 6).
3 Select the HP DeskJet 1120C printer in the Printers folder, right click the mouse and select
Properties.
4 Go to the Ports tab, select Add Port, and configure the type of Port Monitor you wish to use for this
shared printer, such as HP JetDirect Port.
Be sure to set up this printer so that it is “shared”.
At the client :
Note: If both the client and the server are running Windows NT 4.0, skip the following steps and use Network
Printer Server in NT 4.0 (Point-and-Print) to install the printer software.
1 Install the printer software from the Starter CD or Installation Disk 1 (see page 6).
2 Follow the instruction to complete the installation. Select the HP DeskJet 1120C printer and any LPT
port when installing.
3 To access the Properties sheet of your printer, right-click on your printer icon in the Printers folder and
select Properties.
4a Windows 95:
Go to the Details tab, select Add Port, select Local Port and type the name of the server followed by
the name of the printer, such as \\ComputerName\\PrinterName.
4b Windows NT 4.0:
Go to the Ports tab, select Add Port, highlight Local Port, select New Port and type the name of the
server followed by the name of the printer, such as \\ComputerName\\PrinterName.
Note: If the server is running Windows NT 4.0, install the JetAdmin software which comes with the
JetDirect products.