


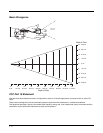


2 - 5
Removing / Replacing the Trigger Module
Equipment Needed: Phillips screwdriver with a blade diameter of 1/8” (.4mm). Not supplied.
Caution: Do not perform the following procedures if the ring bar code reader is tethered to a mobile computer There is a
possibility the Scan button may be pressed inadvertently and the laser beam emitted. Disconnect the ring scanner before
attempting to remove or replace the trigger module.
Do not touch, push on or brace your finger against the scan aperture at any time.
Installing and removing accessories should be performed on a clean, well-lit surface. When necessary, protect the work
surface, the mobile device, and components from electrostatic discharge.
A 20-pak of full Trigger assemblies is available. Contact Customer Support (page 7-1) for the latest updates and accessories.
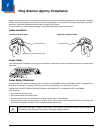
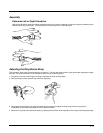
Remove Finger Strap Assembly
Fold the flexible liner back until the screw hole is visible.
Rotate the trigger module until the black screw is visible.
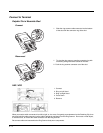
1. Using a Phillips screwdriver with a blade diameter of 1/8” (.4mm) loosen the black screw counter-clockwise and set the
screw aside in a safe place.
2. Remove the trigger module.
Replace Trigger Module
1. Position the trigger module on the base of the Ring Scanner, making sure the empty screw hole is visible.
2. Find the tiny black screw that you removed previously.
3. Using a Phillips screwdriver with a blade diameter of 1/8” (.4mm) rotate the black screw clockwise until the trigger
module is secured to the ring scanner.
4. Install the finger strap.
5. Removing / Replacing the Ring Finger Strap Assembly
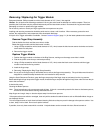
Note: Do not pull on the finger strap or the flexible liner to remove the finger strap assembly. This quick disconnect function is
designed for occasional safety hazards and is not intended for daily removal.
Using the Quick Disconnect Function, grasp the finger strap and pull the finger strap out and away from the ring scanner.
Before attaching the finger strap to the trigger module, thread the finger strap first through the hinge, then under and over the pin
next to the scan button.
It should slide easily.
Cleaning the Beam Aperture
Note: These instructions are for components made of glass. If there is a removable protective film sheet on the beam aperture,
remove the film sheet before cleaning and before first use.
Keep fingers and rough, sharp or abrasive objects away from the beam aperture.
If the aperture becomes soiled or smudged, clean only with a standard household cleaner such as Windex® without vinegar or
use Isopropyl Alcohol.
Do not use paper towels or harsh-chemical-based cleaning fluids since they may result in damage to the aperture surface. Use
a clean, damp, lint-free cloth. Do not scrub optical surfaces.
If possible, clean only those areas which are soiled. Lint/particulates can be removed with clean, filtered canned air.