


318 J.D. Edwards’ OneWorld B73.3 and Windows Terminal Server
to performing a client install on the Windows Terminal Server, complete the
following steps:
1. On the deployment server, go to the \Oneworld\b733\client directory.
2. Create a new directory called \olddlls off of the \client directory.
3. Move the following .dlls from the \client directory to the \client\olddlls directory:
Odbc32.dll, Odbccp32.dll, Odbccr32.dll, and Odbcint.dll.
4. Continue performing the steps in the next section to prepare the client install
on the Windows Terminal Server.
Note: The above steps will allow you to successfully run clients from your
Windows Terminal Server without using MDAC2.1.
9.11.2 Modify the JDE.INI File on the Deployment Server
You must modify the JDE.INI file on the deployment server prior to installing
OneWorld on your workstations. To begin, perform the following steps:
1. On the deployment server, sign on as JDE.
2. Edit the JDE.INI on the deployment server.
• [JDENET]
The serviceNameListen and serviceNameConnect parameters must match
those in the enterprise server JDE.INI.
3. To ensure the workstation will be set up correctly (such as for National
Language Support), make the following changes to the JDE.INI file in the
OneWorld\B733\Client\Misc
directory on the deployment server:
• [INSTALL]
Verify that the LocalCodeSet parameter is set to the appropriate language
value. Also, verify that your code page is set up properly. For appropriate
values and code pages, see the "National Language Support" section of
the
OneWorld Installation Guide (Windows NT-Based Systems), Release
B73.3
.
• [NETWORK QUEUE SETTINGS]
Set the UBEQueue parameter appropriately (optional).
Note: You can resynchronize replicated data by changing the ForcedSync
value in the [REPLICATION] section from 0 to 1. When client workstations are
installed, this value is set to 0, meaning you do not want to resynchronize
data.
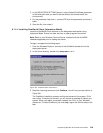
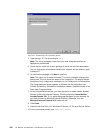
9.11.3 Modify the Setup.inf File on the Deployment Server
In this section, Setup.inf will be modified to specify the default environment.
Complete the following steps to change your default environment to WCRP733.
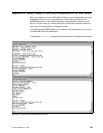
1. From Windows Explorer, open Setup.inf, which is in the OneWorld\B733\Client
directory.
2. In the [DB SYSTEM SETTINGS] section, set the Default Env parameter to the
valid environment you want to be the default (for example, CRP733 or
PRT733). In our example, we typed
WCRP733.