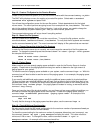
The SMIT utility displays the screen to create a new volume group. Enter a new volume group name. In
our example we will use the preferred name dominovg. Also, select the physical volume to use in this
new volume group. When this information has been entered, press Enter.
A pop up message will appear asking you to verify that you really want to create a new volume group.
Press Enter again to create the volume group. The command status screen will let you know if
everything worked.
Step 9 - Create a Logical Volume for the Domino Data Directory
Now that a new volume group has been created, create a logical volume for our Domino data directory.
with the command smitty mklv.
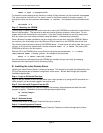
The SMIT utility then displays the screen to create a new logical volume. Type in the name of the
volume group just created in step 8 and press Enter.
Next you will see the configuration screen for a new logical volume. Enter a new logical volume name.
In an example, we'll use the preferred name dominodatalv. Enter the total number of logical partitions
to allocate for this logical volume. The minimum amount of space needed is 200 MB. Since our
physical partition size is 4 MB, we specified 50 logical partitions in our example. Next change the
position on the physical volume to center. This improves system performance by reducing disk arm
movement when accessing data. Also, change the range of the physical volume to maximum. This
improves system performance by making sure that the data is spread evenly across all disks in the
volume group. When you have completed this screen, press Enter.
The command status screen will let you know if everything worked.
Step 10 - Create a Logical Volume for the Domino Binaries
Create a logical volume for our Domino binaries with the command smitty mklv.
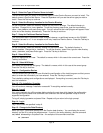
The SMIT utility then displays the screen to create a new logical volume. On this screen use the
recommended volume group rootvg for the new logical volume. Type rootvg and press Enter.
Next you will see the configuration screen for our new logical volume. Enter a new logical volume name.
In our example we will use the preferred name dominobinlv. Enter the total number of logical
partitions to allocate for this logical volume. The minimum amount of space needed is 160 MB. Since
our physical partition size is 4 MB, we specified 40 logical partitions in our example. Next change the
position on the physical volume to the edge. Since the binaries are only executed once at server startup,
we place them on the outer most band of the disk. Also, change the range of the physical volume to
maximum. This improves system performance by making sure that the data is spread evenly across all
disks in the volume group. When you have completed this screen, press Enter.
The command status screen will let you know if everything worked.
Step 11 - Create a File System for the Domino Data Directory
Now that logical volumes are created and ready, we need to create a new journaled file system (JFS) for
our Domino data directory. To create the file system, use the command smitty crjfslv.
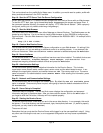
The SMIT utility displays a menu for creating a journaled file system. Select Add a Large File
Enabled Journaled File System if you want to support files larger than 2 GB, otherwise select
Add a Standard Journaled File System and press Enter.
You will see the configuration screen for the new file system. Select dominodatalv for the logical
volume name. The mount point we are going to use in our example will be /server1. It is a good idea
to name the mount point something which will be descriptive to the server you are installing. Finally, on
this screen you need to change the mount automatically at system restart to yes. After you have
finished, press Enter.
The command status screen will let you know if everything worked.
Lotus Domino Server R5 Implementation Guide June 18, 2001
Page 35


