


10
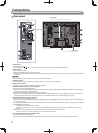
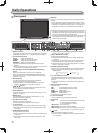
Front panel
1 Speakers (stereo)
The speakers emit the same audio signal emitted from the AUDIO
(MONITOR OUT) terminals. (☞ “ 6 AUDIO terminals” on page 8)
2 Picture adjustment knob
PHASE: Adjusts the picture hue.
CHROMA: Adjusts the picture color density.
BRIGHT: Adjusts the picture brightness.
CONTRAST: Adjusts the picture contrast.
● PHASE and CHROMA cannot be adjusted for certain signal
formats.
● When “Component Phase” is set to “Disable” and an NTSC signal
is input, PHASE can be adjusted (☞ page 18).
3 VOLUME adjustment button/EMBEDDED AUDIO setting
button
Adjusts the volume when no menu screen is displayed.
Selects an audio channel when EMBEDDED AUDIO signals are
contained in SDI input. (☞ “Volume Adjustment/Audio Channel
Selection” on page 11)
4 MUTING button
Turns off the sound when no menu screen is displayed.
●
To cancel the function, press the button again.
● Muting function is also canceled when “Balance” of “Audio
Setting” in the Main Menu is changed (☞ page 16).
5 / / / buttons
When a menu screen is displayed
selects or adjusts menu items.
(☞ “The operation procedure” on page 12)
6 FUNCTION button
Assign functions to the F1 and F2 buttons when the menu is not
displayed.
(☞
page 21)
7 MENU button
Activates/deactivates the display of the Main Menu. (☞ “The
operation procedure” on page 12)
8 COLOR OFF button/lamp
Displays only the luminance signal.
● This function does not work for RGB input signals.
9 1:1 button/lamp
Displays the picture in the original resolution of the input signal.
● The aspect ratio of the picture may change depending on the
input signal.
p AREA MARKER button/lamp
Displays/hides the area marker.
● Select the style of the area marker in “Marker” of the Main Menu
(☞ page 15).
● This function works only when displaying the picture in 16:9
aspect ratio.
Daily Operations
“No Effect” is displayed when you press a button which is not •
available for the current input or signal format (the lamp lights
even when the function does not actually work).
The items controlled by the MAKE system cannot be controlled •
by the buttons on the front panel (“Remote On” is displayed
and the lamps do not light).
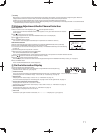
Tally lamp
This lamp is controlled by the tally function of the MAKE/TRIGGER
terminal.
You can select the color of the tally lamp from “Green” or “Red.” •
You can also select whether the whole lamp is turned on at once,
or whether it is turned on one half at a time. (☞ “Tally Setting” in
“Set-Up Menu” on page 17 and “External Control” on page 22)
The illustration of the monitor is of DT-E21L4.
●
This function does not work when “Area Marker” or “R-Area
Marker” is set to “Off” in “Marker.”
q SAFETY MARKER button/lamp
Displays/hides the safety marker.
● Adjust the area of the safety marker in “Marker” of Main Menu
(☞ page 15).
● This function will not work when the picture is displayed in 1:1
aspect ratio and “SD 4:3 Size” on the menu is set to “H Full”.
● This function does not work when “Safety Marker” or “R-Safety
Marker” is set to “Off” in “Marker.”
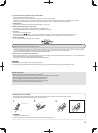
w SCREENS CHECK button/lamp
Displays only the selected element (R, G, or B) of the video signal.
● Each time you press this button, the picture changes in the
following order.
e T.C. (time code) button/lamp
Activates/deactivates the display of the time data (time code)
contained in the SDI signal. (☞ “On the Information Display” on
page 11)
● Select the time code type in “Information” of Set-Up Menu (☞
page 19).
r INPUT SELECT buttons/lamps
Selects an input.
SDI 1: E. AUDIO HD/SD SDI (IN 1) terminal
SDI 2: E. AUDIO HD/SD SDI (IN 2) terminal
HDMI: HDMI terminal
COMPO./RGB
: COMPO./RGB terminal
VIDEO: VIDEO terminal
● The lamp for the selected input lights.
t F1/F2 buttons/lamps
You can use the functions assigned to this button.
y Power lamp
Unlit: The monitor is completely off (the power switch
on the rear panel is turned off).
In Low Power Mode (☞ page 20)
Lights in Green:
The monitor is on.
Lights in orange:
The monitor is off (on standby).
Flashes in orange:
The monitor is in the Power Save (power save) mode.
(
☞
“No Sync Action” in “Sync Function” on page 17)
u button
Turns on and off (on standby) the monitor.
● The power switch is equipped on the rear panel of the monitor
(☞ 1 on page 8).
RGB (Normal screen) Red screen
Blue screen Green screen