


13
EN
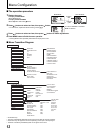
MAIN MENU
PICTURE FUNCTION
Setting for the picture quality
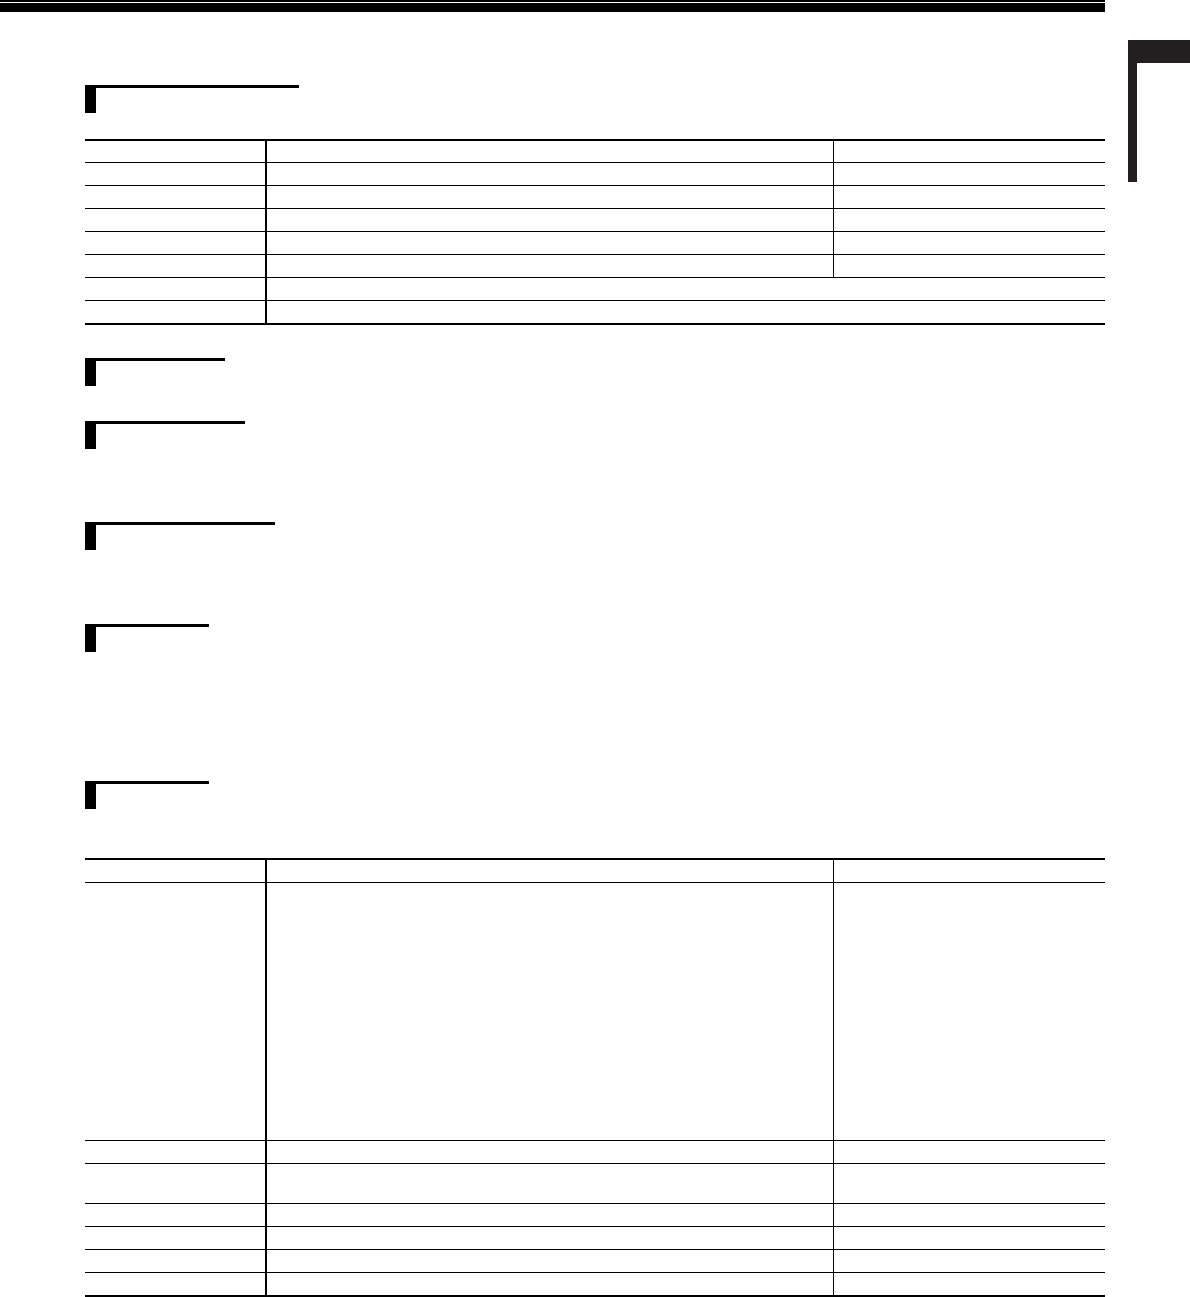
Item To do Setting value
APERTURE
*1
Activates/deactivates the function at the level set in “APERTURE LEVEL.” OFF, ON
APERTURE LEVEL
*1
Compensate the frequency response of the luminance signal of the video signal.
01 – 10
CTI Adjust the clearness of the outlines of the chrominance signal. OFF, NORMAL, HARD
LTI Adjust the clearness of the outlines of the luminance signal. OFF, NORMAL, HARD
I/P MODE Selects a proper mode corresponding to the input picture. NORMAL, CINEMA, FIELD
sub menu
Display the sub menu which enables you to adjust the items of “PICTURE FUNCTION” while viewing the actual picture.
reset Restore the default settings for all the items in “PICTURE FUNCTION.”
*1
Memorized for each input.
BACK LIGHT
Setting value: –20 – +20
Adjusts the brightness of the display.
AUTO ASPECT
Setting value: ON, OFF
Switches the automatic aspect ratio setting function when the input signal of the VIDEO (WSS) has information for a 16:9 or 4:3 aspect ratio
(horizontal to vertical ratio of the screen).
Not activate when picture is displayed in the 1:1 mode.
MANUAL ASPECT
Setting value: 4:3, 16:9
Sets the aspect ratio of the SD signal when AUTO ASPECT is set to OFF or AUTO ASPECT is set to ON and no correspondent aspect ratio is
provided.
Not activate when picture is displayed in the 1:1 mode.
SD4:3 SIZE
Setting value: NORMAL, H FULL, V FULL
*1
Selects the picture size when the input signal format is 4:3.
NORMAL: Matches the vertical picture size to the number of pixels.
H FULL: Matches the horizontal picture size to the horizontal size of the screen. At this time, the top and bottom of the picture are overscanned.
V FULL: Matches the vertical picture size to the vertical size of the screen.
Not activate when picture is displayed in the 1:1 mode.
*1
DT-R24L4D only
MARKER
*1*2
Settings for marker functions
1/2
Item To do Setting value
AREA MARKER
*3
Activate/deactivate the area marker and select the style of it.
The setting values and features are as follows.
OFF: Deactivate the marker.
LINE: Displays the area with an outline.
HALF: The area outside the specifi ed aspect ratio of the screen is
displayed at 50% transparency.
HALF+L: The area of the specifi ed aspect ratio of the screen is indicated
by an outline, and the area outside of that is displayed at 50%
transparency.
BLK.:
The area outside the specifi ed aspect ratio of the screen is black.
Only the portion of the picture within the designated area is displayed.
BLK. +L: The area of the specifi ed aspect ratio of the screen is indicated by
an outline, and the area outside of that becomes black so that only
the area inside the line is displayed.
OFF, LINE, HALF, HALF+L, BLK. ,
BLK.+L
MARKER ASPECT
*3
Select the aspect ratio of the area marker.
4:3, 14:9, 13:9, 2.35:1, 1.85:1, 1.66:1
SAFETY MARKER Activate/deactivate the safety marker and select the style of it.
*4
OFF, LINE, HALF, HALF+L, BLK. ,
BLK.+L
SAFETY AREA Adjust the area of the safety marker. 80% – 100%
FRAME Displays/hides the frame indicating the area of
the specifi ed aspect ratio.
OFF, ON
CENTER MARKER Displays/hides the marker indicating the center position of the picture. OFF, ON
LINE BRIGHTNESS Adjust the brightness of the marker. HIGH, LOW
The area marker or the safety marker is displayed by using AREA MARKER or SAFETY MARKER button, or external control.
Select either non-“R-” items or “R-” items to activate by using external control. (☞
“External Control”
on page 18)
When a picture is displayed in 4:3 aspect ratio, the safety marker for the 4:3 area is displayed.
To display the safety marker for the area of a picture displayed in 16:9 aspect ratio, hide the area marker.
*1
Memorized for each input.
*2
Not displayed when the picture is displayed in the 1:1 mode and when “SD4:3 SIZE” setting in MAIN MENU is “H FULL” and the input signal
format is 4:3.
*3
Displayed only when picture is displayed in 16:9 aspect ratio.
*4
The setting values are the same as that of “AREA MARKER”.
•
•
•
•
•
•
•