


Using the Image Print Server Software
D-2 September 2000
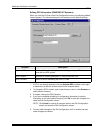
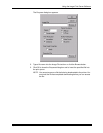
Installing the Software
1. Insert the IPS Software CD into the CD-ROM drive.
2. Double-click on the Setup.exe icon.
3. Follow the on-line instructions to complete the installation.
The default installation location for the software is “C:\Eastman Kodak\KPro
Applications\KODAK PROFESSIONAL Image Print Server.” In addition to the
application, the installation procedure also installs a tone scale correction LUT
that may be used by the IPS application. The default installation location for this
LUT is “C:\Eastman Kodak\KPro Color Management\LUTS.”
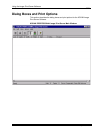
Using the Image Print Server
This section summarizes the process of printing an image. See “Dialog Boxes and
Print Options” on page D-6 for detailed descriptions of the options.
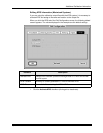
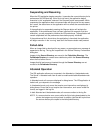
Inserting Images into the Print Queue
The IPS application allows you to submit images by specifying a “hot folder” (for
example: the Source Directory in the Source Directory Preferences dialog box)
or inserting through the enqueue function from the application menu bar.
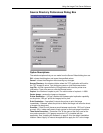
Source Directory Insertion
Images placed in the Source Directory are automatically placed into the print
queue. The images are then sorted by the date and time that they were placed in
the Source Directory. Images are printed in the order that they are placed into
the directory. Once the image has been downloaded, the file is removed from the
Source Directory.
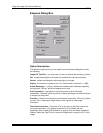
NOTE: The properties of the images that are placed in the Source Directory are
taken from the Source Directory Preferences dialog box.
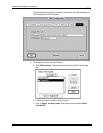
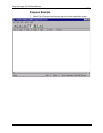
Menu Bar Insertion
To enqueue an image through the menu bar, select File->Enqueue or click the
Enqueue button.
Images placed in the queue through the menu bar are not removed from their
original directory after they are downloaded.
NOTE: The properties of images inserted in this manner are taken from the
Enqueue dialog box.