


Operating Procedures
3-34 September 2000
Setting the Current Day
1. Select “Setup” from the main menu on the OCP.
2. Select “Time”.
3. Select “Day”.
4. Use the Up and Down Arrows to select a new day.
5. Press Select to select/set the new value.
6. Select “Exit” to return to the previous menu on the OCP.
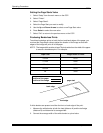
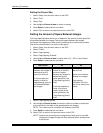
Setting the Amount of Space Between Images
The Page Spacing feature allows you to determine the amount of white space the
printer adds between the images. Having this space between the images
maximizes the image area of each print by centering the cut and order punches
(that will be removed later by a cutter) in this space.
1. Select “Setup” from the main menu on the OCP.
2. Select “Printer”.
3. Select “Page Spacing”.
4. Select “Page Spacing Enabled”.
5. Use the Up and Down Arrows to select either “On”, “Off” or “Host Select”.
6. Press Select to select/set the new value.
7. Select “Page Spacing (pixels)”.
8. Use the Up and Down Arrows to select the value for number of pixels that
you would like for the width of the space between the images.
NOTE: This value must be a multiple of 8 between 8 and 248.
9. Press Select to select/set the new value.
10. Select “Exit” to return to the previous menu on the OCP.
NOTE: Another way to maximize the image area of each print is to overfill
(enlarge) the images through the host software before sending them
to the printer.
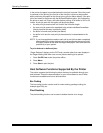
Host Select On Off
The amount of space
between the images is
determined by the
input from the host.
If the host does not
specify a value for
page spacing, space is
not inserted between
the images.
The Page Spacing
feature is on and the
amount of space
between the images is
determined by the
value specified in the
“Page Spacing (pixels)”
field.
If the host specifies a
value, this value is
used in place of the
value specified in the
“Page Spacing (pixels)”
field.
The Page Spacing
feature is off.
Space is not inserted
between the images.
Page spacing
information from the
host is not used by the
printer.