


Diagnostics and Troubleshooting
September 2000 5-11
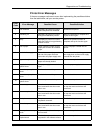
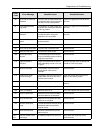
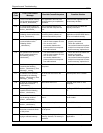
Troubleshooting Observable Errors
Observation Possible Cause Possible Solution
A print has a line on it. The circuit breaker was turned off
when paper was in the shoe.
• Do not turn off the circuit breaker when
paper is in the shoe.
• Do a shutdown prior to turning off the circuit
breaker.
The printer was disturbed or
bumped during the print cycle.
Do not disturb or bump the printer during the
print cycle.
The prints have a
repeated unfocused
pattern on the edges.
The roll of paper was dropped on
its edge.
Load a new roll of paper.
The edges are out of
focus.
The relative humidity level is too
low for the paper to be stored in the
cassette for more than one day.
Increase the humidity level in the room or store
the paper in a sealed plastic bag when it is not
being used.
The prints have a light
leak exposure on them.
The opening for the control strip
feed box is open.
Store and carry the cassette with the opening
facing down.
The rotor is hitting the
paper in the printer and
causing noise.
The paper is not loaded correctly. Reload the paper.
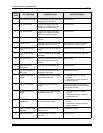
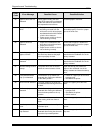
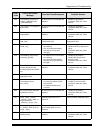
The vacuum reduction
insert is damaged and
causing noise in the
printer.
• The vacuum reduction insert
was not installed properly and
has become damaged.
• A damaged vacuum reduction
insert was installed.
Properly install an undamaged vacuum
reduction insert.
The paper is being
creased and crumpled
when feeding into the
printer.
The lead edge of the paper has not
been squarely trimmed and is
being pulled at an angle or
unevenly or it is being loaded at an
angle into the rollers.
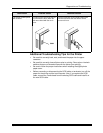
1. Pull the paper out of the printer from the
paper supply area.
2. Recut the lead edge of the paper squarely.
3. Reload the paper. Wait for a message and
the push the paper evenly and slowly.
NOTE: If necessary, remove the curl in the
paper by rolling the paper on an
empty core in the opposite direction
of the curl.
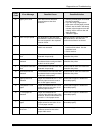
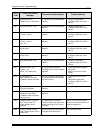
The paper jams
repeatedly.
Small strips or pieces of paper are
caught in the printer from the
previous paper jam.
Remove small pieces of paper from the printer.
The splice tape was only installed
on one side of the digital printer
paper saver and the paper.
Apply splice tape to both sides of the paper
and the digital printer paper saver. See
“Attaching a Digital Paper Saver” on
page 3-10.
The prints have not been
cut correctly by your
cutter.
• The cutter may not be set
correctly.
• The punch marks line up with
the ends of the image.
• Readjust the cutter.
• Check the position of the paper punch.