


8 Printer Conversion to KODAK EKTACOLOR Edge 8 and EKTACOLOR ROYAL VIII Papers • CIS-201
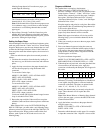
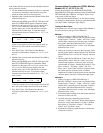
Subtract the test densities from the reference (aim)
densities.
This example includes neutral density equal to the
lowest correction figure (-5). Removing the neutral
density results in this correction:
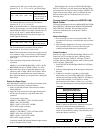
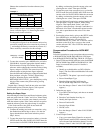
To change these figures from densitometer units to key
corrections, multiply the color corrections by a factor of
.7, and multiply the density corrections by a factor of .5.
These are the key corrections for this example.
5. To enter the correction, press MODE twice, and select
COLOR BAL. Input the appropriate channel number.
Write down the existing color balance figures as a
reference. Add or subtract the corrections to the existing
figures, and press ENTER. The corrections will be
entered and the existing balance figures adjusted.
Press the Shift and Centering keys and perform the Dead
Heat procedure, using the “Normal” Printer Setup
Negative. When the display reads ENTER
RINGAROUND LEVEL#=_, press the Skip key to skip
this part. Then return to the print mode by pressing
MODE once.
Repeat Steps 3 through 5 until the test prints are within
3 densitometer points of the aim figures, with a spread
between the values of less than 5 points.
Setting the Paper Slope
After matching the Normal test and Normal reference prints,
make test prints from the “Under” and “Over” Printer Setup
Negatives. Make sure to use the same channel you used to
make the reference prints. If the Under and Over test prints
match the reference prints, the paper change is complete.
If the Under and Over test prints do not match the
reference prints, proceed as follows:
1. Compare the readings and work out corrections, using
the method described in Step 4, above. (Use the aim
figures obtained from the Normal reference print in
Step 2, above.)
2. To enter the paper slope correction (under), go into the
SETUP mode and select SLOPE ADJ. Write down the
current values for SLOPE UNDER. Make the correction
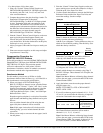
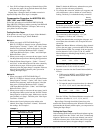
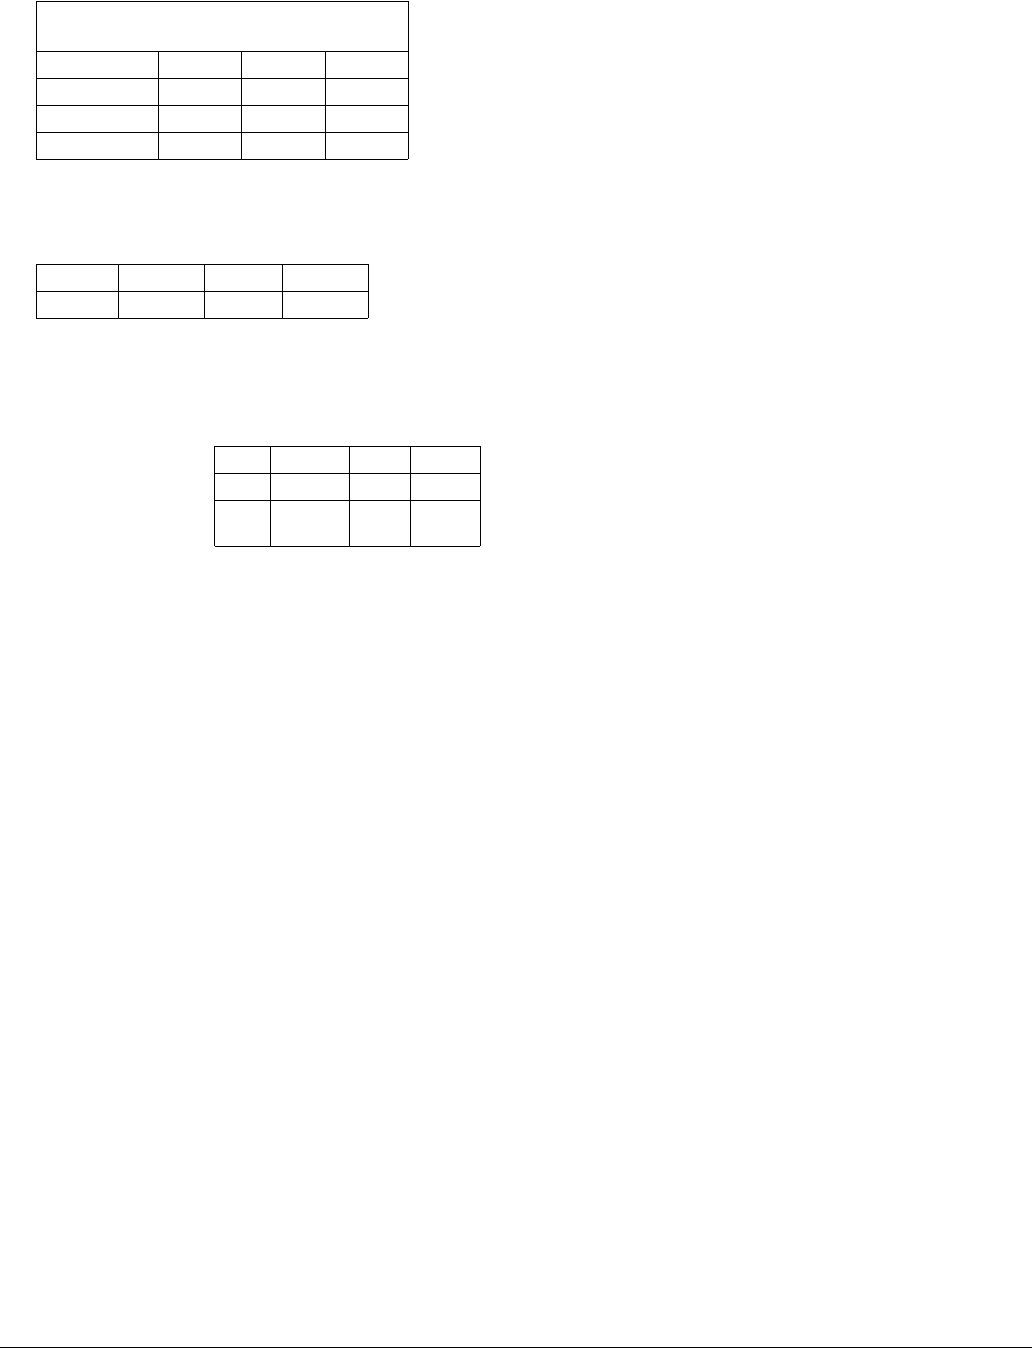
Example 1
Densitometer Readings—Normal Reference
and Normal Test Prints
Cyan Magenta Yellow
REFERENCE 70 70 70
TEST 75 78 83
Difference -5 -8 -13
Cyan Magenta Yellow Density
0-3-8-5
Cyan Magenta Yellow Density
0-3-8-5
Multiply by .7 for color
and .5 for density
0-2-6-3
by adding or subtracting from the current values and
entering the new values. Then press ENTER.
3. To enter the paper slope correction (over), go into the
SETUP mode and select SLOPE ADJ. Write down the
current values for SLOPE OVER. Make the correction
by adding or subtracting from the current values and
entering the new values. Then press ENTER.
4. Press the Shift and Centering keys and perform the Dead
Heat procedure, using the “Normal” Printer Setup
Negative. Then reprint both “Under” and “Over”
negatives, and repeat Steps 1 through 3 until there is a
difference of less than 3 densitometer points from the
aim, with a spread between the values of less than
5 points.
5. Back up the printer data by going to the SETUP mode.
Press MODE twice, and then press the Shift and
Transfer keys. The display will read DATA
TRANSFER FM_TO_. Enter “B1” in the first section,
and then use the arrow keys to move to the second
section and enter “B2.” Press ENTER to back up the
new printing data.
Compensation Procedure for AGFA MSP
Printers
Follow this procedure to set up your printer when converting
to KODAK EKTACOLOR Edge 8/ROYAL VIII Papers
from KODAK EKTACOLOR Edge 7/ROYAL VII Papers
1. Enter ITT Schwarzchild Coefficient values for KODAK
EKTACOLOR Edge 8/EKTACOLOR ROYAL VIII
Paper in an unused table (a total of 10 tables is
available).
a. Identify an available table; use DFPA (Define
Paper). (The list of Schwarzchild tables follows this
procedure.)
b. Type MOTC. The printer’s password is required.
c. Enter a Brand/Paper Type.
d. Enter the Schwarzchild Coefficients for
EKTACOLOR Edge 8/ROYAL VIII Paper.
e. Save the changes. (Enter Y when VALUES OK?
appears.)
2. Define the new paper.
a. Type DFPA (Define Paper), and choose an unused
Paper Number.
b. Enter the Code Number from Step 1a.
c. Identify the Paper Surface.
d. Enter an Emulsion ID.
e. Enter the Paper Width.
f. Hit ESC twice.
g. Save the changes. (Enter Y when VALUES OK?
appears.)
3. Create a Paper Channel.
a. Copy your current Paper Channel to an unused
Paper Channel (use the COPC command). Enter the
source channel and destination channel. Save the
changes. (Enter Y when VALUES OK? appears).