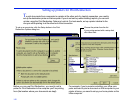
. . . Scheduling an Xchange Agent to run automatically
133
LapLink does not have to be running on the guest for an
agent to run as scheduled. When the scheduled time
comes, LapLink starts, the connection is opened, files are
synchronized, the connection is closed, and LapLink shuts
down.
LapLink prepares an Xchange Agent to run on schedule by
setting it up in the LapLink scheduler program.
NOTE You can also use the Windows Task Scheduler
included in Windows 98, ME, 2000, XP, and 2003. For
more information, consult your Windows documentation.
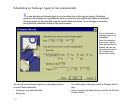
To schedule an Xchange Agent Using the LapLink
Scheduler:
1 From within LapLink or Xchange Agent, open the agent.
2 On the File menu, click Schedule.
The Schedule wizard begins.
3 Give a name to the schedule file.
4 Fill out the schedule by specifying the time and frequency.
TIP To create another schedule for the same agent,
repeat the above procedure and assign a different name
to the schedule file.
TIP To change how an Xchange agent is scheduled,
access it throught the LapLink scheduler icon, which
appears at the right end of the Windows taskbar.
To run a scheduled agent:
• Leave your Windows operating system and your
scheduler running.
Running an agent unattended
A scheduled agent runs without preview, even if you have
specified preview on the Run Options tab of Properties.
When conflicts are encountered, they are ignored; neither
file is copied. If you prefer to have the newer file in each
conflict copied over the older one, click Properties on the
File menu. On the Run Options tab, click this option: Run
Unattended, without Preview or Confirmations. Then click
this option: Copy the Newer File over the Older.
1
TIP To ensure that an agent runs and synchronizes as
scheduled, the agent should originally be created while
connected to the host via an Address Book entry. This
stores the log-in name and password required by the
remote computer to open the connection.
1 For more information about resolving conflicts, see page
126.


