Installing the system board
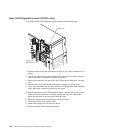
To install the system board, complete the following steps.
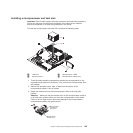
1. Grasp the system board by the handles and insert the system board into the
chassis at a slanted angle and slide it toward the rear of the server until it fully
locks into place on the chassis.
2. Install any of the following components that were removed from the system
board:
v Battery (see “Installing the battery” on page 114).
v DIMMs (see “Installing a memory module” on page 98).
Note: Replace the DIMM thermal baffles also, if you removed them.
v Microprocessor and heat sink (see “Installing a microprocessor and heat
sink” on page 139).
v Adapters (see “Installing an adapter” on page 82)
3. Reconnect any cables to the system board that you disconnected during
removal.
4. Reinstall the front fan cage assembly (see “Installing the front system fan cage
assembly” on page 109.
5. Rotate the rear system fan air baffle back into the server.
6. Press the power-supply cage release tab and rotate the power-supply cage
assembly into the chassis until it locks in place.
7. Return the power-supply cage handle to the locked position.
8. If you have a hot-swap model, reinstall the hot-swap power supplies (see
“Installing a hot-swap power supply” on page 96).
9. Install the side cover (see “Installing the side cover” on page 79).
10. Lock the side cover.
11. Reconnect the external cables and power cords; then, turn on the attached
devices and turn on the server.
Chapter 4. Removing and replacing server components 145


