


Notes:
1. If the optical drive is not attached to your ThinkPad computer during
recovery, DVD software and CD-recording software will not be installed.
To ensure that they will be installed correctly, attach your ThinkPad
computer to the X4 Dock and install the optical drive in the Ultrabay Slim
before performing a recovery operation.
2. The recovery process might take up to 2 hours.
Attention:
All of the files on the primary hard disk partition (usually drive C)
will be lost in the recovery process. However, before any data is overwritten,
you will be given the opportunity to save one or more files to other media.
1. If possible, save all your files and shut down your operating system.
2. Turn off your computer for at least 5 seconds.
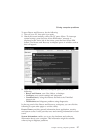
3. Turn on your computer. Watch the display carefully. While the message,
″To interrupt normal startup, press the blue Access IBM button″ is
displayed at the lower left of the screen, press the Access IBM button. The
Rescue and Recovery workspace opens.
4. Click Restore your system.
5. Click Restore my hard drive to the original factory state and then click
Next.
6. Follow the instructions on the screen.
7. When the recovery process finishes, press Enter key. Your computer will
restart with the pre-installed operating system, drivers, and software.
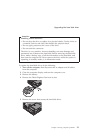
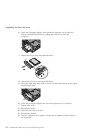
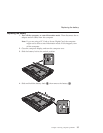
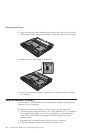
Upgrading the hard disk drive
You can increase the storage capacity of your computer by replacing the hard
disk drive with one of greater capacity. You can purchase a new hard disk
drive from your reseller or Lenovo marketing representative.
Notes:
1. Replace the hard disk drive only if you upgrade it or have it repaired. The
connectors and bay of the hard disk drive were not designed for frequent
changes, or drive swapping.
2. The Rescue and Recovery workspace and the Product Recovery program
are not included in the optional hard disk drive.
Solving computer problems
32 ThinkPad
®
X41 Tablet Service and Troubleshooting Guide