SATA Hard Drive Enclosure
Installation Guide English
Installationsanleitung Deutsch
Manuel Utilisateur Français
Manuale d’uso Italiano
© LINDY ELECTRONICS LIMITED & LINDY-ELEKTRONIK GMBH - SECOND EDITION (November 2009)
INSTALLATION
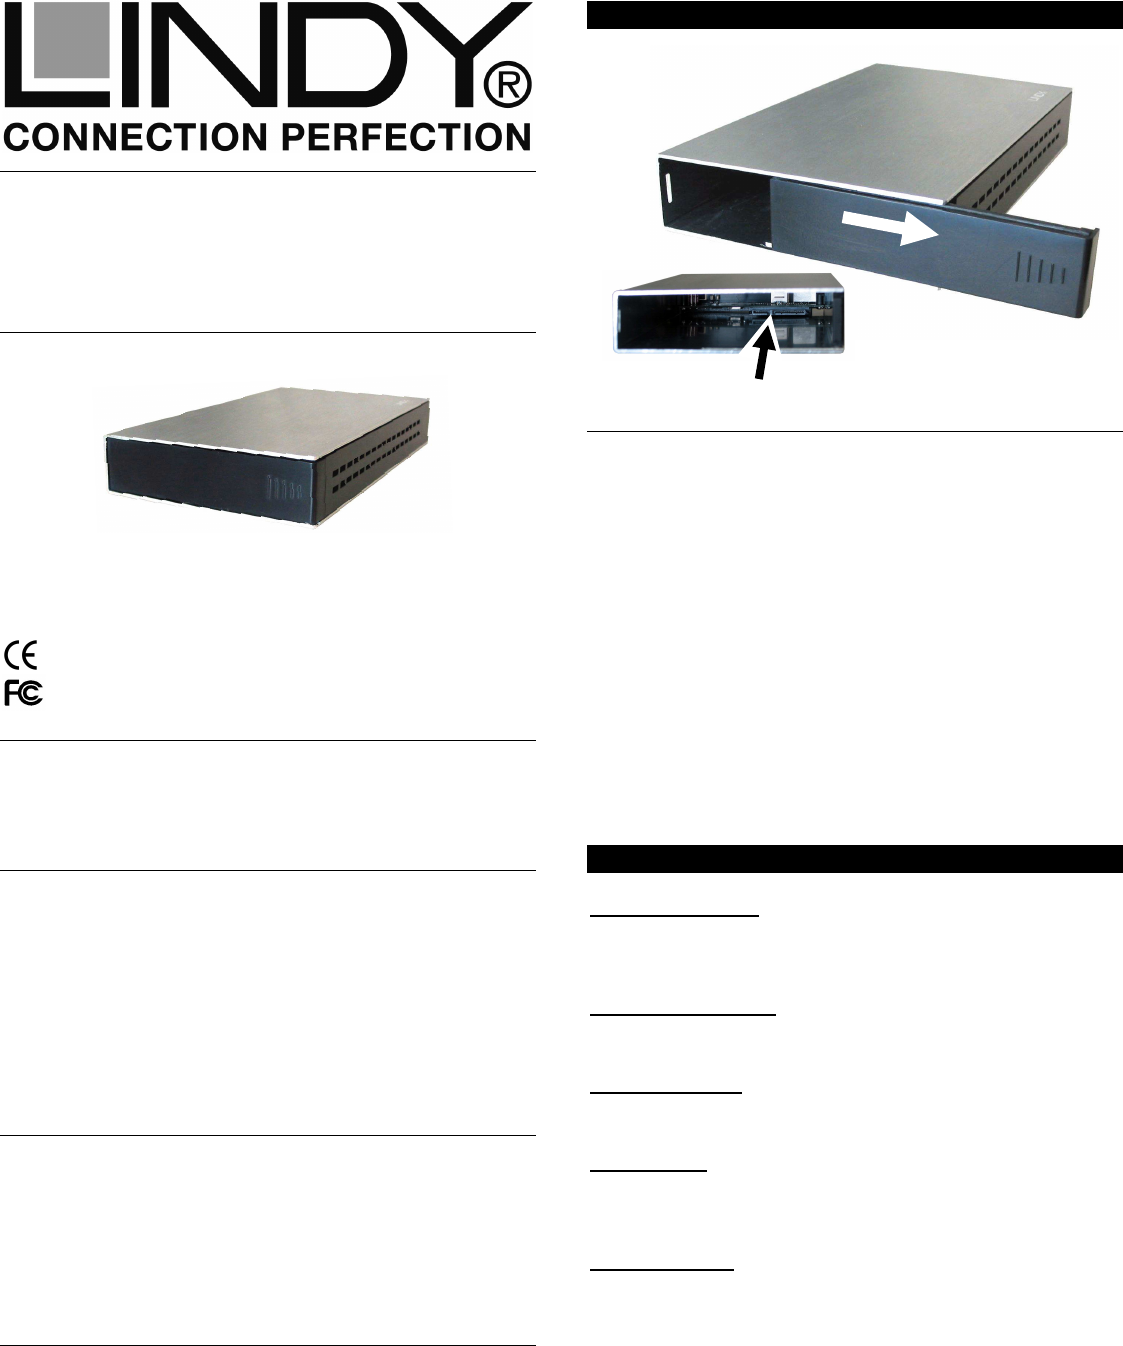
ENGLISH
1. Slide the plastic end cover in the direction as shown above by
the white arrow.
2. Slide in the HDD so that the SATA connector properly fits into
the backplane as shown above (black arrow) and press it
firmly. Not all HDDs are exactly the same size, and so once
you have inserted your HDD it is important to move the enclo-
sure around to ensure that the HDD does not move inside the
enclosure. If it does move, firstly check that the SATA connec-
tion has been made correctly, then attach some of the supplied
adhesive foam strips to your HDD in appropriate positions to
stop the HDD moving.
3. Reinstall the end cover by sliding it back into position so both
sides engage safely.
For Home and Office Use
Tested to Comply with FCC Standards
No. 42841 (USB 2.0 & eSATA)
No. 42842 (USB 2.0 & FW400)
No. 43100 (USB 3.0)
www.LINDY.com
Deutsch
(1) Schieben Sie die Endkappe wie oben gezeigt seitlich heraus.
(2) Schieben Sie die Platte so ein, dass sie sicher in die Anschlussleiste
(Bild Vorseite, schwarzer Pfeil) einrastet. Aufgrund leicht unterschiedlicher
Formen kann die Platte sich im Gehäuse bewegen, prüfen Sie dies durch
Schütteln. Stoßen Sie die Platte gegebenenfalls aus dem Gehäuse in die
offene Hand und befestigen Sie einen beiliegenden Schaumstreifen an
geeigneter Stelle der Platte. Achten Sie darauf, dass sie nicht so fest sitzt,
dass sie später nicht wieder heraus genommen werden kann! Stoßen Sie
die Platte und das Gehäuse nie auf harte Flächen um die Festplatte
nicht zu beschädigen!
(3) Schieben Sie nun die Endkappe von der Seite her wieder so auf, dass
beide Seiten sicher einrasten.
Français
(1) Retirez la façade comme vu ci-dessus (flèche blanche)
(2) Insérez le disque dur fermement dans la connectique SATA indiquée
par la flèche noire
Un disque dur n’a pas toujours la même taille, et peut bouger dans le
boîtier, vérifiez cela en secouant le boîtier. Fixez ensuite les bandes
adhésives fournies sur votre disque dur pour l’empêcher totalement de
bouger. Ne cognez pas le disque et le boîtier sur des surfaces dures,
pour ne pas endommager le disque dur !
(3) Remettez la façade
Italiano
1. Far scorrere il frontalino nella direzione indicata nel disegno soprastante
2. Inserire l’HDD nel verso giusto per permettere il collegamento al
connettore SATA come evidenziato qui sopra (freccia nera).
Non tutti gli HDD hanno le stesse dimensioni, verificare quindi, dopo aver
inserito l’HDD, che lo stesso sia collegato correttamente scuotendo
l’alloggiamento; se il disco all’interno si muove, controllare che l’HDD sia
collegato correttamente al connettore SATA interno, quindi attaccare le
strisce adesive incluse nella fornitura all’HDD in modo da impedirne il
movimento all’interno del box.
3. Reinserire il frontalino facendolo tornare nella posizione iniziale.
OPERATION (ENGLISH)
Power Requirement
3.5” drives cannot be powered by the USB bus and therefore need
their own power supply. Do not use any power supply other than
the one supplied, as it may damage the enclosure or your HDD.
Computer connection
The dual interface models 42841, 42842 can be connected only
via one of their interfaces at a time!
Driver Installation
Modern operating systems such as Windows XP, Vista and 7
already include the necessary drivers, so installation is automatic.
LED Indicator
The right LED indicator lights up red when the housing is powered
up. The left LED flashes blue during data transfer.
Do not disconnect the enclosure whilst the LED is flashing!
HDD Partitioning
If you use a brand new hard drive it may not be formatted or have
a partition and so your operating system will not show a drive
letter. Use the partitioning program from your operating system
(FDISK or similar). In Windows, Right click on My Computer and
select Manage. Then click Disk Management. On the bottom
right side the new drive should now be shown without a drive
letter. Right click on the grey field to the left of the drive and select
Initialize Disk. Once completed you can right click on the new
drive, choose to format it and change drive letters according to
your requirements.
Find more information on this topic from the HELP section of your
operating system.


