


Document Part Number: DB11-000013-00 September 2002
®
Quick Hardware Setup Guide
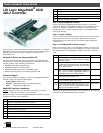
LSI Logic MegaRAID
®
SCSI
320-2 Controller
Thank you for purchasing the MegaRAID SCSI 320-2 Controller. Please take
a few minutes to read this Quick Hardware Setup Guide before you install the
MegaRAID controller. If you need more information about any topic covered in
this guide, please refer to the other documents on your Driver and
Documentation CD.
Contents of Driver and Documentation CD
The Driver and Documentation CD is packaged with the MegaRAID SCSI
320-2 Controller. The CD contains utility programs, device drivers for various
operating systems, and the following documentation:
· MegaRAID SCSI 320-2 Hardware Guide
· MegaRAID Configuration Software Guide
· MegaRAID Operating System Driver Installation Guide
· Software license agreement and warranty registration card
Technical Support
If you need help installing, configuring, or running the MegaRAID SCSI 320-2
Controller, contact LSI Logic Technical Support:
Phone Support: 678-728-1250
Web Site: http://megaraid.lsilogic.com/support/index.html
Email: MegaRAIDsupport@lsil.com
MegaRAID Controller Installation
Caution: Make a backup of your data before you change your system
configuration. Otherwise you may lose data.
Follow these steps to install the MegaRAID SCSI 320-2 Controller. Each step
is explained more fully in the following text:
Step 1: Unpack MegaRAID Controller
Unpack and install the MegaRAID SCSI 320-2 Controller in a static-free
environment. Remove the MegaRAID controller from the anti-static bag and
inspect it for damage. If it appears to be damaged, or if the Driver and
Documentation CD is missing, contact LSI Logic or your MegaRAID OEM
support representative.
Step 2: Prepare Computer
Turn off the computer and remove the power cord from the back of the power
supply. Remove the cover from the chassis. Make sure the computer is
disconnected from the power and from any networks before installing the
controller card.
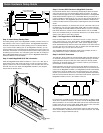
Step 3: Check MegaRAID Controller Jumpers
Make sure the jumper settings on the MegaRAID controller are correct. The
jumpers are set at the factory, and you probably do not need to change them.
The following table lists the MegaRAID controller jumpers that you should
check:
The following diagram shows the location of these jumpers and of the various
connectors on the MegaRAID SCSI 320-2 Controller.
Step Action
1 Unpack the MegaRAID SCSI 320-2 Controller.
2 Turn off the computer, remove the power cord, and remove the cover.
3 Check the MegaRAID controller jumper settings.
4 Install the battery backup pack.
5 Install the MegaRAID controller.
6 Connect the SCSI devices to the MegaRAID controller.
7 Set the target IDs for the SCSI devices.
8 Set SCSI termination.
9 Replace the computer cover and turn the power on.
10 Run the MegaRAID BIOS Configuration Utility.
11 Install the operating system driver.
Jumper Description Type
J2 SCSI activity indicator: this can be connected to the
hard disk LED on the computer enclosure to display
SCSI bus activity.
4-pin header
J3 Write Pending indicator: this can be connected to
an LED on the computer enclosure. The LED will be
lit when data in the cache has not yet been written
to the storage device.
2-pin header
J4, J5 SCSI Termination Control for SCSI Channels 1 (J5)
and 0 (J4): Leave at the default setting (jumper on
pins 1 and 2) to allow the MegaRAID controller to
automatically set its own SCSI termination.
3-pin headers
J10 Battery pack connector: this connector is used to
connect the backup battery pack.
3-pin header
J16 Enables or disables the MegaRAID onboard BIOS.
Leave the BIOS enabled (no jumper).
2-pin header
J17,
J18
TermPWR Enable for SCSI Channels 0 (J17) and 1
(J18): Leave at the default setting (jumper on pins 1
and 2) to allow the PCI bus to provide termination
power on the two SCSI channels.
2-pin headers
Step Action