English-8
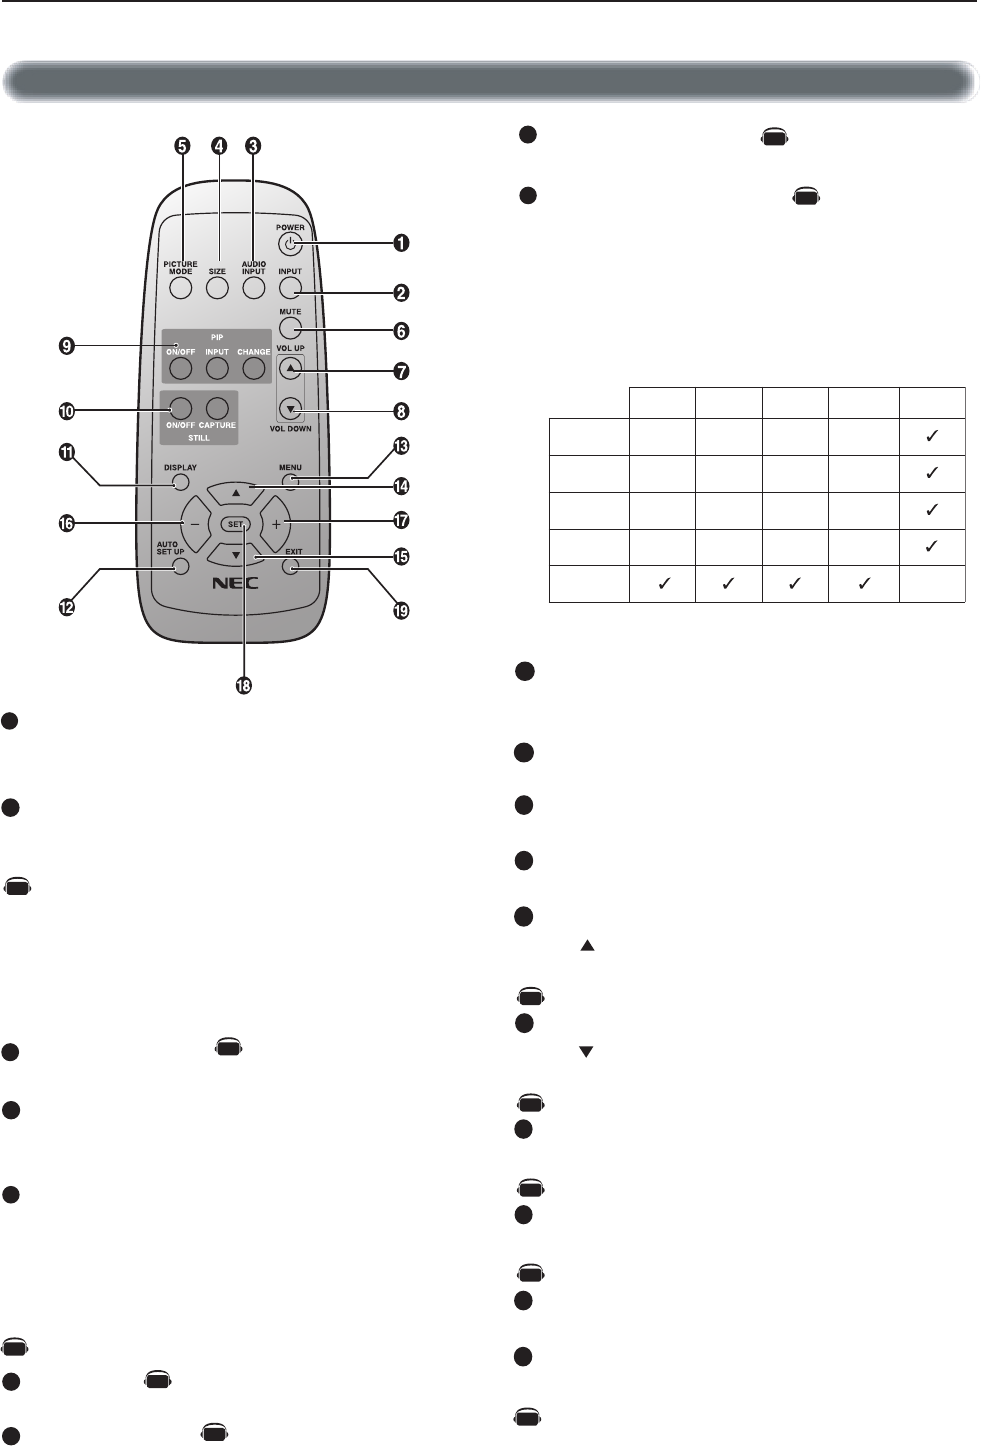
Wireless Remote Control
POWER button
Switches the power on/off.
* If Power Indicator is not glowing, then no controls will work.
INPUT button
Selects from input signal, [RGB1], [RGB2], [RGB3], [DVD/HD],
[VIDEO] and [VIDEO<S>].
[DVD/HD], [VIDEO] and [VIDEO<S>] inputs can be selected
when the AV optional module is installed.
[VIDEO<S>] is enabled by selecting the “SEPARATE” mode
in the OSM or by having the “S VIDEO” cable connected
with the “S VIDEO” signal present and selecting “PRIORITY”
MODE”. See page 26.
AUDIO INPUT button
Selects from input audio signal, [AUDIO1], [AUDIO2], [AUDIO3]
SIZE button
Selects picture size, [FULL], [NORMAL], [WIDE] and [ZOOM].
See page 19.
PICTURE MODE button
Selects from picture mode, [HIGHBRIGHT], [STANDARD],
[sRGB], [CINEMA]. See page 19.
HIGHBRIGHT: for moving image such as DVD
STANDARD: for images (Shipping condition)
sRGB: for text based images
CINEMA: for movies.
MUTE button
To turn on/off the mute function.
VOLUME UP button
Increase the audio output level.
VOLUME DOWN button
Decrease the audio output level.
PIP (Picture In Picture) button
ON/OFF button: PIP ON/OFF.
INPUT button: Select the ‘picture in picture’ input signal.
CHANGE button: Replaces to the main picture and sub
picture.
STILL button
ON/OFF button: To turn on/off the still picture mode.
CAPTURE button: Update the still picture.
DISPLAY button
To turn on/off the Information OSM. See page 19.
AUTO SETUP button
To enter the auto setup menu. See page 23.
MENU button
To turn on/off the menu mode.
UP button
Acts as button to move the highlighted area up to select the
adjustment with OSM menu.
Small screen which adjusted “PIP” mode moves up.
DOWN button
Acts as button to move the highlighted area down to select
the adjustment with OSM menu.
Small screen which adjusted “PIP” mode moves down.
MINUS button decrease
Acts as (-) button to decrease the adjustment with OSM menu.
Small screen which adjusted “PIP” mode moves left.
PLUS button increase
Acts as (+) button to increase the adjustment with OSM menu.
Small screen which adjusted “PIP” mode moves right.
SET button
Acts as SET button with OSM menu.
EXIT button
Turn to previous menu with OSM menu.
Parts Name and Functions -continued
2
3
4
5
6
7
8
9
10
11
12
13
14
15
16
17
18
19
1
RGB3 DVD/HD VIDEO
1BGR
_ _ _
2BGR
_ _ _
3BGR
_ _ _
_ _ _
DH/DVD
_
_
_
_
OEDIV
Sub Picture
Main Picture
Note: The aspect ratio of PIP synchronizes with a setup in the Main Picture.
RGB2RGB1
_
AV
AV
AV
AV
AV
AV
AV
AV
AV
AV
AV
Denotes an AV unit function.
All AV functions are enabled when the AV unit is installed.
AV
REMOTE
CONTROLLER RU-M104


