


``` ``` ```
```
a
b
c
d
```
a
Currentdate
b
Recordingmodeindicator
c
Microphonesensitivityindicator
d
Totalnumberofrecordedles
for the date
e
Currentlenumber
f
Elapsedrecordingtime
g
Remainingrecordingtime
a
b
c
d
e
f
g
```
VOICE RECORDER
NOTE CORDER
DP-201
EN
INSTRUCTIONS
Thank you for purchasing an Olympus Digital Voice Recorder.
Please read these instructions for information
about using the product correctly and safely.
Keep the instructions handy for future reference.
To ensure successful recordings, we recommend that
you test the record function and volume before use.
Shinjuku Monolith, 3-1 Nishi-Shinjuku 2-chome, Shinjuku-ku, Tokyo 163-0914, Japan.
Tel. +81 (0)3-3340-2111
http://www.olympus.com
3500 Corporate Parkway, P.O. Box 610, Center Valley, PA 18034-0610, U.S.A.
Tel. 1-888-553-4448
http://www.olympusamerica.com
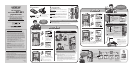
Getting started
1 Insert batteries. 2 Turn on the power.
Slide the POWER switch to ON.
•
Be sure to remove the protective lm on the display before using this product.
To turn off the power:
While the recorder is in the stop mode, slide the
POWER switch to
OFF/HOLD.
Power save mode:
If no operations are performed for more than 10 minutes when the
powerison,thedisplay automatically turnsoffandtherecorderenters
the power save mode.To exit the power save mode, press any button.
HOLD:
If sliding the
POWER swich to OFF/HOLD while the recorder is in
operation, all buttons and switches are disabled without interrupt
-
ing the current operations.
Strap eyelet
•
A strap is not supplied with this product.
Battery indicator:
If[ ]isdisplayedonthescreen,replacebatteriesassoonaspossible.Ifthe
battery level becomestoo low, [
]and[Battery Low]aredisplayedandthen
therecorderautomaticallyturnsoff.
Set the time and date.
“Setting time and date” (Verso)
“Changing the recording mode” (Verso)
Recording indicator lightswhilerecording.
Pause
Microphone sensitivity
Turn the microphone
towardasound sourceto
berecorded.
High
Low
Highly sensitivemodewhich can record surround-
ing noises (
H
)
Standardsensitivity
(
L
)
• Toensuresuccessfulrecordings,werecommendyoutotestrecordingwiththeselected
functions andvolume beforehand.
• Toensurerecordingfromthebeginning,startrecordingasoundsourceafterthe
recording indicator lights.
• Therecordercannotrecordif[
Memory Full]or[Maximum File Size is reached]is
displayed.Deleteunnecessarylestofreeupsomespaceinmemory.
• Iftherecorderisplaceddirectlyonatable,thevibrationsofthetablearelikelytobe
recorded.Torecordsoundclearly,placeanotebookorhandkerchiefbetweenthe
recorder andthe tableto preventthe vibrations frombeingrecorded.
• Whentheavailablerecordingtimebecomeslessthan60seconds,therecording
indicatorstartsashing.Theindicatorashesfasteriftheavailabletimedecreasesto30
secondsandto 10 seconds.
Recording
Recording
• The[Set Time & Date] screen appears when you use the recorder for the rst time or when the recorder is turned on after more
than 30 minutes without power supply.
• Ifthetimeanddatearenotset,thetimeanddateofthedefaultsettingsarerecordedtoles.
a
Recordingdate
b
Currentlenumber
c
Elapsedplaybacktime
d
Playbackpositionbarindicator
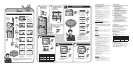
Forwarding and Rewinding
Changing the playback speed
Noise cancel
Fast
Slow
Noise Cancel indicator
On
Off
Noiseisreducedwhen
played backtoachieve
better soundquality.
When anearphone isconnected, thespeaker is turned
off. Playbacksoundfor anearphoneis monaural.
To avoid irritation totheear, turn down
thevolumebeforeinsertinganearphone.
Do notraise thevolumetoo highwhen
using anearphone. Itmay causehearing
impairmentandadecrease inhearing
ability.
• An earphone is not supplied with
this product.
Volume
High
Low
File search
Recorderstatus
indicator
:Duringplayback
F
:Duringfastplayback
S
:Duringslowplayback
When the recorder is in
stop mode, press and
hold the
STOP (/)but-
tontodisplaythe[
Time &
Date]and[Remain].
e
Approximatelelength
Playback
Playback
Pressand hold
e
You can
change the
recording
mode!
To pause recording, pressthe REC(-)buttonwhile
recording. To resumethe recording,pressthe
REC(-)
button again.
• Recordingisautomaticallystoppedif60
minuteselapsedafterrecordingispaused.
Select thesensitivity according to the surroundingconditions.
Recorded files are
grouped by date.
s To fast-forward or rewind a le, press and hold
0
or
9
button while playing
back a le.
s To skip to the next le or previous le, press
0
or
9
button.
s Fast-forwarding or rewinding continues to the next le.
Playback speed is changed
between0.5x,0.75x,normal,
1.2x, 1.5x, and 2.0x by each
pressofthebuttons.
Thefileis played backasit
wasrecorded.
• WhentheNOISE CANCELswitch isset to ON,playback
speed returns tonormal.
Search for files
by the date they
were recorded.
s
When searching for a le recorded on October 15.
Thedatedisplay
appears.
Select October15. Thefirstfileis
played back.
If the file is skipped,
the recorder plays
back the next file.
U1-BS0952-01
TR1111
Introduction
• Thecontents ofthisdocumentmaybe changedinthe futurewithoutadvanced
notice.Contact our Customer Support Center for the latest informationrelating
to product namesand modelnumbers.
• Thescreenandrecorderillustrationsshowninthismanualwereproducedduring
thedevelopmentstagesandmaydifferfromtheactualproduct.Theutmostcare
hasbeentakentoensuretheintegrityofthecontentsofthisdocument.Inthe
unlikelyeventthataquestionableitem,error,oromissionisfound,pleasecontact
our Customer Support Center.
• Anyliabilityforpassivedamagesordamageofanykindoccurredduetodataloss
incurred by a defect of the product, repair performed by the third party other
than Olympus or an Olympus authorized service station, or any other reason is
excluded.
For customers in North and South America
USA RFI:
Thisequipmenthasbeentestedandfoundtocomplywiththelimits
foraClassBdigitaldevice,pursuanttopart15oftheFCCRules.These
limits are designedto provide reasonableprotection against harmful
interference ina residential installation.This equipmentgenerates,uses
and canradiateradiofrequency energy and,if notinstalledand used in
accordance with the instructions, maycause harmfulinterference to radio
communications.However, thereisno guarantee that interference will
not occurin aparticular installation. If this equipmentdoes cause harmful
interference to radioor televisionreception,which canbe determined by
turningthe equipment off andon, the userisencouragedtotryto correct
the interference byone ormore ofthe following measures:
• Reorientorrelocatethereceivingantenna.
• Increasetheseparationbetween theequipmentandreceiver.
• Connectthe equipmentintoanoutlet onacircuit differentfrom thatto
which the receiver isconnected.
• Consultthedealeroranexperiencedradio/TVtechnicianforhelp.
Canadian RFI:
This digital apparatus does notexceed theClass Blimits forradio noise
emissions fromdigital apparatusasset outin theRadioInterference
Regulations oftheCanadian Department ofCommunications.
Cetappareil numériquene dépasse pasles limites deCatégorieB pour les
émissionsde bruitradioémanant d’appareils numériques,tel queprévu
dans lesRèglementssur l’InterférenceRadio duDépartement Canadien
des Communications.
Protective lm