


INTRODUCTION
Congratulations on your purchase of the RM106A Atomic Clock.
Features of model RM106A include:
- RF controlled Clock and Calendar
- EL Backlight for night viewing
- Dual Alarm (Single and Weekday Alarm) with Snooze function
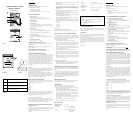
MAIN FEATURE [FIG. 1]
A. SNOOZE BUTTON
-Press to turn on the backlight for 5 seconds
-Press to activate the 8-minute Snooze function when alarm goes off
B. CLOCK WINDOW
-Displays clock function
C. ALARM BUTTON
-Press to toggle among Weekday Alarm, Single Alarm and Clock mode
-Press and hold for 2 seconds to enter the alarm time setting mode when
the respective alarm mode is in display
D. MODE BUTTON
-Press to toggle among the following displays:
Clock with Second › Clock with Weekday › Clock with offset hour › …
-Press and hold for 2 seconds to enter the clock setting mode
E. UP & DOWN BUTTONS
-Press to increase or decrease the value of a setting
-Press to activate or deactivate the alarm when the respective alarm time
is shown
G. BATTERY COMPARTMENT
-Uses 1 piece of UM-3 or "AA" battery
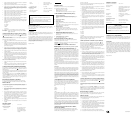
BATTERY INSTALLATION [FIG. 2A]
Insert One "AA" Alkaline battery according to the polarity indicated in the
battery compartment
Remark: Replace with new battery when the low battery indicator [ ] is
displayed [Fig. 2b]
HOW TO USE THE EL BACKLIGHT
Press the SNOOZE button to turn on the EL backlight for 5 seconds.
ABOUT RADIO RECEPTION [FIG. 3]
Model RM106A is designed to synchronize its calendar clock automatically
once it is brought within range of the radio signal from the U.S. Atomic Clock.
When the unit is new and just out of the box, synchronization with the U.S.
Atomic Clock can take up to 72 hours. When the unit is receiving the signal,
the Radio Reception symbol will start to blink. Generally, complete reception
takes around 2 to 10 minutes depending on the strength of the radio signal.
To disable the reception of RF signal manually, press and hold the DOWN
button for 2 seconds until the Radio Reception symbol disappears.
To enable the reception again, press and hold the UP button for 2 seconds. The
Radio Reception symbol will blink and the unit will search for RF signal
automatically.
Interference
Reception can be affected by a number of factors. For best reception, place the
device away from metal objects and electrical appliances. Other causes for signal
interference include electrical power transmission towers, steel reinforced
concrete construction, and/or metal siding.
Note: Radio Frequency clocks perform best when placed near a window. After
receiving the initial signal, updates are accomplished with greater ease. Even
though there are areas that may have more difficulty in receiving a signal, the
Atomic Clock contains a very accurate quartz movement and will retain
precise time even if a signal is missed on a rare occasion.
HOW TO SET YOUR TIME ZONE
Time Zones around the world are identified by how many hours they are offset
from Greenwich Mean Time. US time zones are 5 to 9 hours behind
Greenwich Mean Time and are identified as:
Eastern - 5
Central - 6
Mountain - 7
Pacific - 8
Alaska - 9
RM106A is pre-set to Pacific Time. To set your clock to your time press and
hold the mode button for 2 seconds. The offset hours will appear and blink in
the clock window. Press the up or down button to designate your time zone.
Press the alarm button to exit time zone setting mode.
How To Set 12 hour or 24 hour Display
Press and hold the mode button to 2 seconds. The offset time will appear.
Press the mode button again. The 12hr or 24hr display will blink. Press the up
or down button to toggle back and forth between 12 hr and 24 hr display
mode. Press the alarm button to exit 12hr or 24 hr setting mode.
HOW TO MANUALLY SET THE TIME AND DATE
AND LANGUAGE
Your clock is designed to automatically set itself using the radio signal
originating from the US Atomic Clock. Please allow your clock up to 72 hours
to synchronize with this signal.
Should the need or desire to manually set the clock arise, follow these
instructions:
Strong, Forte, Fuerte
Weak, Faible, Devil
No Reception, Pas de réception, No Hay Recepcion
Receiving, Recevant , Recibiendo
FIG. 3
ATOMIC ALARM CLOCK
MODEL : RM106A
USER MANUAL
FIG. 1
FIG. 2A FIG. 2B
1. Press and hold the mode button for 2 seconds. The time zone offset hours
will begin to blink.
2. Press the mode button again. The 12hr 24 hr mode will blink.
3. Press the mode button again. The hour will begin to blink. If in 12hr
mode the PM indicator will show afternoon hours. The PM indicator will
not show for morning hours. Press the up or down button to reach the
desired hour.
4. Press the mode button again. The minutes will begin to blink. Press the
up or down button to reach the desired minutes.
5. Press the mode button again. The year will begin to blink. Press the up or
down button the reach the desired year.
6. Press the mode button again. The month will begin to blink. Press the up
or down button to reach the desired month.
7. Press the mode button again. The date will begin to blink. Press the up or
down button to reach the desired date.
8. Press the mode button again. A letter indicating the language will begin to
blink. Use the up or down button to change the language used to show
the weekday.
E - English
D - German
F - French
I - Italian
S - Spanish
9. Press the mode button again to exit setting mode.
NOTE: You may press the alarm button anytime to exit the setting mode.
HOW TO SET AND ACTIVATE THE ALARM(S)
This unit is equipped with 2 alarms: Single Alarm [] and Weekday Alarm
[]. For the Single Alarm, it will go off only once at the preset time. For the
Weekday Alarm, it will be enabled from Monday to Friday and disabled
automatically during weekend (i.e., Saturday and Sunday).
To set the weekday and/or single alarms:
1. Press the alarm button. The weekday alarm icon will appear.
2. Press and hold the alarm button for 2 seconds to enter the setting mode.
The hour will begin to blink. Press the up or down button to reach the
desired hour. In 12hr mode the PM indicator will light for afternoon
hours.
3. Press the alarm button again. The minute will begin to blink. Press the up
or down arrow to reach the desired minute. Press the alarm button again
to exit the weekday alarm setting mode.
4. Press the alarm button again. The single alarm icon will appear.
5. Press and hold the alarm button for 2 seconds to enter the setting mode.
The hour will begin to blink. Press the up or down button to reach the
desired hour. In 12hr mode the PM indicator will light for afternoon
hours.
6. Press the alarm button again. The minute will begin to blink. Press the up
or down arrow to reach the desired minute. Press the alarm button again
to exit the single alarm setting mode.
To activate or deactivate the alarms:
1. Press the alarm button until either the weekday or single alarm icon appears.
2. Press the up or down button to activate or deactivate the chosen alarm. If
dashes show instead of time, the alarm has been deactivated.
CRESCENDO ALARM AND SNOOZE FUNCTION
When the alarm goes off at the preset time, the backlight will be turned on for
8 seconds. The ALARM ON icon [ ] flashing and the alarm sound will be
turned on.
The crescendo alarm function allows the alarm sound to start off gently with
step-up intensity. Without interruption, the alarm will go off for 2 minutes.
To stop the alarm, press ALARM or SNOOZE. If SNOOZE button is pressed,
the alarm sound will be turned off temporarily and the snooze function will be
activated. The alarm will go off again after approx. 8 minutes until other key is
pressed to turn off the alarm.
RESETTING THE UNIT
In case of malfunction or abnormal display, take out and re-install the batteries
again. All settings will be cleared and reset to their default values.
MAINTENANCE
When handled properly, this unit is engineered to give you years of
satisfactory service. Here are a few product care instructions:
1. Do not immerse the unit in water. If the unit comes in contact with water,
dry it immediately with a soft lint-free cloth.
2. Do not clean the unit with abrasive or corrosive materials. Abrasive cleaning
agents may scratch the plastic parts and corrode the electronic circuit.
3. Do not subject the unit to excessive: force, shock, dust, temperature, or
humidity. Such treatment may result in malfunction, a shorter electronic
life span, damaged batteries, or distorted parts.
4. Do not tamper with the unit’s internal components. Doing so will terminate
the unit’s warranty and may cause damage. The unit contains no user -
serviceable parts.
5. Only use new batteries as specified in this instruction manual.
6. Read this instruction manual thoroughly before operating the unit.
SPECIFICATIONS
Operating Temperature : 23°F to 122°F
Clock Functions
Radio Control : By Radio signal generated from the
U.S. Atomic Clock
Calendar : Weekday in English, German, French,
Italian and Spanish
Month / Day
Clock Time : 12 / 24 hour format
Accuracy : +/-0.5 second/day (when RF is disabled)
Hour Offset : +/- 9 hours
General Specification
Battery Type :
1 piece of UM3 or "AA" size 1.5V battery
Unit Dimension : 4.4” x3.3” x 1.3” (L x W x T)
Unit Weight : 3.28 oz. (without battery)
CAUTION
- The content of this manual is subject to change without further
notice.
- Due to printing limitation, the displays shown in this manual may
differ from the actual display.
- The contents of this manual may not be reproduced without the
permission of Equity Time USA.
CUSTOMER ASSISTANCE
Should you require assistance regarding this product and its operation, please
contact our customer care department at 541-868-8205 or via email at
helpme@oscientific.com.
WARRANTY
This product is warranted to be free of manufacturing defects for a period of 90
days from date of retail purchase. Defective product should be directed to the
place of retail purchase for exchange.
Should this not be possible, contact our customer care department for
assistance and a return material authorization. No returns may be made without
a return authorization. Warranty exchanges require proof of date of purchase
(purchase receipt showing date, place and product purchased). This warranty
does not cover product subjected to abuse, misuse, accidental damage or
tampering.
Printed in China
ENGLISH FRENCH
INTRODUCTION
Nous vous félicitons d’avoir fait l’acquisition de la pendule radio pilotée
RM106A.
Caractéristiques du RM106A :
- Horloge et calendrier radio pilotée
- Rétro-éclairage
- Double alarme : alarme simple et alarme des jours de la semaine avec
fonction snooze
CARACTÉRISTIQUE PRINCIPALE [FIG. 1]
A. COMMANDE DE REPETITION DE REVEIL
- Appuyer pour activer le rétro-éclairage pendant 8 secondes
- Appuyer pour activer la répétition de réveil 8 minutes quand l'alarme
se déclenche.
B. ECRAN DE LA PENDULE
- Affichage de l'heure
C. COMMANDE D'ALARME
- Appuyer pour alterner entre alarme de jour de semaine, alarme simple
et mode de calendrier
- Appuyer pendant 3 secondes pour entrer le mode de réglage de l'heure
d'alarme quand le mode d'alarme respectif est affiché.
D. COMMANDE DE MODE
- Appuyer pour faire alterner les affichages suivants :
Pendule avec secondes / Pendule avec jour de semaine / Pendule avec
heure compensée
- Appuyer pendant 2 secondes pour entrer le mode de réglage de la
pendule.
E. COMMANDES HAUT ET BAS
- Appuyer pour augmenter ou diminuer la valeur d'un réglage.
- Appuyer pour activer ou annuler l'alarme quand l'heure d'alarme
respective est affichée.
G LOGEMENT DE LA PILE
- Utilise 1 pile UM-3 ou AA/R6 alcaline
INSTALLATION DE LA PILE [FIG. 2A]
Installer une pile alcaline AA/R6 en respectant les polarités indiquées à
l’intérieur du compartiment.
Remarque : Remplacer la pile quand l’indicateur de pile faible [
]
s’affiche [Fig. 2b].
COMMENT UTILISER LE RETRO-ECLAIRAGE
Appuyer sur SNOOZE pour activer le rétro-éclairage EL pendant cinq secondes.
SUR LA RECEPTION RADIO [FIG. 3]
Le modèle RM106A est conçu pour synchroniser automatiquement sa pendule
calendrier dès qu’il se trouve dans le rayon du signal radio émis par la Pendule
Atomique US. Quand l’appareil est neuf et qu’il vient d’être déballé, la
synchronisation sur la Pendule Atomique US peut prendre jusqu’à 72 heures.
Quand il reçoit le signal, le symbole de Réception radio se met à clignoter. En
règle générale, une réception complète prend de 2 à 10 minutes en fonction de
la force du signal.
Pour annuler manuellement la réception du signal RF, appuyer sur DOWN
pendant deux secondes jusqu’à ce que le symbole de réception radio disparaisse.
Pour réactiver la réception, appuyer sur UP pendant deux secondes. Le symbole
de réception radio se mettra à clignoter et l’appareil recherchera automatiquement
le signal FR.
Interférences
La réception peut être gênée par un certain nombre de facteurs. Pour une
meilleure réception, placer l’appareil à l’écart d’objets métalliques et appareils
électriques. Les autres causes d’interférences avec le signal incluent tours de
transmission électrique, constructions en béton armé et/ou cloisons métalliques.
Remarque : Les pendules à fréquence marchent mieux quand elles se trouvent
près d’une fenêtre. Après réception du signal initial, les actualisations se font
plus facilement. Bien que dans certaines zones il soit plus difficile de recevoir
un signal, la Pendule Atomique renferme un mouvement à quartz très précis
qui lui permet de conserver l’heure exacte même en cas de signal
exceptionnellement manqué.
COMMENT REGLER LE FUSEAU HORAIRE
Les fuseaux horaires dans le monde sont identifiés par rapport au Méridien de
Greenwich. Les fuseaux horaires étasuniens sont de 5 à 9 heures derrière le
Méridien de Greenwich et sont identifiés de la façon suivante :
Eastern -5
Central -6
Mountain -7
Pacific -8
Alaska -9
Le RM106A est pré-réglé sur le fuseau Pacific. Pour le régler sur un autre
fuseau horaire, appuyer sur la commande Mode pendant deux secondes. Les
heures de compensation s’afficheront en clignotant sur la fenêtre de la pendule.
Appuyer sur Up ou Down pour rechercher le fuseau désiré. Appuyer sur la
commande Alarme pour sortir de ce mode de réglage.
Comment règler l’affichage 12 ou 24 heures
Appuyer sur la commande Mode pendant deux secondes. L’heure de compen-
sation s’affichera. Appuyer encore une fois sur Mode. L’affichage 12 ou 24
heures se mettra à clignoter. Appuyer sur Up ou Down pour alterner entre les
modes d’affichage 12 ou 24 heures. Appuyer sur la commande d’alarme pour
sortir de ce mode de réglage.
COMMENT REGLER MANUELLEMENT L’HEURE, LA
DATE ET LA LANGUE
Votre pendule est conçue pour se règler automatiquement sur le signal radio
émis par la Pendule Atomique US. Cependant, il faut lui laisser 72 heures pour
se synchroniser sur le signal.
Pour règler la pendule manuellement, si nécessaire, suivre les instructions
suivantes :